Love this? Save it for later!
Share the inspiration with your friends
Alma wasn’t trying to impress anyone. I’d stopped by to drop off a casserole dish she’d lent me three weeks ago — honestly, it was starting to feel awkward keeping it that long — and the smell hit me before I even got through the screen door. It was warm and sweet, but not in that cloying bakery way. More like someone had figured out how to bottle October and bake it into something edible.
She was standing at her counter in faded jeans and a flour-dusted sweatshirt, drizzling something over a tray of tiny golden cakes. “Oh, those are just the mini pumpkin bundt cakes,” she said when I asked, like it was no big deal. Like she hadn’t just created the exact thing I’d want to eat every morning for the rest of fall. “My grandmother used to make them for church potlucks. I had a craving.”
That’s the thing about the best recipes, you know? They don’t come from some fancy cooking class or a chef’s test kitchen. They come from someone’s grandmother who needed to feed a crowd without breaking a sweat. Alma’s version used a box of cake mix as a shortcut — which I almost judged until I tasted one — but I knew I could build something from scratch that honored the same spirit. Easy enough for a Tuesday night, special enough for a dinner party.
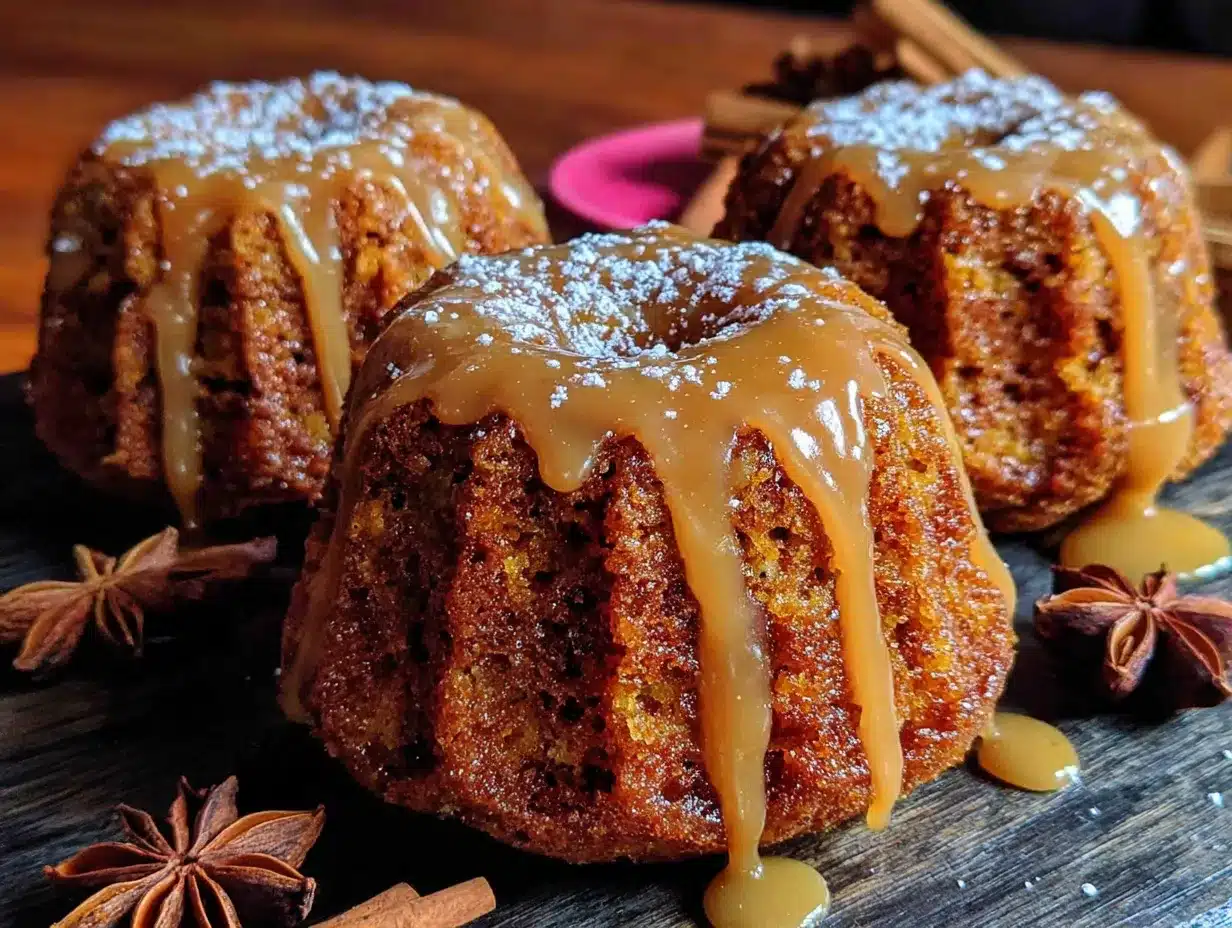
I stood there eating one (okay, two) while she told me about the glaze. Maple syrup, a little butter, some powdered sugar. “Just eyeball it,” she said. That’s not helpful, Alma. But she was right. The maple glaze is what makes these mini pumpkin bundt cakes unforgettable. It seeps into the crevices, gets a little crunchy on the edges, and tastes like the first morning of sweater weather.
Maybe you’ve been there — standing in someone’s kitchen, eating something so good you forget you’re supposed to be polite about it. That’s what these little cakes do to people. And when I finally recreated them from scratch in my own kitchen, I knew I had to share them with you. Especially if you’re the kind of person who loves hosting but hates the stress of complicated desserts.
Why You’ll Love This Recipe
Let me tell you why these mini pumpkin bundt cakes have become my go-to for every fall gathering. I’ve tested this recipe at least seven times — I lost count, honestly — tweaking the spice blend, adjusting the baking time, and figuring out exactly how thick the glaze needs to be so it doesn’t just slide off into a sad puddle on the plate. The version I’m sharing today is the one that made my neighbor actually ask for the recipe. That’s my gold standard.
- Quick & Easy : From start to finish, these come together in about 45 minutes. That includes cooling time. You can have them on the table before your guests finish their first glass of wine.
- Simple Ingredients : Canned pumpkin, pantry spices, eggs, butter, flour — nothing that requires a specialty grocery run. You probably have most of it right now.
- Perfect for Hosting : Mini bundt cakes look impressive on a dessert table. They’re individually portioned, which means no awkward slicing, and they travel beautifully if you’re bringing dessert to someone else’s house.
- Crowd-Pleaser : I’ve served these to kids, grandparents, and that one friend who claims they “don’t really like pumpkin.” Every single one of them went back for seconds.
- Unbelievably Delicious : The texture is what gets people. They’re moist without being dense, tender without falling apart. And that maple glaze? It’s the kind of thing you’ll want to put on pancakes, waffles, and maybe just a spoon.
What makes this recipe different from every other pumpkin cake out there is the technique. I use a combination of melted butter and oil — sounds weird, I know — but it gives you the richness of butter with the moisture that oil provides. Plus, I add a touch of maple extract to the cake batter itself, so the flavor runs all the way through, not just on top. It’s not just another version of pumpkin cake. It’s the one that’ll make you close your eyes after the first bite.
These mini pumpkin bundt cakes are comfort food reimagined. They’re perfect for impressing guests without stress, or turning a simple fall evening into something memorable. And honestly? They make your kitchen smell like heaven.
What Ingredients You Will Need
This recipe uses simple, wholesome ingredients to deliver that cozy pumpkin flavor and tender crumb. Most of these are fall pantry staples, so you might already have everything you need. Let me walk you through what each ingredient does and a few tips I’ve picked up along the way.
For the Mini Pumpkin Bundt Cakes
- 1 ¾ cups (220g) all-purpose flour — I use King Arthur Flour because it’s consistently good, but any brand works. Spoon and level your flour, don’t scoop straight from the bag, or you’ll end up with dry cakes.
- 1 teaspoon baking soda — This helps the cakes rise and gives them that light texture. Make sure it’s fresh, or your cakes won’t puff up properly.
- ½ teaspoon baking powder — Works with the baking soda for the perfect lift.
- 1 teaspoon ground cinnamon — The backbone of pumpkin spice. I prefer Saigon cinnamon for its warmer, bolder flavor.
- ½ teaspoon ground nutmeg — Freshly grated if you have it, but pre-ground works fine too.
- ½ teaspoon ground ginger — Adds a little warmth without being spicy.
- ¼ teaspoon ground cloves — Use sparingly. Cloves are strong and can overpower everything else.
- ½ teaspoon salt — Don’t skip this. It balances the sweetness and brings out the pumpkin flavor.
- 2 large eggs, at room temperature — Cold eggs can seize the batter. If you forgot to take them out, place them in a bowl of warm water for 5 minutes.
- ¾ cup (150g) granulated sugar — Adds sweetness and helps with browning.
- ½ cup (100g) packed light brown sugar — This adds moisture and a subtle molasses flavor that pairs beautifully with pumpkin.
- ½ cup (120ml) vegetable oil — Keeps the cakes incredibly moist. I use canola or avocado oil for a neutral flavor.
- ¼ cup (60g) unsalted butter, melted and slightly cooled — The butter adds richness that oil alone can’t provide. I melt it in the microwave in 20-second bursts.
- 1 cup (245g) canned pumpkin puree — Make sure it’s 100% pumpkin, not pumpkin pie filling. Libby’s is my go-to brand.
- 1 teaspoon vanilla extract — Pure vanilla, not imitation, if you can swing it.
- ½ teaspoon maple extract — This is my secret weapon. It reinforces the maple glaze flavor throughout the cake. You can find it in the baking aisle near the vanilla.
For the Maple Glaze
- ¼ cup (60g) unsalted butter — Adds richness and helps the glaze set with a slight sheen.
- ½ cup (120ml) pure maple syrup — Please use real maple syrup, not pancake syrup. Grade A dark amber has the strongest flavor and works best here.
- 1 cup (120g) powdered sugar, sifted — Sifting prevents lumps. I know it’s an extra step, but it makes a difference.
- ¼ teaspoon salt — A pinch of salt cuts the sweetness and makes the maple flavor pop.
- ½ teaspoon vanilla extract — Optional, but I like the depth it adds.
Ingredient Substitutions
If you’re gluten-sensitive, you can substitute the all-purpose flour with a 1:1 gluten-free baking flour. I’ve tried Bob’s Red Mill and King Arthur Measure for Measure, and both worked well. For a dairy-free version, use a plant-based butter substitute in both the cakes and the glaze. The texture will be slightly different, but still delicious. And if you don’t have maple extract, just add an extra teaspoon of vanilla — the cakes will still taste wonderful, just with less maple intensity throughout.
Equipment Needed
You don’t need a professional bakery setup for these mini pumpkin bundt cakes, but having the right tools makes the process smoother. Here’s what you’ll need:
- Mini bundt pan: This is non-negotiable. A standard 12-cavity mini bundt pan works perfectly. I use a Nordic Ware pan because the non-stick coating is reliable and the designs come out crisp. If you don’t have one, you can use a standard muffin tin, but you’ll lose the pretty shape.
- Mixing bowls: One medium bowl for dry ingredients and one large bowl for wet ingredients. Glass or stainless steel works best.
- Whisk: For combining dry ingredients and smoothing out the batter.
- Rubber spatula: Essential for scraping down the sides of the bowl and folding ingredients together without overmixing.
- Measuring cups and spoons: For accuracy. I prefer metal measuring cups for dry ingredients and glass liquid measuring cups for wet ones.
- Cooling rack: A wire rack allows air to circulate around the cakes so they cool evenly. Trust me, don’t skip this.
- Small saucepan: For making the maple glaze. A heavy-bottomed pan prevents scorching.
- Pastry brush: For greasing the bundt pan thoroughly. You can use a paper towel, but a brush gets into all the nooks and crannies.
- Piping bag or zip-top bag: For drizzling the glaze neatly. A zip-top bag with a tiny corner snipped off works just as well.
If you’re on a budget, look for mini bundt pans at discount stores or secondhand shops. I found my first one at a thrift store for three dollars, and it worked beautifully for years.
Preparation Method
Alright, let’s make these mini pumpkin bundt cakes. I’ve broken everything down into clear steps so you can follow along without any guesswork. Take your time, and don’t rush — especially with the greasing step. I learned that the hard way.
- Preheat your oven to 350°F (175°C). Position the rack in the center of the oven. While it’s heating, generously grease your mini bundt pan with softened butter or non-stick baking spray. Get into every crevice — I use a pastry brush to make sure nothing is missed. Then dust the pan lightly with flour, tapping out the excess. This is the most important step. I once skipped the flour dusting and ended up with half a cake stuck to the pan. Not pretty.
- Whisk the dry ingredients together. In a medium bowl, combine the flour, baking soda, baking powder, cinnamon, nutmeg, ginger, cloves, and salt. Whisk until everything is evenly distributed. This takes about 30 seconds. Set the bowl aside.
- Mix the wet ingredients. In a large bowl, whisk the eggs, granulated sugar, and brown sugar together until smooth and slightly thickened, about 1 minute. The mixture should look pale and glossy. Add the vegetable oil and melted butter, whisking continuously. Then add the pumpkin puree, vanilla extract, and maple extract. Whisk until the batter is completely smooth. It should be a beautiful deep orange color — that’s how you know it’s right.
- Combine wet and dry ingredients. Pour the dry ingredients into the wet ingredients. Use a rubber spatula to fold everything together gently. Stop as soon as you no longer see streaks of flour. Overmixing will make the cakes tough, and nobody wants a tough mini pumpkin bundt cake. The batter will be thick and slightly fluffy.
- Fill the bundt pan cavities. Use a cookie scoop or a spoon to divide the batter evenly among the 12 cavities. Fill each about ¾ full — they need room to rise. Don’t overfill, or the tops will spread and lose their shape. I use a small offset spatula to smooth the tops slightly.
- Bake for 12-15 minutes. Rotate the pan halfway through for even baking. The cakes are done when a toothpick inserted into the center comes out clean or with a few moist crumbs. The tops should spring back when lightly pressed. Every oven runs differently, so start checking at 12 minutes. My oven runs hot, so mine are usually perfect at 13 minutes.
- Cool in the pan for 5 minutes. This is crucial. If you try to remove them too soon, they’ll fall apart. After 5 minutes, gently loosen the edges with a small knife or offset spatula. Invert the pan onto a cooling rack and tap it firmly. The cakes should release cleanly. If any stick, let them cool a minute longer and try again.
- Let the cakes cool completely. This takes about 20 minutes. Don’t glaze them while they’re warm, or the glaze will melt into a puddle. I know it’s tempting, but patience pays off here.
- Make the maple glaze. While the cakes cool, melt the butter in a small saucepan over medium heat. Add the maple syrup and stir until combined. Remove from heat and whisk in the powdered sugar, salt, and vanilla extract. Stir until smooth. The glaze should be thick but pourable — if it’s too thick, add a teaspoon of milk. If it’s too thin, add a tablespoon more powdered sugar.
- Glaze the cakes. Place the cooled cakes on a wire rack set over a baking sheet (to catch drips). Spoon the glaze over each cake, letting it run down the sides. For a cleaner look, use a piping bag or zip-top bag with a tiny corner snipped off. Let the glaze set for about 10 minutes before serving.
Cooking Tips & Techniques
After making these mini pumpkin bundt cakes more times than I can count, I’ve picked up a few tricks that make a real difference. Let me share them so you don’t have to learn the hard way.
Room temperature ingredients matter. I know, I know — it’s annoying to wait. But cold eggs and cold pumpkin can make the batter seize up, resulting in dense cakes. Set everything out 30 minutes before you start. If you’re in a hurry, place the eggs in a bowl of warm water for 5 minutes.
Don’t overmix the batter. This is the number one mistake I see. Once you add the dry ingredients, mix just until combined. A few lumps are fine. Overmixing develops the gluten and makes the cakes tough instead of tender. I speak from experience — my first batch was basically hockey pucks.
Grease the pan like your life depends on it. Mini bundt pans have intricate designs, and batter loves to hide in those crevices. Use a pastry brush to get into every groove. I use a mixture of softened butter and a little flour, or a baking spray that contains flour. My grandmother used to swear by shortening, and honestly, that works too.
Check for doneness early. Mini cakes bake faster than you think. Start checking at 12 minutes. If the toothpick comes out clean, they’re done. Overbaking dries them out, and there’s no coming back from that.
Let the glaze set properly. If you’re serving these at a dinner party, glaze them about 20 minutes before guests arrive. That gives the glaze time to set into a slightly firm, glossy shell. If you glaze them too early, they can get sticky. Too late, and the glaze slides off. Timing is everything.
Variations & Adaptations
One of the best things about these mini pumpkin bundt cakes is how adaptable they are. I’ve tried several variations over the years, and each one brought something new to the table. Here are a few of my favorites.
Chocolate Chip Pumpkin Bundt Cakes: Fold ½ cup of mini chocolate chips into the batter before baking. The chocolate melts into little pockets of richness that pair beautifully with the pumpkin spice. I use semi-sweet chips, but dark chocolate works too if you like a less sweet dessert.
Cream Cheese Filled Bundt Cakes: This one takes a little extra effort, but it’s worth it. Make a cream cheese filling by mixing 4 ounces of softened cream cheese, 2 tablespoons of sugar, and ½ teaspoon of vanilla. Spoon a layer of batter into each cavity, add a teaspoon of the cream cheese mixture, then cover with more batter. The result is a surprise center that feels extra special.
Vegan Version: Substitute the eggs with flax eggs (1 tablespoon ground flaxseed mixed with 3 tablespoons water per egg), use coconut oil instead of butter, and replace the milk in the glaze with oat milk. The texture is slightly denser, but the flavor is still fantastic. I tested this for a friend who’s vegan, and she asked for the recipe immediately.
Gluten-Free Option: Swap the all-purpose flour with a 1:1 gluten-free baking blend. I’ve had the best results with Cup4Cup. Add an extra tablespoon of milk to the batter if it seems too thick. The cakes won’t rise quite as high, but they’ll still be tender and delicious.
Spice Variation: If you’re feeling adventurous, try adding ½ teaspoon of cardamom or allspice to the spice blend. Cardamom gives the cakes a slightly floral, exotic note that’s unexpected in the best way. I tried this for a holiday party, and people kept asking what my “secret ingredient” was.
Serving & Storage Suggestions
These mini pumpkin bundt cakes are designed to be the star of your dessert table, but they play well with others too. Here’s how I like to serve and store them.
Serving Temperature: Serve them at room temperature. The glaze sets best this way, and the texture is perfectly moist. If you’ve refrigerated them, let them sit out for about 30 minutes before serving. I don’t recommend serving them warm — the glaze will be too runny.
Presentation Ideas: Arrange the cakes on a tiered stand for visual impact. Dust them with a little extra cinnamon or a sprinkle of flaky sea salt right before serving. The salt sounds weird, I know, but it cuts the sweetness and makes the maple flavor pop. For a dinner party, I like to place each cake on a small dessert plate with a dollop of whipped cream and a few candied pecans on the side.
What to Serve Alongside: These pair beautifully with a cup of coffee, spiced chai, or hot apple cider. If you’re serving them as part of a larger dessert spread, they go well with a pumpkin cheesecake or a simple apple crisp. For a more savory contrast, serve them alongside a cheese board with sharp cheddar and dried figs.
Storage Instructions: Store the glazed cakes in an airtight container at room temperature for up to 3 days. If you stack them, place a sheet of parchment paper between layers to prevent sticking. For longer storage, freeze the unglazed cakes in a freezer-safe bag for up to 3 months. Thaw them at room temperature, then glaze them fresh. The glaze doesn’t freeze well, so always add it after thawing.
Reheating Tips: If you want to enjoy them warm, microwave an unglazed cake for about 10 seconds. Don’t overdo it, or they’ll dry out. For a group, warm them in a 300°F oven for 5 minutes, then add the glaze.
Flavor Development: Honestly, these cakes taste even better the next day. The spices mellow and meld together, and the texture becomes even more tender. I’ve been known to make them a day ahead for parties, and nobody ever complains.
Nutritional Information & Benefits
I’m not a nutritionist, but I try to be mindful of what goes into my body — especially during the holiday season when desserts are everywhere. Here’s the estimated nutritional breakdown for one mini pumpkin bundt cake with glaze.
| Nutrient | Amount Per Serving |
|---|---|
| Calories | 285 |
| Total Fat | 14g |
| Saturated Fat | 5g |
| Cholesterol | 45mg |
| Sodium | 210mg |
| Total Carbohydrates | 38g |
| Dietary Fiber | 2g |
| Sugars | 24g |
| Protein | 4g |
Pumpkin is the real hero here. It’s packed with vitamin A, which supports eye health and immune function. It’s also a good source of fiber, which helps with digestion and keeps you feeling full. The cinnamon and ginger in the spice blend have anti-inflammatory properties, too. So while these mini pumpkin bundt cakes are definitely a treat, they’re not completely empty calories.
If you’re watching your sugar intake, you can reduce the sugar in the cake by a quarter cup and use a sugar-free maple syrup in the glaze. The texture will be slightly different, but the flavor will still be satisfying. For a lower-fat option, substitute the oil with unsweetened applesauce. The cakes will be a bit denser, but still delicious.
These cakes contain gluten, dairy, and eggs, so they’re not suitable for those with allergies to those ingredients. The vegan and gluten-free variations I mentioned earlier are great alternatives.
Conclusion
These mini pumpkin bundt cakes with maple glaze have become my signature fall dessert, and I’m honestly a little proud of that. They’re the kind of recipe that makes people think you spent hours in the kitchen when really, you just followed a few simple steps and let the ingredients do the work. The tender crumb, the warm spices, that glossy maple glaze — it all comes together in something that feels both rustic and elegant.
I hope you’ll make these for your next gathering. Whether it’s a casual dinner with friends, a potluck, or a full-blown Thanksgiving feast, they’ll fit right in. Don’t be afraid to customize them to your taste — add more spice, try a different glaze, or stuff them with cream cheese. The recipe is a starting point, not a rulebook.
I’d love to hear how yours turn out. Drop a comment below and let me know if you tried any variations or if these became a hit at your party. Share this post with a friend who loves fall baking, and pin it to your dessert board for later. Happy baking, friends. Your kitchen is about to smell incredible.
Frequently Asked Questions
Can I use fresh pumpkin instead of canned?
Yes, you can. Roast a small sugar pumpkin until tender, then puree the flesh in a food processor. Make sure to drain off any excess liquid, or the batter will be too wet. Canned pumpkin is more consistent, but fresh works beautifully if you have the time.
Why did my mini pumpkin bundt cakes stick to the pan?
This usually happens when the pan isn’t greased thoroughly enough. Make sure you get into every crevice with a pastry brush, and dust with flour after greasing. Let the cakes cool in the pan for exactly 5 minutes — any longer, and they can stick as they cool and contract.
Can I make this recipe as a full-sized bundt cake?
Absolutely. Pour the batter into a greased and floured 10-cup bundt pan and bake at 350°F for 45-55 minutes. Check for doneness with a toothpick. You’ll need to double the glaze recipe to cover the larger cake.
How do I make the glaze thicker or thinner?
For a thicker glaze, add more powdered sugar, one tablespoon at a time. For a thinner glaze, add milk or maple syrup, one teaspoon at a time. The ideal consistency is thick enough to coat the back of a spoon but pourable enough to drizzle.
Can I freeze these cakes with the glaze already on them?
I don’t recommend it. The glaze can become sticky and lose its glossy finish after thawing. It’s better to freeze the unglazed cakes and add fresh glaze after they’ve thawed at room temperature. The cakes themselves freeze beautifully for up to three months.
PrintPerfect Mini Pumpkin Bundt Cakes with Maple Glaze
These mini pumpkin bundt cakes are moist, tender, and topped with a glossy maple glaze. They come together in about 45 minutes and are perfect for fall gatherings, potlucks, or a cozy night in.
- Prep Time: 15 minutes
- Cook Time: 15 minutes
- Total Time: 45 minutes
- Yield: 12 servings 1x
- Category: Dessert
- Cuisine: American
Ingredients
- 1 ¾ cups (220g) all-purpose flour
- 1 teaspoon baking soda
- ½ teaspoon baking powder
- 1 teaspoon ground cinnamon
- ½ teaspoon ground nutmeg
- ½ teaspoon ground ginger
- ¼ teaspoon ground cloves
- ½ teaspoon salt
- 2 large eggs, at room temperature
- ¾ cup (150g) granulated sugar
- ½ cup (100g) packed light brown sugar
- ½ cup (120ml) vegetable oil
- ¼ cup (60g) unsalted butter, melted and slightly cooled
- 1 cup (245g) canned pumpkin puree
- 1 teaspoon vanilla extract
- ½ teaspoon maple extract
- ¼ cup (60g) unsalted butter (for glaze)
- ½ cup (120ml) pure maple syrup (for glaze)
- 1 cup (120g) powdered sugar, sifted (for glaze)
- ¼ teaspoon salt (for glaze)
- ½ teaspoon vanilla extract (for glaze)
Instructions
- Preheat your oven to 350°F (175°C). Generously grease a 12-cavity mini bundt pan with softened butter or non-stick baking spray, then dust lightly with flour, tapping out excess.
- In a medium bowl, whisk together flour, baking soda, baking powder, cinnamon, nutmeg, ginger, cloves, and salt until evenly distributed.
- In a large bowl, whisk eggs, granulated sugar, and brown sugar until smooth and slightly thickened, about 1 minute. Add vegetable oil and melted butter, whisking continuously. Then add pumpkin puree, vanilla extract, and maple extract, whisking until smooth.
- Pour dry ingredients into wet ingredients. Fold gently with a rubber spatula until just combined—do not overmix. Batter will be thick and slightly fluffy.
- Divide batter evenly among the 12 cavities, filling each about ¾ full. Smooth tops slightly with a small offset spatula.
- Bake for 12-15 minutes, rotating the pan halfway through. Cakes are done when a toothpick inserted into the center comes out clean or with a few moist crumbs, and tops spring back when lightly pressed.
- Cool in the pan for exactly 5 minutes. Gently loosen edges with a small knife, then invert onto a wire rack and tap firmly to release. Let cool completely, about 20 minutes.
- While cakes cool, make the glaze: In a small saucepan over medium heat, melt butter. Add maple syrup and stir until combined. Remove from heat and whisk in powdered sugar, salt, and vanilla extract until smooth. Adjust consistency if needed (add milk to thin, more powdered sugar to thicken).
- Place cooled cakes on a wire rack over a baking sheet. Spoon or pipe glaze over each cake, letting it run down the sides. Let glaze set for about 10 minutes before serving.
Notes
Grease the pan thoroughly to prevent sticking. Use room temperature ingredients for best texture. Do not overmix the batter. Let cakes cool completely before glazing. For a full-sized bundt cake, bake at 350°F for 45-55 minutes and double the glaze recipe.
Nutrition
- Serving Size: 1 mini bundt cake
- Calories: 285
- Sugar: 24
- Sodium: 210
- Fat: 14
- Saturated Fat: 5
- Carbohydrates: 38
- Fiber: 2
- Protein: 4
Keywords: mini pumpkin bundt cakes, maple glaze, fall dessert, pumpkin spice, easy pumpkin recipe


