Love this? Save it for later!
Share the inspiration with your friends
I was standing in the grocery store aisle last October, staring at a bag of green bell peppers, when a memory hit me so hard I almost laughed out loud. The smell of roasted peppers and warm spices—someone nearby was buying a rotisserie chicken—and suddenly I was seven years old, sitting at my aunt Margie’s tiny kitchen table in Pittsburgh. She was pulling a baking sheet out of the oven, and on it were these weird, wonderful little pepper creations wrapped in what looked like tiny white scarves.
“They’re mummies,” she said, sliding one onto my plate. “Stuffed pepper mummies. For Halloween.”
I didn’t get it at first. But then I saw the little olive eyes peeking out from under the crescent roll wrappings, and I was hooked. Honestly, I ate three of them that night. My mom kept saying I’d get a stomach ache, but Aunt Margie just winked and slid me another one. She passed away a few years ago, and I haven’t thought about those peppers in forever—until that moment in the grocery store, with the rotisserie chicken smell and the fluorescent lights buzzing overhead.
I grabbed a bag of peppers without even thinking. Then I grabbed another. Then I stood there wondering if I could even remember how she made them. The answer was no—not really. I remembered the look of them, the taste, the way the crescent roll got all golden and flaky. But the actual recipe? Gone.
So I did what any reasonable person would do. I bought the peppers anyway and spent the next three days experimenting. Maybe you’ve been there—chasing a food memory that feels just out of reach, trying to recreate something that exists more in your heart than in your recipe box. That’s exactly what happened here. And honestly? The version I landed on might be even better than Aunt Margie’s. It’s lighter, fresher, and somehow still hits that same cozy, nostalgic spot.
These Lightened-Up Stuffed Pepper Mummies are my little tribute to her—and to all those imperfect, wonderful kitchen experiments that turn into something you keep making year after year.
Why You’ll Love This Recipe
Let me tell you why these stuffed pepper mummies are going to become your new Halloween tradition. I’ve tested this recipe about six times now—yes, six—and every single batch disappeared faster than the candy bowl on my front porch. Here’s what makes them special:
- Quick & Easy: You can have these on the table in about 35 minutes flat. Perfect for those chaotic Halloween weeknights when you’re juggling costume emergencies and last-minute candy runs.
- Simple Ingredients: No hunting down weird specialty items. Ground turkey, bell peppers, crescent rolls, and a few pantry staples—that’s it. You probably already have most of this stuff.
- Perfect for Halloween: They’re festive without being fussy. Kids love the mummy look, and adults love that they’re actually a real dinner, not just themed junk food.
- Crowd-Pleaser: I brought these to a Halloween potluck last week, and I’m not kidding—a grown man asked me for the recipe. They appeal to everyone, from picky toddlers to health-conscious friends.
- Unbelievably Delicious: The combo of savory turkey filling, sweet roasted pepper, and flaky, buttery crescent roll is next-level comfort food. You won’t miss the extra calories one bit.
What makes this version different from the old-school stuffed pepper mummies? I swapped out ground beef for lean turkey, used light cream cheese instead of full-fat, and added extra veggies to the filling for moisture and flavor. The result is a lighter dish that still feels indulgent—because let’s face it, nobody wants a sad, dry pepper on Halloween. These are juicy, flavorful, and just the right amount of creepy-cute.
This recipe isn’t just good—it’s the kind that makes you close your eyes after the first bite. It’s comfort food reimagined: healthier, faster, but with the same soul-soothing satisfaction. Perfect for impressing your kids without stress, or turning a simple Tuesday dinner into something memorable.
What Ingredients You Will Need
This recipe uses simple, wholesome ingredients to deliver bold flavor and satisfying texture without the fuss. Most of these are pantry staples or easy to find at any grocery store. Here’s what you’ll need:
For the Pepper Base
- 4 large bell peppers (any color works, but green or red give the best mummy “head” shape—look for squat, round peppers that sit flat)
- 1 tablespoon olive oil (for roasting the peppers and adding a little richness)
For the Filling

- 1 pound lean ground turkey (93/7 is ideal—keeps things light without drying out)
- 1/2 cup finely diced onion (yellow or white works best; red onion is a bit too sharp here)
- 2 cloves garlic, minced (fresh is better than jarred for that punchy flavor)
- 1/2 cup finely diced mushrooms (adds moisture and umami without extra calories—trust me on this)
- 1/2 cup cooked brown rice or quinoa (for bulk and texture; leftover rice works perfectly)
- 1/4 cup light cream cheese, softened (makes the filling creamy without being heavy—I use Philadelphia 1/3 less fat)
- 1 teaspoon dried oregano (or Italian seasoning if that’s what you have)
- 1/2 teaspoon smoked paprika (adds a subtle smokiness that makes the turkey taste richer)
- 1/2 teaspoon salt (plus more to taste)
- 1/4 teaspoon black pepper
- 1 large egg, lightly beaten (helps bind everything together)
For the Mummy Wraps
- 1 can (8 ounces) refrigerated crescent roll dough (I prefer Pillsbury—the original kind, not the flaky layers, which are harder to cut into strips)
- 12 to 16 small olive slices (black olives work best for eyes; pimiento-stuffed green olives also look fun and festive)
A quick note on ingredients: I’ve tried this with ground chicken instead of turkey, and it works fine—just make sure it’s not too lean or it’ll dry out. For a vegetarian version, use crumbled firm tofu or a plant-based ground meat substitute. And if you’re gluten-free, look for gluten-free crescent roll dough (it exists, and it works surprisingly well for this recipe).
One more thing—those mushrooms I mentioned? I know some people are suspicious of mushrooms in unexpected places. But they melt into the filling so completely that even my mushroom-hating neighbor didn’t notice. They just add moisture and a little savory depth. You can leave them out if you really want to, but give them a try first. You might be surprised.
Equipment Needed
Nothing fancy here—just basic kitchen tools you probably already own. Here’s what you’ll need:
- Baking sheet (a rimmed one works best to catch any drips)
- Parchment paper or silicone baking mat (for easy cleanup—trust me, the cheese can get sticky)
- Large skillet (for cooking the filling; nonstick makes life easier)
- Sharp knife and cutting board (for dicing veggies and cutting peppers)
- Small bowl (for mixing the filling)
- Spoon or small cookie scoop (for filling the peppers evenly)
- Kitchen scissors or pizza cutter (for cutting crescent roll dough into strips—scissors are honestly easier and less messy)
If you don’t have a silicone baking mat, no worries—parchment paper works just as well. And if you’re short on time, you can skip the skillet and use a microwave-safe bowl to cook the turkey mixture, though you’ll lose a little bit of the caramelized flavor you get from browning it on the stove. I’ve done it both ways, and the stovetop version is worth the extra five minutes.
Preparation Method
Alright, let’s make some mummies! This whole process takes about 35 minutes from start to finish, and I promise it’s easier than it looks. Here’s how to do it:
- Preheat your oven to 375°F (190°C). Line a baking sheet with parchment paper or a silicone mat. While the oven heats up, cut the tops off your bell peppers and scoop out the seeds and membranes. You want a nice clean cavity for the filling. If the peppers wobble, trim a tiny slice off the bottom to make them sit flat—but don’t cut through the bottom or the filling will leak out.
- Start the filling. Heat the olive oil in a large skillet over medium heat. Add the diced onion and cook for about 3 minutes, until it’s soft and translucent. Add the minced garlic and cook for another 30 seconds—just until it smells amazing. Then add the ground turkey and break it up with a wooden spoon. Cook for 5 to 7 minutes, stirring occasionally, until the turkey is browned and cooked through.
- Add the mushrooms and seasonings. Toss in the diced mushrooms, oregano, smoked paprika, salt, and pepper. Cook for another 2 to 3 minutes, until the mushrooms have released their moisture and the mixture looks cohesive. Remove the skillet from the heat and let it cool for a few minutes—you don’t want to cook the egg in the next step.
- Mix in the binders. Transfer the turkey mixture to a medium bowl. Add the cooked rice (or quinoa), softened cream cheese, and beaten egg. Stir everything together until it’s well combined. The mixture should look moist but not wet—if it seems too dry, add a splash of chicken broth or water. If it’s too wet, add a little more rice.
- Stuff the peppers. Spoon the filling into each pepper cavity, packing it gently but firmly. Don’t overstuff—you want the filling to be level with the top of the pepper, not mounded above it. A small cookie scoop works great for this step.
- Make the mummy wraps. Open the can of crescent roll dough and unroll it. Separate the dough along the perforations into 8 triangles. Using kitchen scissors or a pizza cutter, cut each triangle lengthwise into 3 or 4 thin strips. You’ll have about 24 to 32 strips total—more than enough for four mummies.
- Wrap the mummies. Take 2 strips of dough and wrap them around each stuffed pepper, crisscrossing them like bandages. Leave a small gap near the top for the eyes. Don’t wrap too tightly—the dough will expand as it bakes, and you want those mummy wraps to look loose and authentic. Press the ends of the strips gently against the pepper to secure them.
- Add the eyes. Press 2 or 3 olive slices into the exposed gap near the top of each pepper. Position them however you like—some mummies look better with one eye higher than the other, honestly. It adds character.
- Bake. Place the stuffed pepper mummies on the prepared baking sheet. Bake for 16 to 18 minutes, until the crescent roll strips are golden brown and the peppers are tender but still hold their shape. The filling should be hot all the way through—an instant-read thermometer should read at least 165°F (74°C) in the center.
- Rest and serve. Let the mummies cool on the baking sheet for 5 minutes before serving. This resting time is crucial—the filling sets up and the dough finishes crisping. If you try to move them too soon, the wraps might slide off. Trust me, I learned this the hard way.
A few sensory cues to watch for: The peppers should be bright and slightly softened but not mushy. The crescent roll strips should be deep golden brown and flaky. And the filling should smell savory and aromatic—like a really good stuffed pepper that just happens to look adorable.
Cooking Tips & Techniques
I’ve made these stuffed pepper mummies about six times now, and I’ve picked up a few tricks along the way. Here’s what I wish someone had told me before my first attempt:
Don’t overbake the peppers. I know it’s tempting to leave them in longer for extra crispy dough, but the peppers will keep cooking after they come out of the oven. Pull them when the dough is golden and the peppers are just fork-tender. If you wait until the peppers are super soft, they’ll collapse when you try to serve them—and nobody wants a flat mummy.
Use room temperature cream cheese. Cold cream cheese doesn’t mix evenly into the filling, and you’ll end up with weird white lumps. Take it out of the fridge about 20 minutes before you start cooking. If you forget (which I do, constantly), microwave it for 10 seconds on low power—just until it’s softened, not melted.
Cut your crescent roll strips thin. I made the mistake of cutting them too wide the first time, and my mummies looked like they were wearing thick winter scarves instead of bandages. Aim for strips that are about 1/2 inch wide. They’ll look delicate, but they puff up beautifully in the oven.
Keep the filling moist. Lean turkey can be dry, especially when it’s baked inside a pepper. The mushrooms and cream cheese are your secret weapons here—they add moisture without extra fat. If your filling seems dry before you stuff the peppers, add another tablespoon of cream cheese or a splash of broth. Better too moist than too dry.
Multitask like a pro. While the peppers are baking, use that time to clean up your workspace or prep a simple side dish. I like to toss together a quick salad or heat up some marinara sauce for dipping. The mummies only need 16 to 18 minutes in the oven, so you don’t have much time—but you can definitely get a few things done.
Variations & Adaptations
One of the best things about this recipe is how flexible it is. Here are some variations I’ve tried (and loved):
Vegetarian Version: Swap the ground turkey for 1 cup of crumbled firm tofu or a plant-based ground meat substitute. Sauté the tofu with the onions and garlic until it’s lightly browned, then proceed with the recipe. I’ve also used cooked lentils mixed with finely chopped walnuts—the texture is incredible, and it adds a nice earthy flavor.
Spicy Southwest Mummies: Add 1/2 teaspoon of cumin and 1/4 teaspoon of cayenne pepper to the filling along with the other seasonings. Mix in 1/4 cup of corn kernels and 2 tablespoons of diced pickled jalapeños. Use red bell peppers for a festive look. These are my personal favorite—the heat balances perfectly with the creamy filling.
Cheesy Italian Mummies: Stir 1/4 cup of shredded part-skim mozzarella into the filling before stuffing the peppers. Top each mummy with a sprinkle of Parmesan cheese before baking. Serve with warm marinara sauce for dipping. This version is a little more indulgent, but it’s still lighter than the original.
Low-Carb/Keto Adaptation: Skip the crescent roll dough entirely and wrap the stuffed peppers in thin slices of provolone or mozzarella cheese instead. The cheese will melt and crisp up in the oven, creating a cheesy “bandage” effect. Use cauliflower rice instead of brown rice in the filling. It’s not quite the same as the original, but it’s surprisingly good.
Breakfast Mummies: This one’s a little out there, but hear me out—use the same pepper base, but fill it with scrambled eggs, crumbled turkey sausage, and shredded cheese. Wrap in crescent roll strips as usual. Bake for 12 to 14 minutes. These are perfect for Halloween morning before school or work. My kids absolutely lost their minds over these.
Serving & Storage Suggestions
These stuffed pepper mummies are best served warm, right after they’ve rested for about 5 minutes. The crescent roll strips are at their flakiest and the filling is hot and creamy. I like to arrange them on a platter with a small bowl of marinara sauce on the side for dipping—it adds a nice pop of color and a little extra flavor.
For a complete Halloween dinner, serve them with a simple green salad dressed with balsamic vinaigrette, or some roasted broccoli tossed with garlic and lemon. The brightness of the salad or veggies balances the richness of the stuffed peppers perfectly. You could also serve them alongside a bowl of tomato soup or butternut squash soup for a cozy, comforting meal.
Storage Instructions: Leftover mummies can be stored in an airtight container in the refrigerator for up to 3 days. The crescent roll strips will lose some of their crispness, but the flavor will still be great. To reheat, place them on a baking sheet in a 350°F (175°C) oven for about 10 minutes, or until warmed through. The microwave works in a pinch, but the dough will be soft rather than crispy—still tasty, just different.
Freezer Instructions: You can freeze the unbaked stuffed pepper mummies for up to 2 months. Assemble them completely (including the crescent roll strips and olive eyes), then place them on a baking sheet and freeze until solid. Transfer to a freezer-safe bag or container. To bake, place them on a baking sheet straight from the freezer and add about 5 to 7 minutes to the baking time. No need to thaw—just bake until golden and hot.
One thing I love about this recipe is that the flavors actually get better after a day in the fridge. The peppers absorb more of the seasoning, and the filling becomes even more cohesive. So if you’re planning a Halloween party, feel free to make these a day ahead and reheat them just before serving.
Nutritional Information & Benefits
Let’s talk numbers, because I know that’s what keeps this recipe in regular rotation at my house. Per serving (one stuffed pepper mummy), here’s the approximate nutritional breakdown:
| Nutrient | Amount per Serving |
|---|---|
| Calories | 285 |
| Protein | 24g |
| Carbohydrates | 22g |
| Fiber | 4g |
| Fat | 11g |
| Saturated Fat | 4g |
| Sodium | 520mg |
| Sugar | 6g |
These numbers will vary slightly depending on the exact brands and ingredients you use, but this gives you a good ballpark. Compared to traditional stuffed pepper mummies made with ground beef and full-fat cream cheese, this version saves you about 120 calories and 8 grams of fat per serving.
Beyond the numbers, there are some real health benefits here. Bell peppers are packed with vitamin C—one pepper provides more than your daily needs. The mushrooms add immune-boosting beta-glucans, and the lean turkey provides high-quality protein to keep you full and satisfied. The brown rice adds fiber and complex carbs for steady energy. And honestly, the fact that you’re eating a vegetable that looks like a mummy? That’s a win for everyone.
This recipe is naturally gluten-free if you use gluten-free crescent roll dough, and it can be made dairy-free by using a plant-based cream cheese alternative. It’s also relatively low in added sugar—only what’s in the crescent roll dough and a tiny bit from the vegetables. Perfect for those of us who want to enjoy Halloween treats without totally derailing our healthy habits.
Conclusion
I’m not going to pretend these Lightened-Up Stuffed Pepper Mummies are the most sophisticated dish I’ve ever made. They’re not. But they might be the most fun—and honestly, isn’t that what Halloween is all about? They’re the kind of recipe that makes people smile, that gets kids excited about dinner, that turns an ordinary Tuesday into something a little bit special. And in a world that feels pretty heavy most days, I think we could all use a little more of that.
What I love most about this recipe is how adaptable it is. You can make it your own—swap in your favorite protein, use whatever vegetables you have on hand, adjust the spices to suit your taste. The basic formula is forgiving, and the result is always delicious. That’s the mark of a great recipe, if you ask me.
So go ahead—give these mummies a try. Make them for your kids, your friends, your Halloween party, or just for yourself on a random Tuesday night. And when you do, I’d love to hear about it. Leave a comment below and tell me how they turned out, what variations you tried, or just share your favorite Halloween food memory. Let’s keep this conversation going—because the best recipes are the ones we share with each other.
Happy Halloween, friends. And happy cooking.
Frequently Asked Questions
Can I use ground beef instead of turkey?
Absolutely! Ground beef works great in this recipe. Just use lean ground beef (90/10 or 93/7) to keep things lighter. You might need to drain off a little extra fat after browning, but otherwise, follow the recipe exactly as written.
How do I prevent the crescent roll dough from getting soggy?
The key is not overstuffing the peppers and making sure your filling isn’t too wet. If your turkey mixture seems watery after cooking, let it cool and drain off any excess liquid before adding the egg and cream cheese. Also, make sure the peppers are completely dry inside before stuffing them.
Can I make these ahead of time?
Yes! You can assemble the mummies completely (including the dough and eyes) up to 24 hours in advance. Keep them covered in the refrigerator, then bake them just before serving. You may need to add 2 to 3 minutes to the baking time since they’ll be cold from the fridge.
What other vegetables can I add to the filling?
Finely diced zucchini, grated carrots, or chopped spinach all work beautifully. Just make sure to squeeze out any excess moisture from vegetables like zucchini or spinach before adding them to the filling. You can add up to 1/2 cup of extra vegetables without changing the recipe too much.
Can I use different colored bell peppers?
Of course! Red, yellow, and orange peppers are sweeter and milder than green peppers. They also look gorgeous with the golden crescent roll wraps. Just keep in mind that green peppers hold their shape a little better during baking, so they’re a good choice if you want perfectly round mummies.
Pin This Recipe!
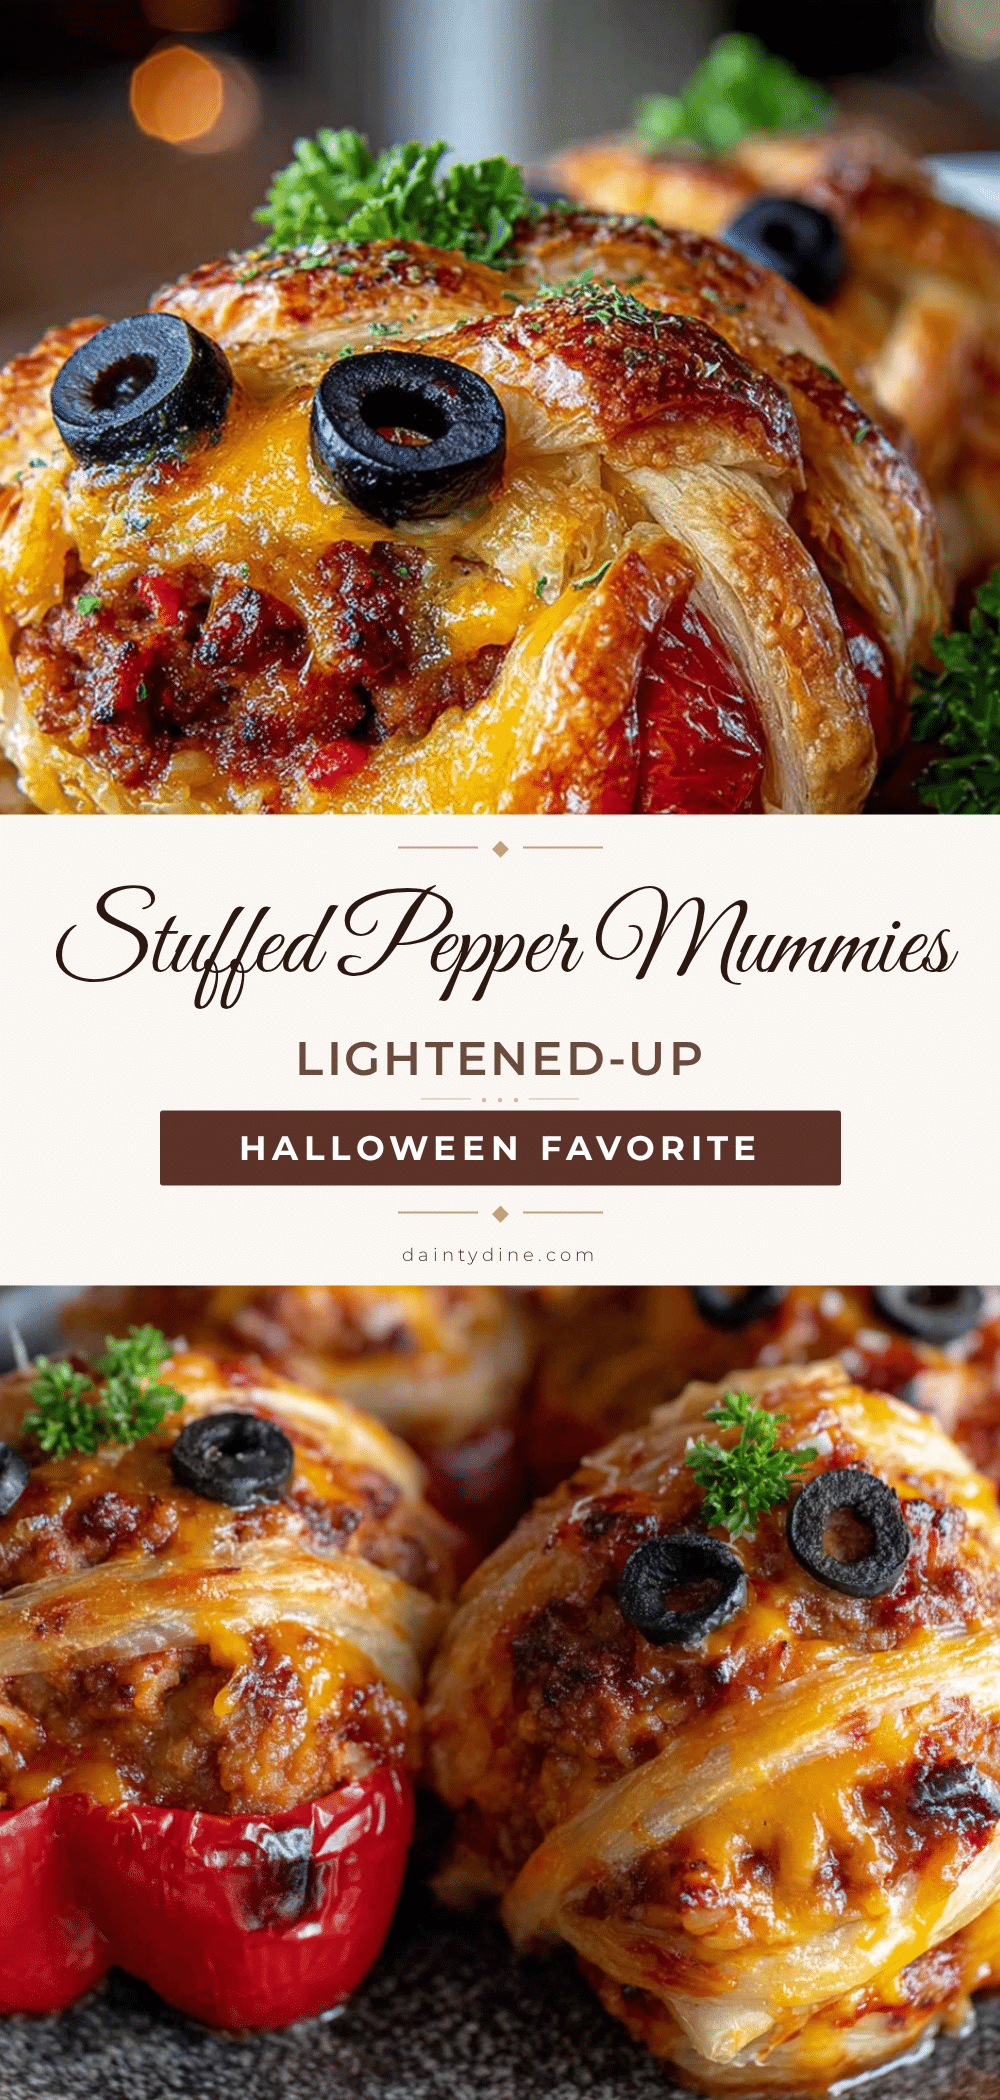
Easy Stuffed Pepper Mummies: A Lightened-Up Halloween Recipe

These lightened-up stuffed pepper mummies are a fun and festive Halloween dinner. Made with lean ground turkey, bell peppers, and crescent roll wrappings, they are quick, easy, and healthier than the classic version.
- Prep Time: 15 minutes
- Cook Time: 20 minutes
- Total Time: 35 minutes
- Yield: 4 servings 1x
- Category: Main Course
- Cuisine: American
Ingredients
- 4 large bell peppers (any color, but green or red work best)
- 1 tablespoon olive oil
- 1 pound lean ground turkey (93/7)
- 1/2 cup finely diced onion (yellow or white)
- 2 cloves garlic, minced
- 1/2 cup finely diced mushrooms
- 1/2 cup cooked brown rice or quinoa
- 1/4 cup light cream cheese, softened
- 1 teaspoon dried oregano
- 1/2 teaspoon smoked paprika
- 1/2 teaspoon salt
- 1/4 teaspoon black pepper
- 1 large egg, lightly beaten
- 1 can (8 ounces) refrigerated crescent roll dough
- 12 to 16 small olive slices (black olives work best)
Instructions
- Preheat oven to 375°F (190°C). Line a baking sheet with parchment paper or a silicone mat.
- Cut tops off bell peppers and remove seeds and membranes. Trim a thin slice off the bottom if needed so they sit flat.
- Heat olive oil in a large skillet over medium heat. Add onion and cook for 3 minutes until soft. Add garlic and cook for 30 seconds.
- Add ground turkey and cook for 5-7 minutes, breaking it up, until browned and cooked through.
- Add mushrooms, oregano, smoked paprika, salt, and pepper. Cook for 2-3 minutes until mushrooms release moisture. Remove from heat and let cool slightly.
- Transfer turkey mixture to a bowl. Add cooked rice, cream cheese, and beaten egg. Stir until well combined.
- Spoon filling into each pepper cavity, packing gently but firmly, level with the top.
- Unroll crescent roll dough and separate into 8 triangles. Cut each triangle lengthwise into 3-4 thin strips.
- Wrap 2 strips of dough around each stuffed pepper, crisscrossing like bandages, leaving a small gap near the top for eyes.
- Press 2-3 olive slices into the gap for eyes.
- Place peppers on prepared baking sheet. Bake for 16-18 minutes until dough is golden brown and peppers are tender.
- Let cool on baking sheet for 5 minutes before serving.
Notes
Don’t overbake the peppers; they will continue cooking after removal. Use room temperature cream cheese for even mixing. Cut crescent roll strips about 1/2 inch wide. Keep filling moist with mushrooms and cream cheese. Multitask while baking to clean up or prep sides.
Nutrition
- Serving Size: 1 stuffed pepper mum
- Calories: 285
- Sugar: 6
- Sodium: 520
- Fat: 11
- Saturated Fat: 4
- Carbohydrates: 22
- Fiber: 4
- Protein: 24
Keywords: stuffed peppers, Halloween, mummies, ground turkey, crescent rolls, lightened-up, healthy, festive