Love this? Save it for later!
Share the inspiration with your friends
There used to be a tiny, windowless bakery called “The Crumb” on a rainy street corner in Portland that made creamy no-bake Biscoff cheesecake bars. When they closed down after just two years, I actually cried in my car. I mean, honestly, who does that? You find the perfect dessert spot, you become a regular, and then poof—it’s gone. The owner just moved to Vermont or something, leaving behind a line of disappointed locals and a void in my dessert life.
I spent the next six months trying to recreate those bars. I bought every Biscoff cookie I could find. I raided specialty stores in Seattle and San Francisco. I failed. And I failed hard. My first few attempts were either too runny, too crumbly, or tasted like cardboard. I remember one night, I was so frustrated I almost threw my stand mixer out the window. Let’s face it, no-bake cheesecakes are tricky beasts if you don’t know the secret to keeping them firm without baking.
After about twelve tries—yes, twelve—I finally got it. The texture was right. The cookie-to-cream ratio was perfect. The flavor hit that exact sweet-spiciness spot that made me crave them every single day. It wasn’t just about the taste; it was about capturing that feeling of walking into that warm, dimly lit shop and knowing something delicious was waiting for you.
This recipe is my tribute to The Crumb. It’s creamy, it’s rich, and it requires zero oven time. You know that feeling when you finally nail a recipe you’ve been obsessed with? It’s pure joy. I keep making these because they remind me of that little bakery and the people I shared them with. If you love a good dessert challenge, you’ll love this recreation. It’s the kind of treat that makes you close your eyes and sigh.
Why You’ll Love This Recipe
Let’s be real for a second. Most no-bake cheesecake recipes are hit or miss. Some are too icy, others are too sweet, and some just fall apart on your plate. This creamy no-bake Biscoff cheesecake bars recipe is different because it’s been tested, tweaked, and perfected over years of trial and error. I’ve stood in my kitchen with flour on my nose and Biscoff spread on my chin, figuring out exactly what works.
- Quick & Easy: This recipe comes together in under 30 minutes of active prep time. You don’t need to turn on the oven or deal with a water bath. It’s perfect for busy weeknights or when you need a dessert fast but don’t want to sacrifice quality.
- Simple Ingredients: You likely already have most of these items in your kitchen. Cream cheese, butter, sugar, and Biscoff cookies. No fancy grocery trips needed. It’s pantry-friendly comfort food at its finest.
- Perfect for Gatherings: These bars are great for potlucks, holiday parties, or just a cozy night in. They travel well and hold their shape, which is a huge win for any host.
- Crowd-Pleaser: I’ve served these to picky eaters and dessert experts alike, and the verdict is always the same: rave reviews. Kids love the sweetness, and adults appreciate the subtle spice of the cookies.
- Unbelievably Delicious: The texture is next-level. It’s dense yet airy, creamy yet crunchy. The combination of the buttery crust and the spiced cream filling is pure magic.
What makes this recipe stand out is the technique. I use a specific ratio of cream cheese to powdered sugar that prevents it from being too heavy. Also, the secret is in the crust. By pulsing the cookies with butter in a food processor, you get a crust that’s sturdy enough to hold up but still melts in your mouth. It’s not just another version; it’s the best version I’ve found.
This isn’t just a dessert; it’s a memory on a plate. It’s the kind of treat that makes you feel like you’re treating yourself to something special, even if you made it in your pajamas. It’s comfort food reimagined—richer, faster, but with that same soul-soothing satisfaction.
What Ingredients You Will Need
This recipe uses simple, wholesome ingredients to deliver bold flavor and satisfying texture without the fuss. The beauty of this creamy no-bake Biscoff cheesecake bars recipe is that it relies on high-quality basics. You don’t need exotic spices or hard-to-find items. Everything you need is likely at your local grocery store.
For the Crust
- Biscoff Cookies: About 2 cups of crushed cookies. I recommend using Lotus Biscoff Spreadable Cookies or the classic cinnamon cookies. They provide that essential spiced flavor. If you can’t find them, speculoos cookies are a good substitute.
- Unsalted Butter: Half a cup, melted. This binds the crumbs together. Using unsalted butter allows you to control the saltiness, though a pinch of salt in the crust is always a good idea.
- Granulated Sugar: Two tablespoons. This adds a little extra sweetness and helps the crust crisp up slightly.
For the Filling
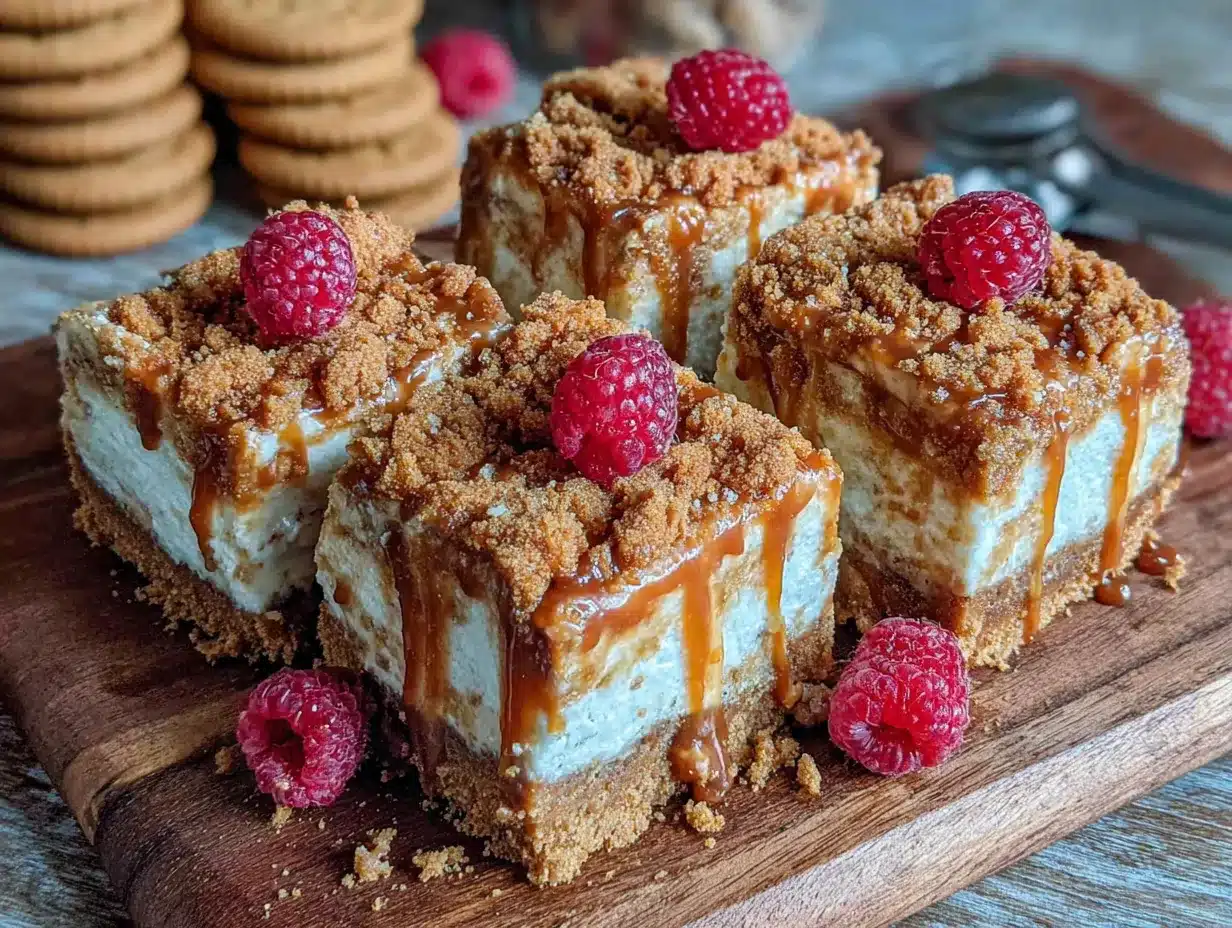
- Cream Cheese: Two 8-ounce blocks, softened. This is the foundation of the cheesecake. Make sure it’s room temperature so it blends smoothly. I use Philadelphia brand because it has a consistent texture and doesn’t separate easily.
- Heavy Cream: One cup, cold. This gives the filling its airy, whipped texture. Don’t substitute with milk, or it won’t set properly.
- Powdered Sugar: One cup. This dissolves easily into the cream cheese, avoiding any grainy texture. If you prefer less sweet, you can reduce this to three-quarters of a cup.
- Biscoff Spread: Half a cup. This is the star flavor component. Use the smooth variety for a consistent filling. It adds moisture and that distinct cinnamon-vanilla note.
- Vanilla Extract: One teaspoon. Enhances the overall flavor profile without overpowering the Biscoff.
For the Topping
- Extra Biscoff Spread: For drizzling. This makes it look fancy and adds an extra hit of flavor.
- Whole Biscoff Cookies: For garnish. Crushed or whole, it adds visual appeal and a crunchy contrast.
If you need substitutions, you can use dairy-free cream cheese and coconut cream for a vegan version, though the texture will be slightly different. For a lighter option, you can use Greek yogurt instead of half the cream cheese, but it will be tangier.
Equipment Needed
You don’t need a lot of fancy gadgets to make these bars. A 9×13 inch baking pan is essential. I prefer a glass pan because it helps the crust set evenly, but metal or ceramic works too. Just make sure to line it with parchment paper for easy removal.
A food processor is your best friend here. It crushes the cookies quickly and evenly. If you don’t have one, a zip-top bag and a rolling pin will work, but it takes more elbow grease. For the filling, an electric hand mixer or stand mixer is helpful to whip the cream to stiff peaks. Doing this by hand is possible but requires serious arm strength and patience.
A rubber spatula is crucial for folding the ingredients together gently. You want to keep the air in the mixture. Also, have a offset spatula ready for spreading the filling smoothly. If you’re feeling fancy, a piping bag can be used for the topping, but a spoon works just fine. Keep your equipment clean and ready before you start, because this recipe moves fast once you begin mixing.
Preparation Method
Getting started on this creamy no-bake Biscoff cheesecake bars recipe is straightforward, but precision matters. Here is how to do it right.
- Prepare the Pan: Line your 9×13 inch baking pan with parchment paper, leaving an overhang on the sides. This is non-negotiable if you want to lift the bars out later without breaking them. Set it aside.
- Crush the Cookies: Place your Biscoff cookies in a food processor. Pulse until they turn into fine crumbs. This should take about 30 seconds. If you’re using a bag, crush them until they look like sand. Avoid over-processing if you want some texture, but fine crumbs make a better crust.
- Make the Crust: Melt your half cup of butter. Mix it with the cookie crumbs and sugar until the mixture resembles wet sand. Press this firmly into the bottom of your prepared pan. Use the bottom of a measuring cup to pack it down tight. A loose crust will crumble when you cut it. Chill this in the fridge for 15 minutes while you make the filling.
- Whip the Cream: In a large bowl, whip your cold heavy cream until stiff peaks form. This means when you lift the beaters, the cream stands up straight. Be careful not to over-whip it into butter.
- Beat the Cream Cheese: In a separate bowl, beat the softened cream cheese, powdered sugar, Biscoff spread, and vanilla extract until smooth and creamy. This should take about 2-3 minutes. Scrape down the sides of the bowl to ensure everything is incorporated.
- Fold Together: Gently fold the whipped cream into the cream cheese mixture in two additions. Use your rubber spatula and fold from the bottom up. Do not stir vigorously, or you will deflate the cream. Stop as soon as there are no white streaks left.
- Spread the Filling: Pour the filling over the chilled crust. Smooth the top with your offset spatula. It should be even and flat. Tap the pan gently on the counter to remove any air bubbles.
- Chill: Refrigerate for at least 4 hours, but overnight is best. This allows the cheesecake to set firmly. If you cut it too soon, it will be mushy.
- Top and Serve: Before serving, drizzle with extra Biscoff spread. Garnish with crushed cookies. Cut into squares using a sharp knife wiped clean between cuts.
Cooking Tips & Techniques
There are a few tricks to making these bars perfect every time. First, temperature control is key. Your cream cheese must be fully softened. If it’s cold, you’ll get lumps. If it’s melted, your filling will be runny. Let it sit on the counter for an hour before you start.
Another common mistake is over-mixing. Once you add the whipped cream, mix gently. You want to preserve the air bubbles that make the texture light. If you mix too hard, you’ll end up with a dense, heavy bar. It should feel fluffy, like a mousse.
When pressing the crust, don’t be shy. Pack it down hard. If it’s loose, the bars will fall apart. I learned this the hard way on my first attempt. Now, I press until my knuckles hurt a little. It’s worth it.
For the cleanest cuts, use a hot knife. Dip your knife in hot water and wipe it dry before each cut. This ensures smooth edges and professional-looking bars. Also, chill the knife in the fridge for a few minutes before cutting for even cleaner lines.
Don’t rush the chilling time. I know it’s tempting to eat it right away, but the bars need time to set. If you cut them too early, you’ll regret it. Patience is a virtue in baking, especially with no-bake recipes.
Variations & Adaptations
While the classic version is my favorite, there are fun ways to tweak this recipe. For a chocolate twist, add a layer of melted chocolate between the crust and the filling. It creates a beautiful barrier and adds richness.
If you want a fruitier version, add a layer of strawberry or raspberry jam on top of the crust before adding the filling. The tartness cuts through the sweetness of the Biscoff nicely.
For a gluten-free option, use gluten-free cinnamon cookies for the crust. Just check the label to ensure they are certified gluten-free. The filling is naturally gluten-free, so that part is easy.
I’ve also tried adding a layer of crushed Oreos to the crust for a cookie-and-cream vibe. It’s surprisingly good, though it changes the flavor profile significantly. It’s less about the Biscoff spice and more about the chocolate. Try it if you want something different.
You can also make individual servings in mason jars or dessert cups. This is great for portion control and looks adorable for gifts. Just adjust the chilling time slightly, as smaller portions set faster.
Serving & Storage Suggestions
These bars are best served chilled. They taste cold and refreshing, which is perfect for warm weather. Pair them with a cup of hot coffee or tea to balance the sweetness. The bitterness of the coffee complements the cinnamon in the Biscoff perfectly.
For storage, keep the bars in the refrigerator in an airtight container. They will last for up to five days. If you need to freeze them, wrap individual squares in plastic wrap and place them in a freezer-safe bag. They can be frozen for up to three months. Thaw them in the fridge overnight before serving.
Don’t leave them out at room temperature for more than two hours. The dairy content means they need to stay cold. If you’re bringing them to a party, keep them in a cooler or on ice until serving time.
The flavors actually develop over time. The Biscoff spread melds with the cream cheese, making the flavor more cohesive after a day or two. So, if you have leftovers, let them sit in the fridge for a day before eating them again. They’ll taste even better.
Nutritional Information & Benefits
While these bars are definitely a treat, they are made with real ingredients. Cream cheese provides protein and calcium, while Biscoff cookies offer a bit of energy from carbohydrates. However, they are high in sugar and fat, so enjoy in moderation.
One serving (one bar) contains approximately 350 calories. It’s rich in saturated fat due to the butter and cream cheese, so if you’re watching your intake, stick to one or two bars. They are not suitable for low-carb or keto diets without significant modifications.
For those with allergies, this recipe contains dairy and gluten. If you have sensitivities, use the substitutions mentioned earlier. Otherwise, it’s a safe and delicious dessert for most people.
I always try to balance these treats with a walk or some light activity. Food is meant to be enjoyed, and these bars are a celebration of flavor. Don’t feel guilty; just enjoy them mindfully.
Conclusion
Making creamy no-bake Biscoff cheesecake bars is a rewarding experience. It’s a recipe that brings joy to both the maker and the eater. I hope you try it and find it as delicious as I do. It’s a tribute to a lost bakery and a testament to the power of persistence.
Feel free to customize it to your liking. Add extra toppings, change the crust, or experiment with flavors. This recipe is a canvas for your creativity. I’d love to hear how you make it your own.
Please share your results with me! Tag me in your photos or leave a comment below. I read every single one and love seeing your creations. If you make this, don’t forget to rate it and share it with your friends. They’ll thank you later.
Enjoy every bite. It’s worth it.
FAQs
Can I use a different type of cookie for the crust?
Yes, you can use graham crackers, digestive biscuits, or even Oreos. However, Biscoff cookies provide the signature cinnamon flavor that defines this recipe. If you use a different cookie, the taste will be quite different.
Why did my cheesecake bars fall apart?
This usually happens if the crust wasn’t packed down tightly enough or if the bars were cut before they were fully set. Make sure to chill them for at least 4 hours, preferably overnight.
Can I make this recipe dairy-free?
Yes, you can use dairy-free cream cheese and coconut cream. The texture might be slightly different, but it will still be delicious. Just ensure your Biscoff cookies are dairy-free, as some varieties contain milk.
How long do these bars last in the fridge?
They last for up to 5 days in an airtight container. After that, they may start to lose their texture or absorb other flavors from the fridge.
Can I freeze the bars?
Absolutely. Wrap individual squares in plastic wrap and place them in a freezer bag. They can be frozen for up to 3 months. Thaw in the fridge before eating.
Pin This Recipe!
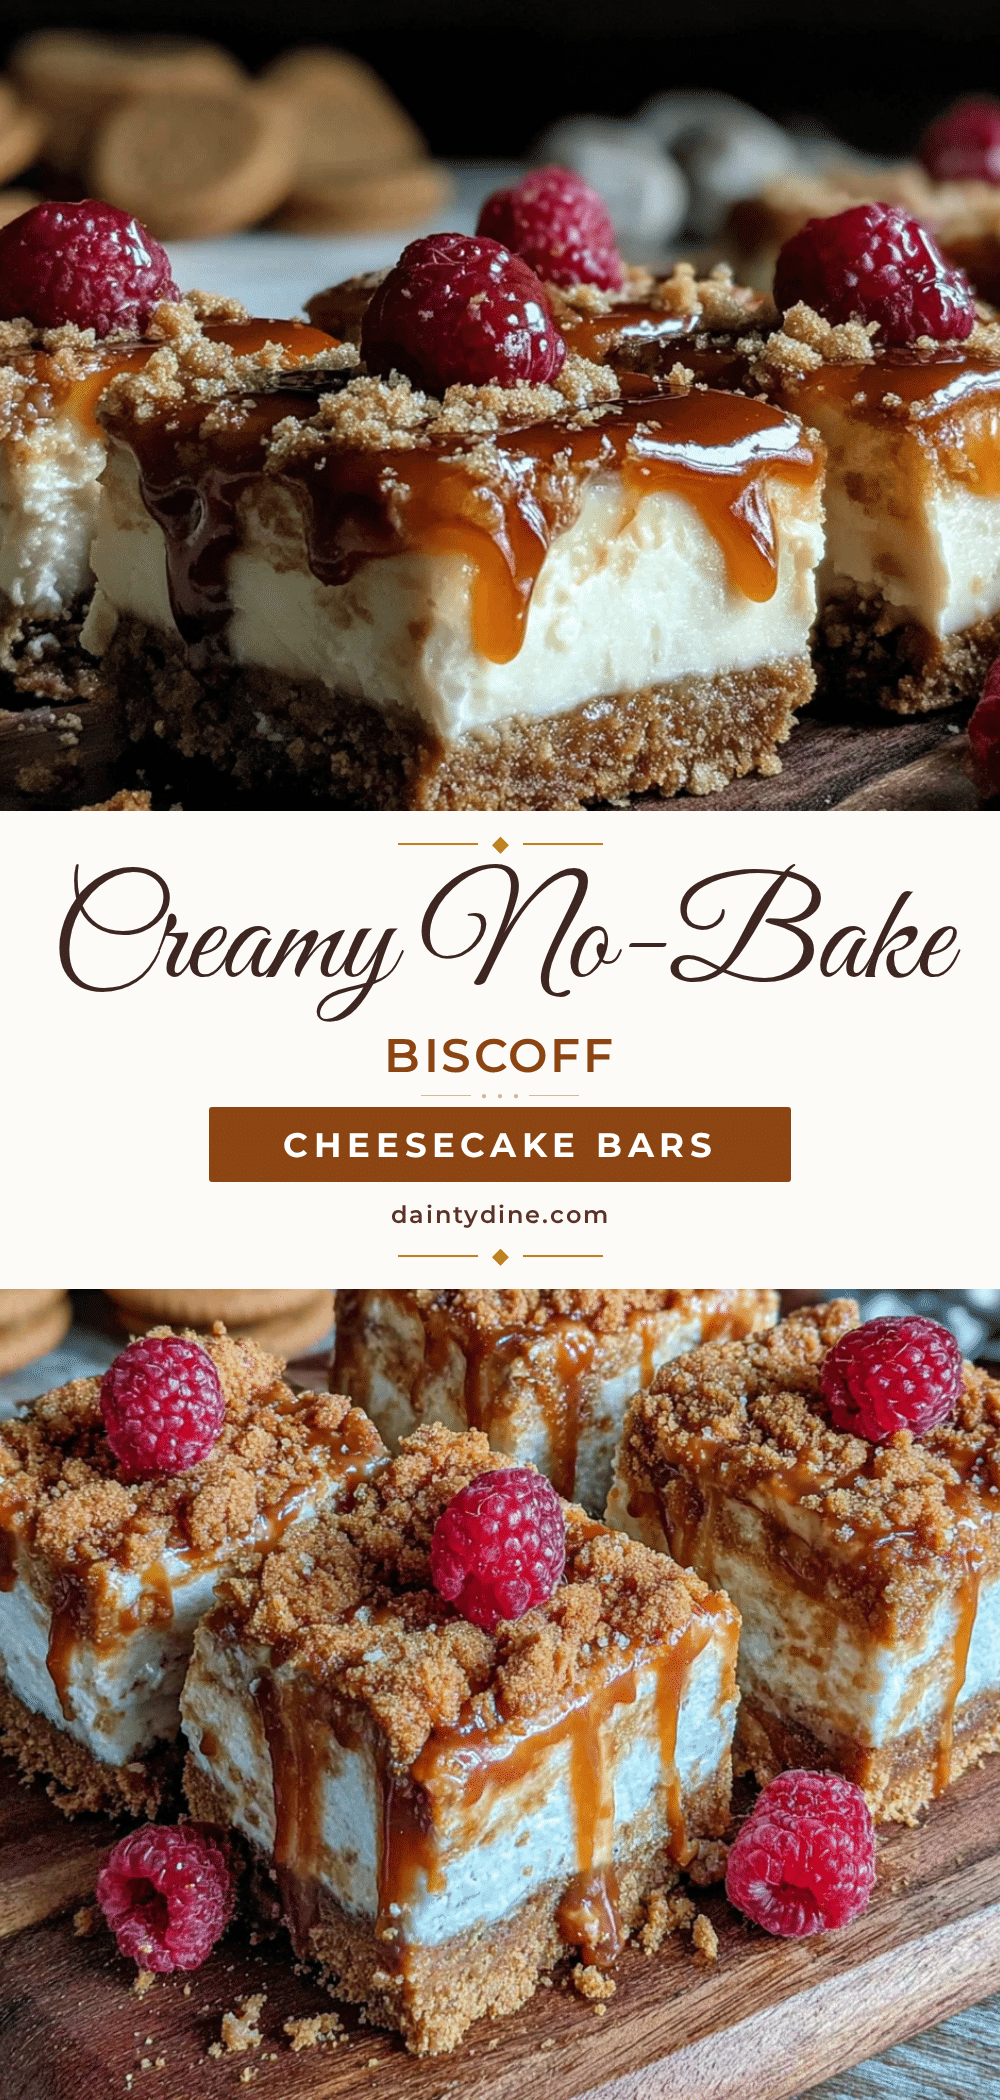
Creamy No-Bake Biscoff Cheesecake Bars
A rich, creamy no-bake cheesecake bar featuring a crunchy Biscoff cookie crust and a spiced cream cheese filling, inspired by a beloved Portland bakery.
- Prep Time: 30 minutes
- Cook Time: 0 minutes
- Total Time: 4 hours 30 minutes
- Yield: 12 servings 1x
- Category: Dessert
- Cuisine: American
Ingredients
- 2 cups Biscoff cookies (crushed)
- 1/2 cup unsalted butter (melted)
- 2 tablespoons granulated sugar
- 2 blocks (8 oz each) cream cheese (softened)
- 1 cup heavy cream (cold)
- 1 cup powdered sugar
- 1/2 cup Biscoff spread (smooth)
- 1 teaspoon vanilla extract
- Extra Biscoff spread (for drizzling)
- Whole or crushed Biscoff cookies (for garnish)
Instructions
- Line a 9×13 inch baking pan with parchment paper, leaving an overhang on the sides.
- Pulse Biscoff cookies in a food processor until they form fine crumbs.
- Mix melted butter and granulated sugar with the cookie crumbs until the mixture resembles wet sand.
- Press the crust mixture firmly into the bottom of the prepared pan and chill in the fridge for 15 minutes.
- In a large bowl, whip cold heavy cream until stiff peaks form.
- In a separate bowl, beat softened cream cheese, powdered sugar, Biscoff spread, and vanilla extract until smooth.
- Gently fold the whipped cream into the cream cheese mixture in two additions until no white streaks remain.
- Pour the filling over the chilled crust and smooth the top with an offset spatula.
- Refrigerate for at least 4 hours, or overnight, until firmly set.
- Drizzle with extra Biscoff spread and garnish with cookies before cutting into squares.
Notes
Ensure cream cheese is fully softened to avoid lumps. Pack the crust down tightly to prevent crumbling. Use a hot, wiped knife for clean cuts. Bars can be frozen for up to 3 months.
Nutrition
- Serving Size: 1 bar
- Calories: 350
- Sugar: 28
- Sodium: 200
- Fat: 22
- Saturated Fat: 12
- Carbohydrates: 35
- Fiber: 1
- Protein: 4
Keywords: Biscoff, cheesecake, no-bake, dessert, bars, Lotus Biscoff, easy recipe, crowd-pleaser


