Love this? Save it for later!
Share the inspiration with your friends
I wasn’t expecting baking advice from my accountant, but there I was, sitting in his cluttered office in early October, watching him sketch a spiderweb on a sticky note while I waited for him to finish my tax return. He looked up, saw me eyeing the doodle, and said, “You know, the trick to a good spiderweb is starting from the center and working your way out. Same with these cheesecake bars my kids beg for every Halloween.” And just like that, between discussions about deductions and depreciation, I got the blueprint for what would become my most-requested fall dessert.
Honestly, I almost laughed it off. Bob the accountant? The guy who wears argyle sweaters and keeps a calculator on his desk from 1992? But something about the way he described the kids’ faces when he pulled these bars out of the oven made me scribble down his instructions on the back of an envelope. Three batches later, and let me tell you—Bob knows what he’s talking about. These Kid-Friendly Spiderweb Chocolate Cheesecake Bars are the real deal.
The first time I made them, I forgot to chill the cream cheese. You know that feeling when you’re rushing and just grab things from the fridge without checking? Yeah, that was me. The batter came out lumpy, and I almost scrapped the whole thing. But I beat it a little longer, crossed my fingers, and baked it anyway. It turned out perfectly—lumps and all. That’s the thing about this recipe. It’s forgiving. It doesn’t need you to be a pastry chef. It just needs you to show up and have a little fun with the spiderweb part.
These bars have become my go-to for Halloween parties, classroom treats, and those October afternoons when the kids are bouncing off the walls and I need something to keep their hands busy. The chocolate base is rich but not too sweet, the cheesecake layer is creamy and smooth, and that spiderweb design? It looks way more impressive than it actually is. I mean, if Bob the accountant can do it between spreadsheets, you can definitely do it with a butter knife and a toothpick. Maybe you’ve been there—staring at Pinterest-perfect Halloween desserts wondering if you even have the patience for piping bags and food coloring. Trust me, this one’s different.
Why You’ll Love This Recipe
Let’s be real for a second. Halloween desserts can be a total headache. Between the complicated decorations, the expensive specialty ingredients, and the three-hour prep times, sometimes you just want something that looks amazing without making you want to pull your hair out. These spiderweb cheesecake bars are that recipe. Here’s why they work for real families on real budgets.
- Budget-Friendly Ingredients: Everything here is stuff you probably already have or can grab at any grocery store without blinking at the price. Cream cheese, butter, chocolate chips, sugar. No weird extracts or hard-to-find decorations.
- Kid-Approved, Parent-Approved: My kids fought over the last bar last year, and my husband ate three before I could stop him. The chocolate cheesecake combo is universally loved—no picky eater drama here.
- No Fancy Equipment Needed: You don’t need piping bags, special tips, or any of that stuff. A butter knife and a toothpick are all you need to make that spiderweb design. I promise.
- Make-Ahead Friendly: These bars actually get better after a night in the fridge. The flavors meld together, the texture firms up perfectly, and you can make them a day or two before your Halloween party without any stress.
- Impressive Without the Effort: When you bring these to a gathering, people will think you spent hours on them. The spiderweb design looks so professional, but it takes maybe two minutes to create. Let them wonder.
What makes these bars different from every other cheesecake bar recipe out there? It’s the ratio. The chocolate cookie crust is thick enough to hold up to the creamy filling, but not so thick that it overpowers everything. The cheesecake layer has just the right amount of sweetness—not cloying, not bland. And the spiderweb design is actually doable for someone who’s never picked up a piping bag in their life. I’ve tested this with my own kids, with my neighbor’s kids, and with a group of very skeptical third-graders at a Halloween party. Every single time, the bars disappeared. That’s not luck—that’s a recipe that works.
What Ingredients You Will Need
This recipe uses simple, honest ingredients that come together to create something truly special. No gimmicks, no fuss—just good baking staples that work together beautifully.
For the Chocolate Cookie Crust
- 2 cups chocolate sandwich cookie crumbs (about 20 cookies, cream filling included—I use Oreo brand for consistent texture, but store-brand works fine too)
- 5 tablespoons unsalted butter, melted (salted butter works if that’s what you have, just skip the pinch of salt below)
- 1 tablespoon granulated sugar (optional, but adds a little extra sweetness to the crust)
- Pinch of salt (balances the sweetness and makes the chocolate flavor pop)
For the Cheesecake Filling
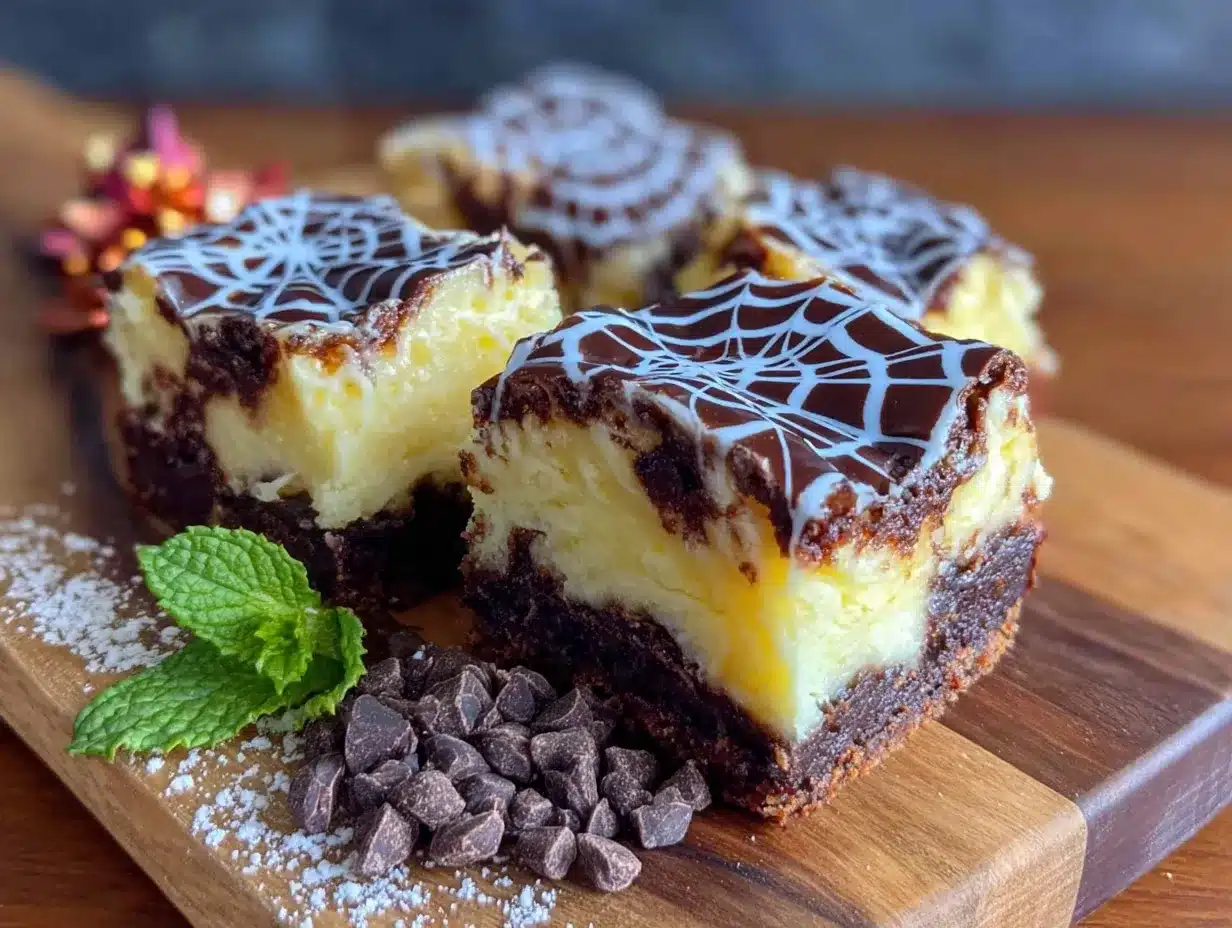
- 16 ounces cream cheese, softened to room temperature (this is important—cold cream cheese creates lumps that won’t smooth out. Let it sit on the counter for at least an hour)
- ½ cup granulated sugar (just enough sweetness without being overpowering)
- 2 large eggs, room temperature (cold eggs can seize the batter. Pop them in a bowl of warm water for 5 minutes if you’re in a hurry)
- 1 teaspoon vanilla extract (pure vanilla extract makes a difference here, but imitation works in a pinch)
- ½ cup sour cream, room temperature (adds tanginess and makes the cheesecake extra creamy. Greek yogurt is a great substitute)
For the Spiderweb Design
- ¼ cup semi-sweet chocolate chips, melted (dark chocolate works too, just make sure it’s smooth and not too thick)
- 1 tablespoon coconut oil or vegetable oil (thins the chocolate so it drizzles easily. Don’t skip this or the chocolate will be too thick to draw with)
Ingredient Selection Tips
For the cream cheese, I really recommend using full-fat block cream cheese, not the spreadable kind in a tub. The spreadable stuff has added water and stabilizers that can make your cheesecake layer too soft. Philadelphia brand is my go-to, but any block cream cheese works. For the chocolate cookies, I’ve tried this with generic store-brand chocolate sandwich cookies, and honestly, they work fine. The filling in the cookies actually helps the crust hold together better, so don’t scrape it out. And for the chocolate drizzle, semi-sweet chips give you that classic chocolate flavor without being too bitter or too sweet. If your kids prefer milk chocolate, go ahead and use milk chocolate chips instead—it’ll be sweeter, but still delicious.
Substitution Guidance
Need this to be gluten-free? Use gluten-free chocolate sandwich cookies for the crust—they’re widely available now and work perfectly. Dairy-free? Use dairy-free cream cheese (I like the Kite Hill brand for baking), dairy-free sour cream, and vegan butter. The texture will be slightly different, but the flavor is still fantastic. If you don’t have sour cream, full-fat plain Greek yogurt is an almost identical substitute. Just make sure it’s room temperature before mixing.
Equipment Needed
You don’t need a fully stocked professional kitchen for these bars. Here’s what you’ll actually use:
- 9×9-inch square baking pan (an 8×8 works too, your bars will just be a little thicker and need a few extra minutes of baking time)
- Parchment paper (I cannot stress this enough—line your pan with parchment paper with overhang on two sides. It makes lifting the bars out so much easier. I learned this the hard way after a cheesecake bar massacre)
- Food processor or zip-top bag and rolling pin (for crushing the cookies. The food processor is faster, but honestly, letting the kids smash cookies in a bag with a rolling pin is half the fun)
- Electric hand mixer or stand mixer (you can mix by hand if you have strong arms, but an electric mixer gives you that smooth, lump-free texture much easier)
- Medium mixing bowls (one for the crust, one for the filling)
- Small microwave-safe bowl (for melting the chocolate drizzle)
- Butter knife (for swirling the spiderweb design—no fancy tools needed)
- Toothpick (for dragging the chocolate into web lines)
- Measuring cups and spoons (standard set will do)
- Rubber spatula (for scraping every last bit of cheesecake batter into the pan)
If you don’t have a food processor, don’t worry. I’ve made the crust plenty of times by putting the cookies in a sturdy zip-top bag and going to town with a rolling pin. My kids fight over who gets to do the smashing. It’s messy, it’s loud, and it’s honestly more fun than the food processor method.
Preparation Method
Alright, let’s get to the good stuff. Here’s how to make these spiderweb cheesecake bars step by step. Take your time, don’t rush, and remember—Bob the accountant made these work, so you’ve got this.
Step 1: Prep Your Pan and Preheat
Preheat your oven to 325°F (163°C). Line your 9×9-inch baking pan with parchment paper, leaving about 2 inches of overhang on two opposite sides. This creates handles that make lifting the finished bars out super easy. Lightly spray the parchment with non-stick cooking spray just to be safe.
Step 2: Make the Crust
Crush your chocolate sandwich cookies into fine crumbs. If using a food processor, pulse until you have uniform crumbs—about 20 seconds. If using the bag method, seal the bag tightly and go to town with your rolling pin until no large pieces remain. You want fine crumbs, not chunks. Transfer the crumbs to a medium bowl, add the melted butter, sugar, and salt, and stir with a fork until everything is evenly moistened. It should look like wet sand and hold together when you squeeze a handful.
Step 3: Press and Bake the Crust
Pour the crumb mixture into your prepared pan. Use the bottom of a measuring cup or a flat-bottomed glass to press it down firmly and evenly. Don’t skip this pressing step—a loose crust will fall apart when you cut the bars. Bake the crust for 10 minutes, then remove it from the oven and set it aside to cool slightly while you make the filling. Leave the oven on.
Step 4: Make the Cheesecake Filling
In a large mixing bowl, beat the softened cream cheese with an electric mixer on medium speed until smooth and creamy—about 2 minutes. Scrape down the sides and bottom of the bowl with a rubber spatula. Add the sugar and beat for another minute until fully combined. Add the eggs one at a time, beating on low speed after each addition just until incorporated. Overbeating at this stage adds too much air and can cause cracks later. Add the vanilla extract and sour cream, and mix on low until smooth. The batter should be silky and lump-free. If you see small lumps, keep mixing on low for another 30 seconds.
Step 5: Assemble and Bake
Pour the cheesecake filling over the warm crust and spread it evenly with your spatula. Give the pan a gentle tap on the counter to release any air bubbles. Bake at 325°F (163°C) for 30 to 35 minutes, or until the edges are set and the center is just slightly jiggly—like a firm Jell-O, not liquid. It will continue to set as it cools. Don’t overbake, or the cheesecake can become dry and crack.
Step 6: Cool Completely
Remove the pan from the oven and place it on a wire rack. Let the cheesecake bars cool to room temperature, which takes about 1 to 2 hours. Then transfer the pan to the refrigerator and chill for at least 4 hours, preferably overnight. This step is crucial—the bars need to be fully chilled and firm before you add the spiderweb design and cut them.
Step 7: Create the Spiderweb Design
Once the bars are fully chilled, melt the semi-sweet chocolate chips with the coconut oil in a small microwave-safe bowl. Microwave in 20-second intervals, stirring between each, until smooth and drizzle-able. Let it cool for 2 minutes so it’s not too hot. Use a small spoon to drizzle the melted chocolate in a spiral pattern on top of the chilled cheesecake—start from the center and work your way outward in a continuous circle, like a snail shell. Then, take a toothpick and drag it from the center outward through the chocolate spiral to the edge of the pan, creating web lines. Repeat this every inch or so around the spiral. You should have about 6 to 8 web lines radiating from the center. Wipe the toothpick clean between each drag for clean lines.
Step 8: Chill, Cut, and Serve
Return the pan to the refrigerator for another 30 minutes to set the chocolate web. Then use the parchment paper handles to lift the entire block out of the pan. Place it on a cutting board and use a sharp knife to cut into 16 squares (4 rows by 4 rows). For clean cuts, wipe the knife clean between each slice. Serve cold or at room temperature.
Cooking Tips & Techniques
I’ve made these bars at least a dozen times now, and I’ve learned a few things the hard way so you don’t have to.
Room temperature ingredients are non-negotiable. I know, I know—it’s annoying to wait. But cold cream cheese creates lumps that won’t smooth out no matter how long you beat them. Cold eggs can cause the batter to curdle. Trust me, I’ve tried to rush it, and the texture was never as good. Set your cream cheese, eggs, and sour cream on the counter an hour before you start baking. Set a timer if you have to.
Don’t overmix the filling. Once you add the eggs, mix on low speed and stop as soon as everything is combined. Overmixing incorporates too much air, which creates bubbles that rise to the surface and cause cracks. A few tiny cracks aren’t the end of the world—the spiderweb design covers them anyway—but a smooth top makes the web look better.
The water bath shortcut. Traditional cheesecake recipes call for a water bath to prevent cracking. I tried it with these bars once and honestly, it wasn’t worth the hassle. The bars are thin enough that they bake evenly without one. If you’re worried about cracking, just place a shallow pan of hot water on the oven rack below the cheesecake. The steam helps keep the surface moist without the risk of water seeping into your crust.
Patience with the chilling. I know you want to eat these immediately. I get it. But cutting into warm cheesecake is a disaster—it’s soft, it sticks to the knife, and the layers smear together. Four hours in the fridge is the minimum. Overnight is better. The flavor actually improves as it sits, and the texture becomes perfectly creamy and firm.
My biggest failure: The first time I tried the spiderweb design, I used melted chocolate without thinning it with oil. It came out of the spoon in thick globs instead of a smooth drizzle, and my spiderweb looked like a toddler’s art project. Adding that tablespoon of coconut oil makes all the difference. The chocolate flows smoothly and creates those delicate, professional-looking lines.
Variations & Adaptations
One of the best things about this recipe is how easy it is to tweak. Here are some variations I’ve tried and loved.
Pumpkin Spice Spiderweb Bars
Add ½ cup of pumpkin puree and 1 teaspoon of pumpkin pie spice to the cheesecake filling. Reduce the sour cream to ¼ cup. The pumpkin adds a beautiful orange tint and that cozy fall flavor. The spiderweb design looks even more dramatic against the orange background. My sister makes these every year for her Thanksgiving dessert table, and they’re always the first thing to disappear.
Peanut Butter Chocolate Version
Swirl ¼ cup of creamy peanut butter into the cheesecake filling before baking. Use a knife to gently swirl it in—don’t overmix, you want ribbons of peanut butter running through the cheesecake. For the spiderweb, use melted peanut butter chips instead of chocolate. My kids went absolutely nuts for this version. Just make sure no one has peanut allergies before serving.
Gluten-Free Adaptation
Use gluten-free chocolate sandwich cookies for the crust. Most major brands now carry a gluten-free version, and they taste almost identical to the original. Everything else in the recipe is naturally gluten-free. I’ve served these to gluten-free friends and they couldn’t tell the difference.
Mini Spiderweb Bites
Line a mini muffin tin with paper liners and press about a tablespoon of crust mixture into each cup. Bake for 5 minutes, then add a tablespoon of cheesecake filling and bake for another 10 to 12 minutes. Top each mini bar with a tiny spiderweb design. These are perfect for classroom parties or Halloween snack tables—no cutting required.
Serving & Storage Suggestions
These bars are best served cold, straight from the fridge. The cheesecake layer is firm and creamy, and the chocolate spiderweb has a satisfying snap when you bite into it. If you prefer a softer texture, let them sit at room temperature for about 10 minutes before serving.
For presentation, I like to arrange the bars on a black or orange platter to really make the spiderweb design pop. Add a few fake spider rings or plastic spiders around the platter for a fun Halloween touch. The kids love it, and it takes about 30 seconds to set up.
These bars pair beautifully with a cold glass of milk—classic, I know, but it works. For an adult twist, serve them with a cup of hot coffee or a glass of red wine. The richness of the cheesecake balances nicely with a bold Cabernet or a dark roast.
Storage: Keep the bars in an airtight container in the refrigerator for up to 5 days. Layer them between sheets of parchment paper to prevent the spiderweb design from sticking to the lid. I’ve never had a batch last longer than 3 days in my house, but theoretically, they’re good for a full week.
Freezer instructions: These bars freeze beautifully. Place the cut bars on a baking sheet and freeze until solid, about 2 hours. Then transfer them to a freezer-safe container or zip-top bag, layering parchment between each bar. They’ll keep for up to 3 months. To thaw, transfer them to the refrigerator overnight. The texture remains creamy and the spiderweb design stays intact.
Flavor development: Honestly, these bars taste even better on day two. The crust softens slightly, the cheesecake firms up perfectly, and the flavors meld together in a way that’s hard to describe. If you can manage to save some for the next day, you’re in for a treat.
Nutritional Information & Benefits
Let’s be honest—these are a treat, not a health food. But knowing what’s in them helps you enjoy them mindfully.
| Nutrient | Per Bar (1/16 of recipe) |
|---|---|
| Calories | 285 |
| Total Fat | 18g |
| Saturated Fat | 10g |
| Cholesterol | 65mg |
| Sodium | 210mg |
| Total Carbohydrates | 28g |
| Dietary Fiber | 1g |
| Sugars | 20g |
| Protein | 5g |
The cream cheese provides a good amount of calcium and protein, while the dark chocolate in the spiderweb offers a small dose of antioxidants. If you use the Greek yogurt substitution, you’ll get a little extra protein and probiotics. These bars are also vegetarian-friendly and can easily be made gluten-free or dairy-free with the substitutions mentioned earlier.
I personally think of these as a special-occasion dessert—perfect for Halloween parties, birthday celebrations, or those cozy fall weekends when you want to make something fun with the kids. They’re rich enough that one bar is genuinely satisfying, and the portion size is just right for a sweet treat without going overboard.
Conclusion
These Kid-Friendly Spiderweb Chocolate Cheesecake Bars are proof that you don’t need to be a pastry chef to create something that looks and tastes amazing. They came from an unlikely source—my accountant, of all people—but that’s what I love most about cooking. Great recipes can come from anywhere: a neighbor, a coworker, a scribbled note on a napkin. You just have to be willing to listen and try.
What makes these bars special isn’t just the rich chocolate crust or the creamy cheesecake filling. It’s the spiderweb design that turns an ordinary dessert into something festive and fun. And the best part? It’s so simple that even the youngest helper in your kitchen can get involved. My kids take turns dragging the toothpick through the chocolate, and they beam with pride when they see the finished design.
I’d love to hear how yours turn out. Did you try one of the variations? Did your kids fight over the toothpick? Drop a comment below and let me know. And if you’re looking for more easy Halloween treats, check out our no-bake Halloween desserts that are perfect for busy weeknights. Happy baking, and remember—if Bob the accountant can nail this spiderweb design, you absolutely can too.
Frequently Asked Questions
Can I use a different size pan?
Yes, you can use an 8×8-inch pan for thicker bars—just increase the baking time by 5 to 8 minutes and keep an eye on the center. A 9×13-inch pan will give you thinner bars, so reduce the baking time by about 5 minutes. Adjust the ingredient amounts proportionally if you’re changing the pan size significantly.
Why did my cheesecake crack?
Cheesecake cracks usually happen from overmixing, overbaking, or sudden temperature changes. Make sure your ingredients are at room temperature, mix on low speed after adding the eggs, and don’t overbake—the center should still be slightly jiggly when you pull it out. Let it cool gradually on the counter before refrigerating. And remember, the spiderweb design covers small cracks beautifully, so don’t stress too much.
Can I make these bars ahead of time?
Absolutely! These bars are perfect for making ahead. You can prepare them up to 3 days in advance and keep them in the refrigerator. Add the spiderweb design on the day you plan to serve them for the best visual effect. You can also freeze the undecorated bars for up to 3 months and add the spiderweb after thawing.
How do I get clean cuts without smearing the spiderweb?
Use a sharp knife and wipe it clean with a damp paper towel between each cut. For the cleanest cuts, chill the bars for at least 4 hours (overnight is better) before cutting. If the chocolate web is still a little soft, pop the bars in the freezer for 15 minutes before slicing. This firms up the chocolate and gives you those sharp, clean edges.
Can I use white chocolate for the spiderweb instead?
Yes, white chocolate works beautifully for the spiderweb design, especially if you want a spookier look—the white web against the dark chocolate crust is really striking. Melt white chocolate chips with a teaspoon of coconut oil just like you would with dark chocolate. Keep in mind that white chocolate is sweeter, so the overall dessert will be a bit more sugary.
Pin This Recipe!
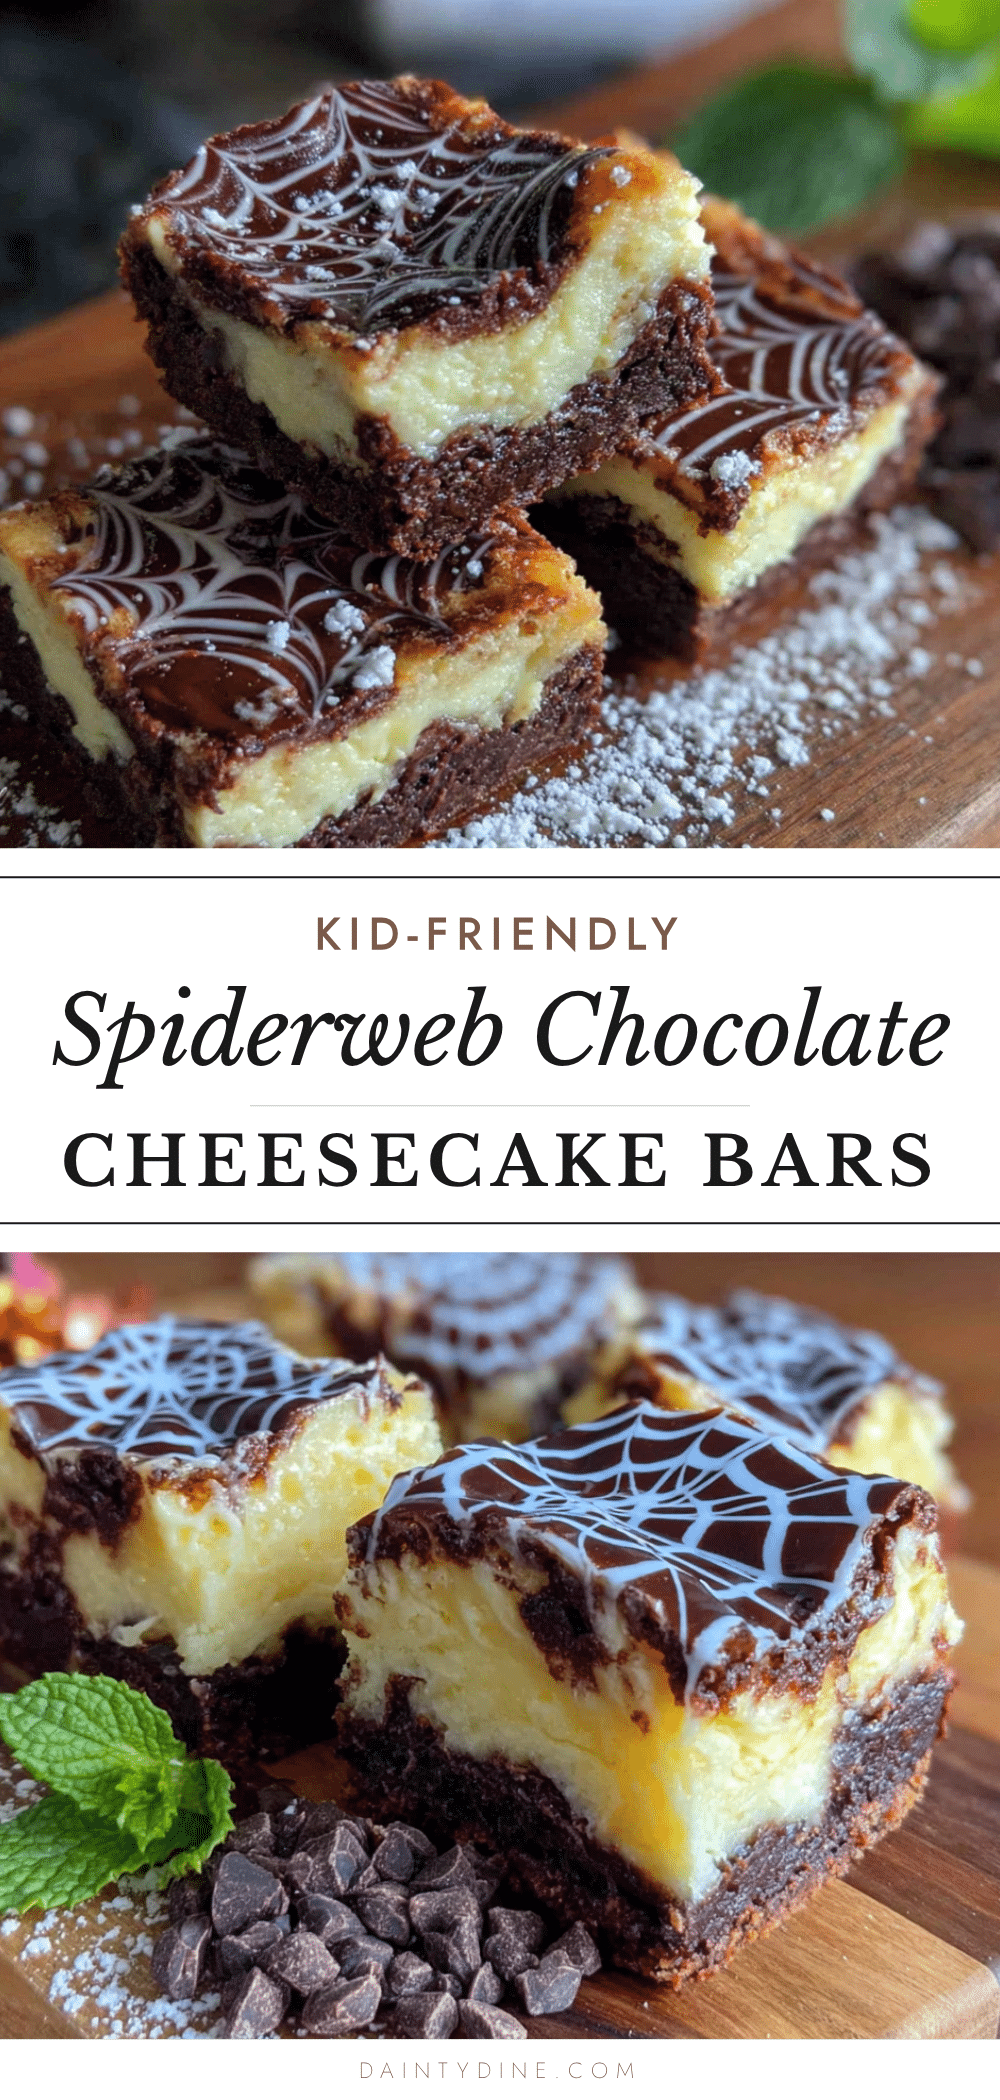
Kid-Friendly Spiderweb Chocolate Cheesecake Bars: Easy Halloween Dessert
These spiderweb cheesecake bars feature a rich chocolate cookie crust, a creamy cheesecake filling, and a simple chocolate spiderweb design that looks impressive but is easy to create. Perfect for Halloween parties and family gatherings.
- Prep Time: 20 minutes
- Cook Time: 35 minutes
- Total Time: 5 hours 25 minutes (includes chilling)
- Yield: 16 servings 1x
- Category: Dessert
- Cuisine: American
Ingredients
- 2 cups chocolate sandwich cookie crumbs (about 20 cookies, cream filling included)
- 5 tablespoons unsalted butter, melted
- 1 tablespoon granulated sugar (optional)
- Pinch of salt
- 16 ounces cream cheese, softened to room temperature
- ½ cup granulated sugar
- 2 large eggs, room temperature
- 1 teaspoon vanilla extract
- ½ cup sour cream, room temperature
- ¼ cup semi-sweet chocolate chips, melted
- 1 tablespoon coconut oil or vegetable oil
Instructions
- Preheat oven to 325°F (163°C). Line a 9×9-inch baking pan with parchment paper, leaving overhang on two sides. Lightly spray with non-stick cooking spray.
- Crush chocolate sandwich cookies into fine crumbs using a food processor or a zip-top bag and rolling pin. Transfer to a medium bowl, add melted butter, sugar, and salt, and stir until evenly moistened.
- Press the crumb mixture firmly into the prepared pan using the bottom of a measuring cup. Bake for 10 minutes, then remove and set aside to cool slightly. Keep oven on.
- In a large bowl, beat softened cream cheese with an electric mixer on medium speed until smooth, about 2 minutes. Add sugar and beat for another minute. Add eggs one at a time, beating on low after each addition. Mix in vanilla and sour cream until smooth.
- Pour cheesecake filling over the warm crust and spread evenly. Tap the pan gently on the counter to release air bubbles. Bake for 30 to 35 minutes, until edges are set and center is slightly jiggly.
- Cool to room temperature on a wire rack, about 1 to 2 hours. Then refrigerate for at least 4 hours, preferably overnight.
- Melt chocolate chips with coconut oil in a microwave-safe bowl in 20-second intervals, stirring until smooth. Let cool for 2 minutes. Drizzle in a spiral pattern on the chilled cheesecake. Use a toothpick to drag lines from the center outward to create a spiderweb design.
- Return to refrigerator for 30 minutes to set the chocolate. Use parchment handles to lift the block out, cut into 16 squares, and serve cold or at room temperature.
Notes
Room temperature ingredients are crucial for a smooth texture. Don’t overmix the filling to avoid cracks. The bars taste even better the next day. For clean cuts, chill thoroughly and wipe the knife between slices.
Nutrition
- Serving Size: 1 bar (1/16 of recip
- Calories: 285
- Sugar: 20
- Sodium: 210
- Fat: 18
- Saturated Fat: 10
- Carbohydrates: 28
- Fiber: 1
- Protein: 5
Keywords: Halloween dessert, cheesecake bars, spiderweb, chocolate cheesecake, kid-friendly, easy dessert


