Love this? Save it for later!
Share the inspiration with your friends
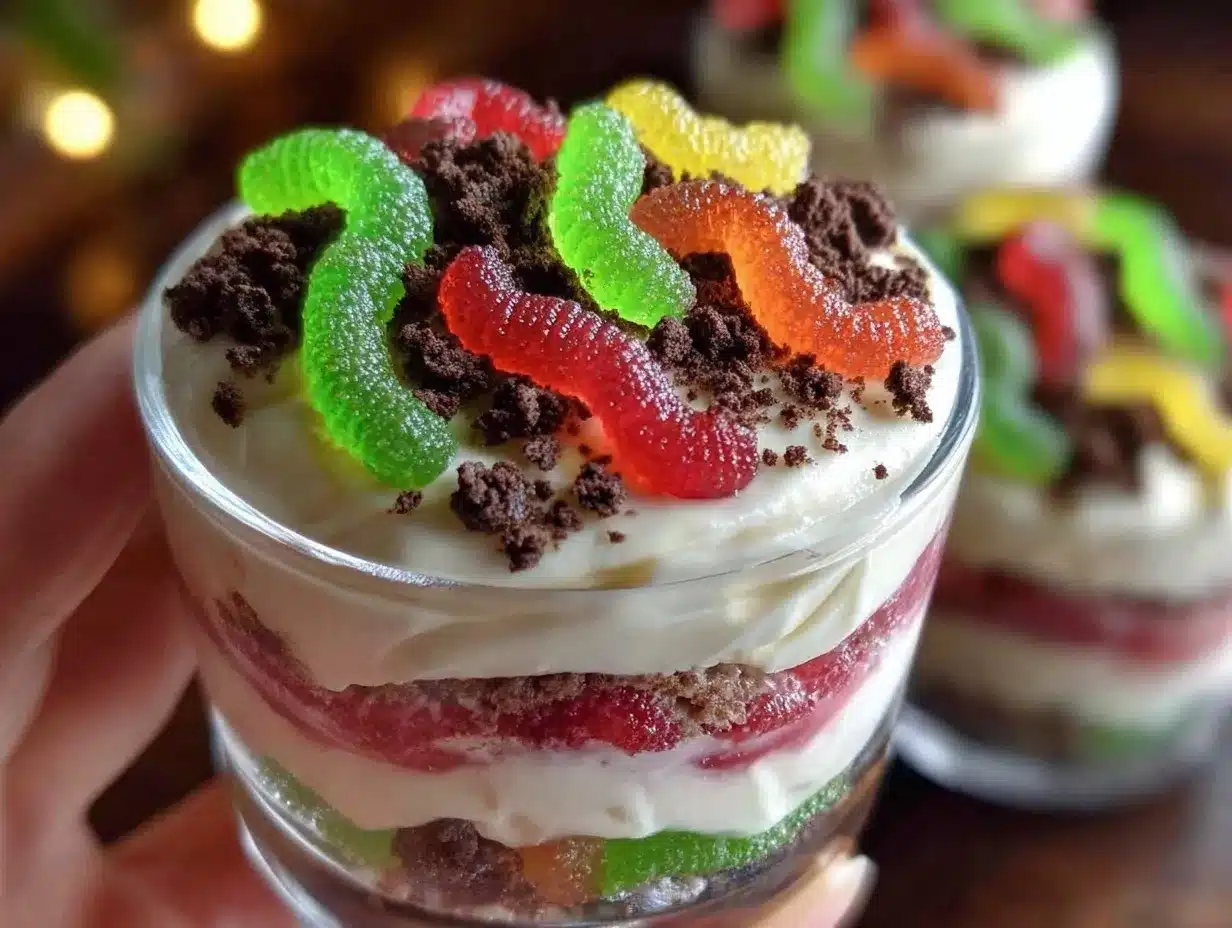
The first time I made these Easter dirt cups with gummy worms, it was a total last-minute save. Our usual Easter dessert plan fell through, and the kids were hangry and restless. I grabbed a few simple ingredients from the pantry, tossed everything together in under 15 minutes, and suddenly the whole family was gathered around the kitchen island, laughing and digging in with their little spoons. The gummy worms wriggling through the chocolate pudding “dirt” were an instant hit, and even my toddler, who’s usually suspicious of new desserts, declared it “the best dirt ever.”
Since then, these kid-approved Easter dirt cups with gummy worms have become a must-have for our holiday celebrations—and honestly, I find myself making them for casual family fun too. What’s not to love? They’re easy, no-bake, and perfect for all ages. Plus, they bring a little whimsy and a lot of joy to the table without any fuss.
If you’re hunting for a simple, fun, and crowd-pleasing treat that the whole family will adore, this recipe is your go-to. And yes, it’s as messy and playful as it sounds—exactly how dessert should be.
Why This Recipe Works
This kid-approved Easter dirt cups recipe has quickly become one of my favorite ways to celebrate because it’s exactly what you want in a holiday dessert for families:
- Super Easy and Quick — You don’t even need to turn on the oven. I’ve pulled this together in under 15 minutes, even with distracted kids around. Perfect for busy parents or last-minute party additions.
- Totally Kid-Friendly — The gummy worms are the star, and the chocolate pudding is creamy and sweet without being overwhelming. Every kid I know has asked for seconds, and it’s a sneaky way to get them excited about dessert.
- Minimal Ingredients, Maximum Fun — You probably have everything already: instant chocolate pudding, crushed chocolate cookies, gummy worms, and milk. No fancy baking skills required.
- Customizable for the Whole Family — Whether you want to sneak in some healthier swaps or add extra layers like whipped cream or mini marshmallows, this recipe adapts. I’ve even made a version with a sprinkle of chopped nuts for the adults.
- Great for All Ages — From toddlers poking at the gummy worms to adults enjoying a nostalgic dessert, it hits all the right notes without being overly sweet or complicated.
This dessert is hands-down my go-to when I want something festive, fun, and fuss-free. It’s the kind of recipe that brings everyone together around the table, smiles included.
Ingredients Breakdown
Here’s the lowdown on what you’ll need and why each ingredient matters. I promise it’s mostly pantry staples, but I’ll share my favorite brands and swap ideas too.
For the Dirt Cups Base:
- Instant chocolate pudding mix (1 package, about 3.9 oz / 110g) — This is the creamy chocolate “mud” that forms the base. Instant pudding is the magic here because it sets quickly without baking or extra steps. I use the classic chocolate flavor, but you could try dark chocolate for a richer taste.
- Cold milk (2 cups / 480ml) — Needed to whisk into the pudding mix to get that perfect creamy texture. Whole milk gives the best flavor, but 2% works fine too.
- Whipped topping (1 cup / 240ml) — I use store-bought whipped cream (the tub kind), but homemade whipped cream works beautifully here if you want to impress. This lightens the pudding and makes the dirt cups fluffy and dreamy.
For the Dirt Layer:
- Chocolate sandwich cookies (about 20 cookies, crushed) — Oreos or any chocolate wafer cookies will do. I crush them finely to mimic real dirt. Pro tip: pop them in a gallon-sized bag and bash with a rolling pin—super satisfying and quick!
For the Fun Factor:
- Gummy worms (1 package, about 3.5 oz / 100g) — The pièce de résistance. I’ve tried sour worms, regular gummy worms, and even rainbow ones. All get gobbled up fast. If you want to keep it allergy-friendly, look for gelatin-free gummy worms.
Optional add-ins: Mini marshmallows, chopped nuts, or even a drizzle of chocolate syrup for extra decadence. I like to keep it simple, but these extras are great for mixing things up.
Equipment You’ll Need
You don’t need much to make these Easter dirt cups—just the basics, really. Here’s what I use every time:
- Mixing bowl — One large bowl to whisk the pudding and fold in the whipped topping.
- Whisk or electric mixer — To mix the pudding powder and milk until silky smooth. I use a whisk, but a hand mixer speeds things up.
- Gallon-sized resealable plastic bag — For crushing cookies. No fancy food processor needed.
- Rolling pin or heavy pan — To bash those cookies into dirt-like crumbs.
- Clear cups or small dessert glasses — For layering the pudding and cookie crumbs beautifully. I like disposable cups for easy cleanup, but reusable glass ones look extra cute.
- Spoons — For serving and eating, obviously.
If you want to get fancy, a piping bag makes layering whipped cream easier, but it’s completely optional. Honestly, a spoon works just fine (and adds to the fun).
Step-by-Step Instructions
- Prepare the pudding base (5 minutes)
In a large mixing bowl, whisk together the instant chocolate pudding mix and cold milk until thick and smooth—this usually takes about 2-3 minutes. Let it sit for 5 minutes to fully set while you get the rest ready. - Crush the cookies (3 minutes)
Place the chocolate sandwich cookies into a gallon-sized resealable bag. Seal tightly and use a rolling pin or heavy pan to crush the cookies into fine crumbs that look like dirt. Set aside. - Fold in whipped topping (2 minutes)
Gently fold the whipped topping into the set pudding. This lightens the texture and makes it creamy and fluffy. Be careful not to overmix; you want the pudding to stay airy. - Layer the dirt cups (5-7 minutes)
Start by spooning a layer of crushed cookies into the bottom of each cup. Next, add a layer of the pudding mixture, then another cookie crumb layer. Repeat until the cups are full, finishing with a cookie “dirt” layer on top. - Add gummy worms (1 minute)
Wiggle a few gummy worms into the top layer of cookie crumbs in each cup. Make them look like they’re crawling out of the dirt for maximum fun. - Chill before serving (at least 1 hour)
Refrigerate the dirt cups for at least an hour so everything sets nicely and the flavors meld. If you’re pressed for time, 30 minutes works in a pinch, but the texture is better chilled longer.
Quick note: These cups are best served the same day but can last covered in the fridge for up to 2 days. After that, the cookie crumbs start to get soggy.
Expert Tips & Troubleshooting
I’ve made these dirt cups more times than I can count, and trust me, a few tips can make your batch even better:
- Don’t skip chilling the pudding — Instant pudding needs time to set. If you try to assemble immediately, it’ll be runny and messy.
- Crush cookies finely for the best texture — Big chunks don’t feel like dirt and can overpower the pudding. I crush until it looks like soil, but with a few slightly bigger pieces for texture.
- Fold whipped topping gently — Overmixing will deflate the fluffiness that makes these cups feel so special. Think gentle folding, not beating.
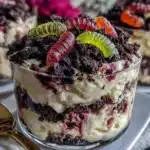
- Use clear cups — The layered look is half the fun! Seeing the chocolate pudding and cookie dirt with gummy worms poking out makes these irresistible.
- Let kids help — This recipe is perfect for little hands. Crushing cookies, layering, and adding gummy worms are all fun jobs that keep kids engaged (and less likely to sneak extra candy before dessert).
Common hiccup: If your pudding feels watery, your milk might have been too warm or you measured wrong. Stick to cold milk and level your measuring cups. Also, if gummy worms sink, nudge them gently into the top layer just before serving.
Variations & Substitutions
Once you’ve nailed the classic kid-approved Easter dirt cups, here’s how to mix things up:
- Healthy-ish swap: Use sugar-free or reduced-sugar pudding mix and swap regular gummy worms for fruit snacks or freeze-dried berries.
- Peanut butter dirt: Add a swirl of peanut butter into the pudding before folding in whipped topping for a nutty twist.
- Berry dirt cups: Replace the gummy worms with fresh berries or sliced strawberries for a less sugary option.
- Oreo Dirt: Use double-stuffed Oreos for extra cookie cream in your dirt layer—my kids think it’s the ultimate treat.
- Mini Marshmallow topping: Sprinkle a few mini marshmallows on top along with gummy worms for extra texture and sweetness.
- Dairy-free version: Use dairy-free chocolate pudding mix and coconut whipped cream, plus allergy-friendly gummy worms.
For a fun twist on simple desserts, I often turn to easy, no-heat recipes like my quick rotisserie chicken Caesar wrap or my fresh smashed cucumber avocado salad. Both are perfect for busy days when you want delicious food without the fuss.
Serving & Storage
These Easter dirt cups are best served chilled, straight from the fridge. I like to let them sit out for about 5 minutes before serving—just enough to take the chill off without losing the creamy texture.
If you’re serving a crowd, line up the cups on a festive tray and let everyone grab their own. They’re great for Easter brunch, after-dinner treats, or even a playful afternoon snack.
Storage tips:
- Refrigerate: Cover the cups with plastic wrap or lids and keep them in the fridge for up to 2 days. The cookie crumbs will soften but still taste amazing.
- Don’t freeze: The pudding texture changes when frozen, so stick to fridge storage.
Leftovers? I’ve been known to scoop the pudding into a bowl and eat it with extra cookie crumbs sprinkled on top. No judgment here.
Nutrition Information
I’m not a nutritionist, but here’s a rough idea of what one serving (about one cup) looks like:
| Nutrient | Per Serving |
|---|---|
| Calories | 250-300 |
| Total Fat | 10g |
| Saturated Fat | 5g |
| Carbohydrates | 40g |
| Sugars | 30g |
| Protein | 3g |
| Fiber | 1g |
This dessert is definitely on the sweeter side—thanks to the pudding and gummy worms—so I like to balance it with a protein-rich meal like my one-pot lemon chicken orzo soup or a quick shrimp taco bowl for dinner.
Final Thoughts
So that’s it—my favorite kid-approved Easter dirt cups recipe that’s perfect for your whole family. I know I’ve shared a lot of little tips and variations, but at its heart, this recipe is about fun, simplicity, and bringing smiles to the table. It’s the kind of treat that feels special without the stress.
Whether you’re making these for Easter or just because you want a playful, easy dessert, I hope you and your family love them as much as mine does. And if you do try this recipe, I’d love to hear how it went—especially if your kids have their own creative twists!
Happy Easter, happy dirt digging, and happy dessert time!
FAQs
Can I make these dirt cups ahead of time?
Absolutely! You can prepare the pudding and cookie crumbs a few hours in advance and assemble the cups up to a day before serving. Just keep them covered in the fridge. The gummy worms are best added right before serving so they don’t get too soft.
Can I use homemade pudding instead of instant?
You can, but instant pudding is the easiest and sets faster, which is key for this recipe. Homemade pudding tends to be softer and might not hold the layers as well. If you want to try homemade, make it firmer by chilling it thoroughly and folding in whipped cream to get that fluffy texture.
What if my kids don’t like gummy worms?
No worries! Substitute with mini marshmallows, fresh berries, or even chocolate chips. The layered pudding and cookie crumbs are delicious on their own, so feel free to customize based on preferences.
Can I make this gluten-free?
Yes! Use gluten-free chocolate sandwich cookies for the dirt layer and double-check your pudding mix is gluten-free (many are). The rest of the ingredients are naturally gluten-free.
How do I crush the cookies if I don’t have a rolling pin?
A heavy pan or even the bottom of a sturdy cup works great. Just be sure to do it inside a sealed plastic bag to avoid a crumb mess.
Is there a way to make this healthier?
Sure! Try reduced-sugar pudding mixes, swap regular gummy worms for fruit snacks, or add a layer of fresh fruit between the pudding and cookie crumbs. It won’t taste exactly the same but still fun and tasty.
Can I turn this into a layered dessert in a large bowl?
Definitely! Layer the pudding, cookie crumbs, and gummy worms in a trifle bowl or any clear glass bowl for a fun family-style dessert. Just be sure to scoop gently to keep the layers visible.
Pin This Recipe!
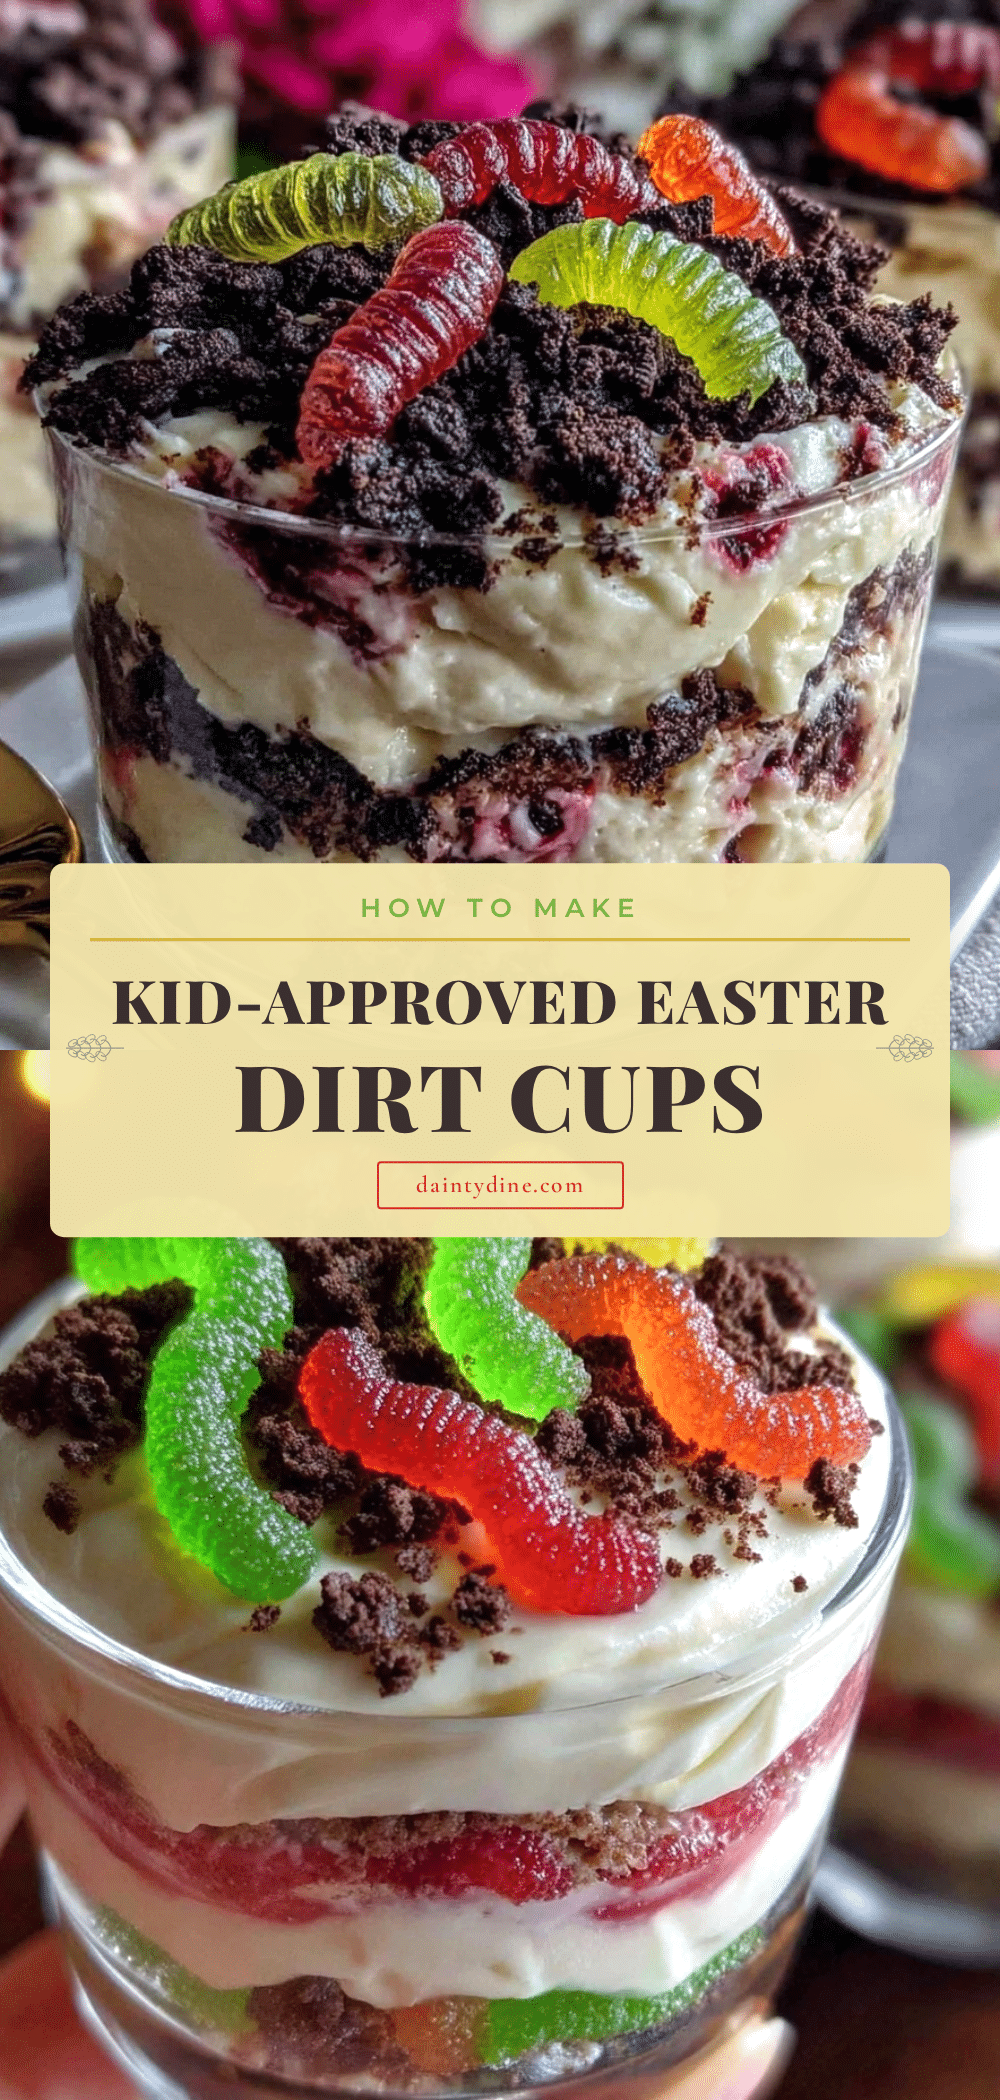
Kid-Approved Easter Dirt Cups Recipe Easy Homemade Gummy Worm Dessert for Family Fun
A fun, easy, no-bake Easter dessert featuring layers of creamy chocolate pudding, crushed chocolate cookies, and gummy worms. Perfect for kids and family celebrations.
- Prep Time: 10 minutes
- Cook Time: 0 minutes
- Total Time: 1 hour 10 minutes
- Yield: 8 servings 1x
- Category: Dessert
- Cuisine: American
Ingredients
- 1 package instant chocolate pudding mix (about 3.9 oz / 110g)
- 2 cups cold milk (480 ml)
- 1 cup whipped topping (240 ml)
- About 20 chocolate sandwich cookies, crushed (Oreos or similar)
- 1 package gummy worms (about 3.5 oz / 100g)
- Optional: mini marshmallows, chopped nuts, chocolate syrup
Instructions
- In a large mixing bowl, whisk together the instant chocolate pudding mix and cold milk until thick and smooth (about 2-3 minutes). Let it sit for 5 minutes to fully set.
- Place the chocolate sandwich cookies into a gallon-sized resealable bag. Seal tightly and crush the cookies into fine crumbs using a rolling pin or heavy pan. Set aside.
- Gently fold the whipped topping into the set pudding to lighten the texture. Avoid overmixing to keep it fluffy.
- Layer the dirt cups by spooning a layer of crushed cookies into the bottom of each cup, then add a layer of pudding mixture, followed by another cookie crumb layer. Repeat until cups are full, finishing with a cookie crumb layer on top.
- Add a few gummy worms on top of each cup, making them look like they are crawling out of the dirt.
- Refrigerate the dirt cups for at least 1 hour before serving to allow flavors to meld and pudding to set.
Notes
Chill pudding before assembling to avoid runny texture. Crush cookies finely for best dirt-like texture. Fold whipped topping gently to keep fluffiness. Add gummy worms just before serving to prevent them from getting soft. Best served the same day; can be refrigerated up to 2 days but cookie crumbs may soften.
Nutrition
- Serving Size: About 1 cup per serv
- Calories: 275
- Sugar: 30
- Fat: 10
- Saturated Fat: 5
- Carbohydrates: 40
- Fiber: 1
- Protein: 3
Keywords: Easter dessert, dirt cups, gummy worms, no-bake dessert, kid-friendly dessert, chocolate pudding, easy dessert