Love this? Save it for later!
Share the inspiration with your friends
My neighbor, Carol, wasn’t trying to impress anyone that Tuesday afternoon. I’d stopped by to return her hedge clippers—the ones I’d borrowed three weeks ago and kept forgetting to give back—and this warm, slightly chocolatey, almost vanilla-tinged scent hit me before I even made it past her screen door. She was standing at her counter in a faded apron, flour dusted across her cheek, scooping what looked like little red snowballs onto a baking sheet. “Oh, those are just cookies,” she said when I asked, as if I’d caught her doing something completely ordinary. But let me tell you, there was nothing ordinary about them.
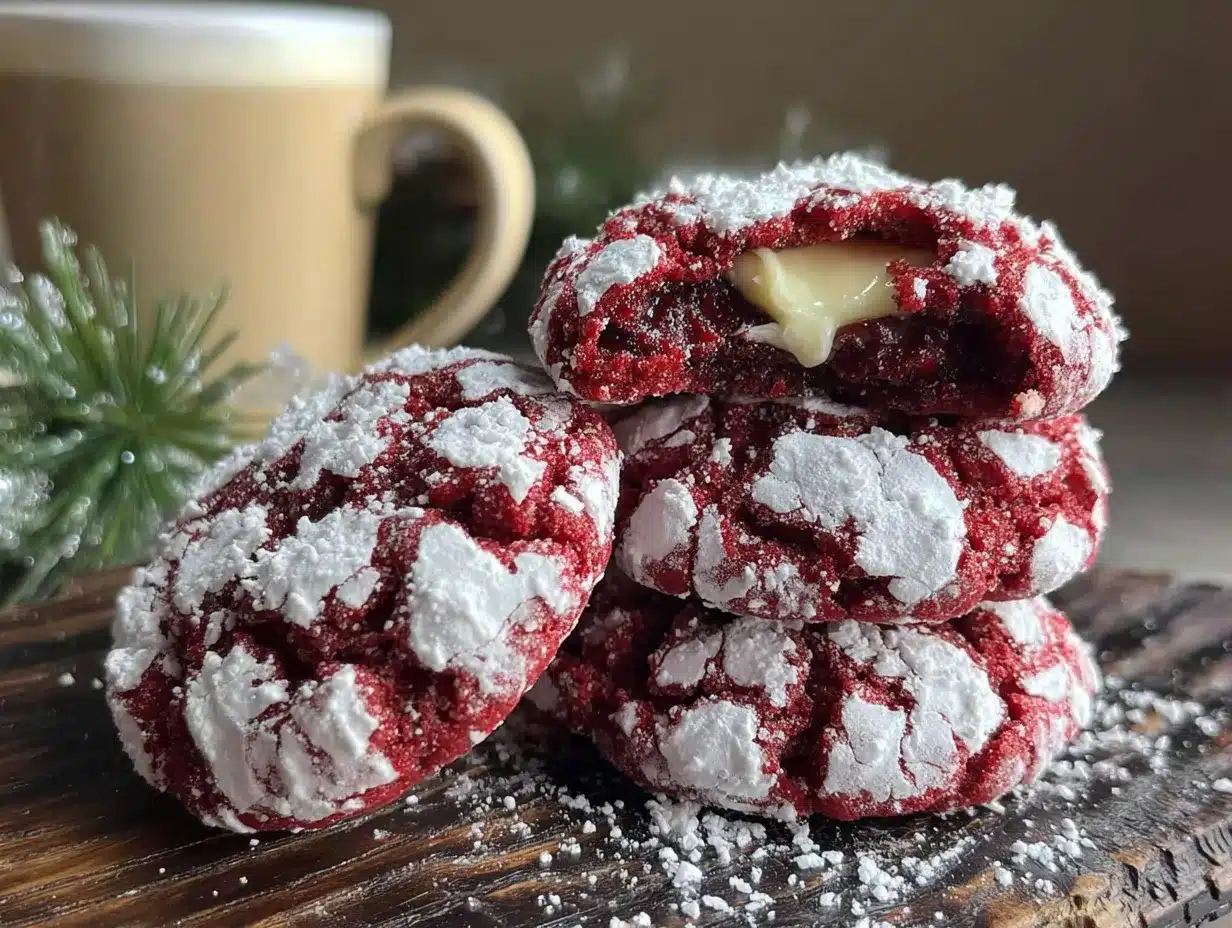
She slid the tray into the oven and waved me over to sit at her kitchen table—the one with the wobbly leg she always props up with a folded napkin. We talked about her dog, the weather, how her hydrangeas were finally blooming. And then the timer went off, and she pulled out these gorgeous, crackled, powdered-sugar-dusted cookies that looked like little winter jewels. I mean, honestly, they were stunning. Red velvet cake had always felt like a special-occasion thing to me, something you order at a restaurant or make for a birthday. But here it was, in cookie form, sitting on a plain white plate in Carol’s cozy kitchen on a random Tuesday. She handed me one, still warm, and I swear I closed my eyes on the first bite. The edges were slightly crisp, the centers were soft and fudgy, and that crackled top was just pure magic.
“It’s nothing,” she said, shrugging when I asked for the recipe. “Just something I threw together.” But I watched her write it down for me on a stained index card, and I knew—this was one of those recipes you keep forever. Maybe you’ve been there, where a completely casual moment turns into a memory you didn’t know you were making. That’s what these cookies are to me now. Every time I make them, I think of Carol’s screen door, the wobbly table, and the way she made something extraordinary feel like it was absolutely no big deal. And that, honestly, is the best kind of recipe.
Why You’ll Love This Recipe
These red velvet crinkle cookies are the kind of treat that solves problems. Had a rough day? One of these with a cup of coffee will fix it. Need something impressive for a holiday cookie swap? These look like you spent hours, but they come together in under 30 minutes of active work. I’ve tested this recipe at least six times to get the perfect balance of fudgy interior and that signature crackled top, and I can tell you with confidence—this is the version you want.
- Quick & Easy: From mixing bowl to cooling rack in under an hour. The dough comes together in one bowl with no electric mixer needed.
- Simple Ingredients: You probably have most of these in your pantry right now. No obscure extracts or specialty flours required.
- Perfect for Cozy Evenings: These cookies are made for cold weather, slow afternoons, or any time you need a little comfort.
- Crowd-Pleaser: Kids love the bright red color, adults love the rich flavor, and everyone loves that crackled sugar top.
- Unbelievably Delicious: The combination of cocoa, vanilla, and buttermilk creates a flavor that’s deeper and more complex than your average cookie.
What makes this recipe different from all the other red velvet cookie recipes out there? It’s the technique. Instead of just mixing everything together and hoping for the best, we’re using a few specific steps—like chilling the dough and rolling in powdered sugar twice—that guarantee those perfect cracks every single time. I’ve burned through a few batches learning what works, so you don’t have to. This is the shortcut to perfection without the shortcut taste.
These cookies aren’t just good. They’re the kind that makes you close your eyes after the first bite. They’re comfort food reimagined—faster than a full red velvet cake, but with the same soul-soothing satisfaction. Perfect for impressing guests without stress, or turning a quiet Tuesday into something memorable.
What Ingredients You Will Need
This recipe uses simple, wholesome ingredients to deliver that classic red velvet flavor and soft, fudgy texture. Most of these are pantry staples, and I’ve included notes on substitutions where they actually work.
- Unsalted butter, softened (½ cup / 113g) — Use good-quality butter here; it makes a difference in flavor. I prefer Kerrygold for its richness.
- Granulated sugar (1 cup / 200g) — Regular white sugar. Don’t substitute brown sugar; it will change the texture and color.
- Large egg (1, room temperature) — Cold eggs don’t emulsify as well. Let yours sit out for 15 minutes.
- Buttermilk (2 tablespoons / 30ml) — This is the secret to that tender, soft crumb. If you don’t have buttermilk, add ½ teaspoon of lemon juice or white vinegar to regular milk and let it sit for 5 minutes.
- Vanilla extract (1 teaspoon) — Pure vanilla, not imitation. It adds warmth and depth.
- All-purpose flour (1½ cups / 190g) — Spoon and level your flour; don’t scoop directly from the bag or you’ll pack in too much.
- Unsweetened cocoa powder (2 tablespoons / 10g) — Natural cocoa, not Dutch-process. I’ve tried both, and natural gives a better color and rise.
- Baking powder (½ teaspoon) — Make sure it’s fresh. Old baking powder won’t give you those nice cracks.
- Salt (¼ teaspoon) — Just enough to balance the sweetness.
- Red food coloring (1 tablespoon / 15ml) — Liquid gel food coloring works best. I use Americolor Super Red. Avoid the watery supermarket drops; they don’t give the same vibrant color.
- White vinegar (½ teaspoon) — This reacts with the buttermilk and baking powder to create the right texture. Don’t skip it.
- Powdered sugar (½ cup / 60g, for rolling) — You’ll need more than you think. I always keep an extra ¼ cup on hand.
For the best results, use room-temperature ingredients. I know it’s tempting to just pull everything out and start mixing, but cold butter and cold egg won’t cream together properly, and you’ll end up with dense, flat cookies. Trust me—I’ve made that mistake more times than I’d like to admit.
Equipment Needed
You don’t need a fancy kitchen to make these cookies. Here’s what you’ll actually use:
- Large mixing bowl — Any bowl will do, but a wide one makes mixing easier.
- Hand mixer or stand mixer — A hand mixer is fine. You can even do this by hand with a wooden spoon if your butter is soft enough.
- Rubber spatula — For scraping down the bowl and folding in the flour.
- Measuring cups and spoons — Accurate measurements matter here.
- Baking sheets — Two standard half-sheet pans. Line them with parchment paper.
- Parchment paper — Non-negotiable. Silicone mats work too, but parchment gives the best browning on the bottom.
- Cooling rack — Let those cookies breathe.
- Small bowl — For the powdered sugar.
- Cookie scoop — A 1.5-tablespoon scoop makes uniform cookies. If you don’t have one, use two spoons.
I’ve made these cookies with a cheap hand mixer I bought at a discount store, and they turned out great. Don’t let fancy equipment stop you. The only thing I wouldn’t skip is the parchment paper—it prevents the cookies from spreading too much and makes cleanup a breeze.
Preparation Method
- Cream the butter and sugar. In a large mixing bowl, beat the softened butter and granulated sugar together until light and fluffy, about 2-3 minutes with a hand mixer on medium speed. You want it to look pale and airy. Scrape down the sides of the bowl with your spatula.
- Add the wet ingredients. Beat in the egg, buttermilk, vanilla extract, red food coloring, and white vinegar. Mix until everything is well combined and the color is uniform. It should be a deep, vibrant red. If it looks more pink than red, add a few more drops of food coloring.
- Mix the dry ingredients separately. In a small bowl, whisk together the flour, cocoa powder, baking powder, and salt. This ensures the cocoa and baking powder are evenly distributed.
- Combine wet and dry. Gradually add the dry ingredients to the wet mixture, mixing on low speed or folding with a spatula just until no streaks of flour remain. Do not overmix—this is where cookies get tough. The dough will be soft and slightly sticky.
- Chill the dough. Cover the bowl with plastic wrap and refrigerate for at least 30 minutes, or up to 2 hours. Chilling is non-negotiable. The dough needs to firm up so it holds its shape and cracks properly during baking. I’ve skipped this step before, and the cookies spread into flat, sad discs.
- Preheat and prepare. Preheat your oven to 350°F (175°C). Line two baking sheets with parchment paper.
- Roll in powdered sugar. Place the powdered sugar in a small bowl. Using a cookie scoop or two spoons, portion out rounded tablespoons of dough (about 1.5 tablespoons each). Roll each portion into a ball between your palms. Drop the ball into the powdered sugar and roll it around until completely coated. Here’s the trick: roll it once, then roll it again. A double coating of powdered sugar is what gives you those dramatic white cracks against the red dough.
- Place on baking sheets. Arrange the coated dough balls about 2 inches apart on the prepared baking sheets. They will spread a little, but not much.
- Bake. Bake for 10-12 minutes. The cookies should look set around the edges but still soft and slightly underdone in the center. They will continue to set on the baking sheet. Do not overbake—this is the most common mistake. At 10 minutes, the cracks should be visible and the tops should look matte, not shiny.
- Cool. Let the cookies cool on the baking sheet for 5 minutes. This is crucial. If you try to move them immediately, they will fall apart. After 5 minutes, transfer them to a wire rack to cool completely.
One note about the chilling: don’t be tempted to skip it even if you’re in a hurry. The dough needs that time to relax and firm up. I once tried to rush this step by popping the dough in the freezer for 10 minutes, and the cookies spread into thin, crispy discs. Still tasty, but not the crackled beauties I was after.
Cooking Tips & Techniques
After making these cookies more times than I can count, here’s what I’ve learned the hard way:
The double-coating trick. This is the number one thing that makes your cookies look bakery-worthy. Roll the dough ball in powdered sugar once, then roll it again. The first layer sticks to the dough, and the second layer creates that thick, snowy crust that cracks open during baking. If you only coat once, the cracks will be faint and the cookies won’t have that dramatic contrast.
Watch your oven temperature. Ovens run hot or cold. I learned this after burning two batches in a row. If your cookies are browning on the bottom but still soft on top, your oven is too hot. If they’re pale and flat, it’s too cool. An oven thermometer is a cheap investment that saves a lot of heartache.
Don’t overmix the dough. I know I’ve said this already, but it’s worth repeating. When you add the flour, mix just until it disappears. Overmixing develops gluten, and that makes cookies tough and cakey instead of soft and fudgy.
Room temperature matters. Cold butter won’t cream properly, and cold egg won’t emulsify. I set my butter and egg on the counter about 30 minutes before I start. If I forget, I microwave the butter for 10 seconds (not melted, just softened) and place the egg in a bowl of warm water for 5 minutes.
Bake one sheet at a time. If you put both sheets in the oven at once, the heat doesn’t circulate properly, and your cookies will bake unevenly. I know it takes longer, but it’s worth it. While one sheet bakes, I keep the other in the fridge so the dough stays chilled.
The underbake is the secret. Pull the cookies out when they still look slightly underdone in the center. They will continue to cook on the hot baking sheet. If you wait until they look fully baked, they’ll be overdone and dry. Trust the process.
Variations & Adaptations
These cookies are pretty perfect as-is, but I’ve played around with a few variations that turned out surprisingly well:
White Chocolate Chunk Version: Fold in ½ cup of chopped white chocolate or white chocolate chips into the dough before chilling. The creamy sweetness of white chocolate pairs beautifully with the mild cocoa flavor of the red velvet. My sister-in-law requests these every Christmas.
Cream Cheese Filling: Make a small batch of cream cheese frosting (4 oz cream cheese, 2 tablespoons butter, 1 cup powdered sugar, ½ teaspoon vanilla) and freeze it in ½-teaspoon dollops. Flatten a dough ball, place a frozen frosting dollop in the center, wrap the dough around it, and then roll in powdered sugar. Bake as directed. The result is a molten, cheesecake-like center that’s absolutely decadent.
Gluten-Free Adaptation: Substitute the all-purpose flour with a 1:1 gluten-free baking flour blend that contains xanthan gum. I’ve used King Arthur Measure for Measure with great results. The texture is slightly more tender, but the cracks still form beautifully.
Vegan Version: Use vegan butter (I like Miyoko’s), a flax egg (1 tablespoon ground flaxseed mixed with 3 tablespoons water, let sit for 5 minutes), and plant-based milk with ½ teaspoon vinegar instead of buttermilk. The color might be slightly less vibrant, but the taste is still spot-on.
Peppermint Red Velvet: Add ½ teaspoon of peppermint extract along with the vanilla. Roll the finished cookies in crushed candy canes for a festive holiday twist. This is my go-to for Christmas cookie exchanges.
I tried a version with dark chocolate cocoa powder once, and honestly, it was too intense. The beauty of red velvet is its subtlety—the cocoa is there but doesn’t overwhelm. Stick with natural cocoa for the best balance.
Serving & Storage Suggestions
These cookies are best served slightly warm, when the edges are still a little soft and the powdered sugar coating is at its fluffiest. I like to pair them with a cold glass of milk, a hot cup of coffee, or—my personal favorite—a mug of creamy hot chocolate. They also make a stunning addition to a holiday cookie platter alongside classic sugar cookies and gingerbread.
For storage, keep the cookies in an airtight container at room temperature. They will stay fresh for up to 5 days, though honestly, they rarely last that long in my house. Place a slice of bread in the container to keep them soft; the bread absorbs excess air and the cookies stay tender. Change the bread slice every other day.
These cookies freeze beautifully. Place cooled cookies in a single layer in a freezer-safe container or zip-top bag, separating layers with parchment paper. They will keep for up to 3 months. To thaw, let them sit at room temperature for about 30 minutes. You can also reheat them in a 300°F oven for 5 minutes to restore that just-baked warmth.
One thing I’ve noticed: the flavor actually deepens after a day or two. The cocoa and vanilla meld together, and the cookies become even more fudgy. So if you can resist eating them all on day one, you’re in for a treat on day two.
Nutritional Information & Benefits
Per cookie (based on 24 cookies): approximately 110 calories, 5g fat, 16g carbohydrates, 1g protein, 10g sugar. These numbers are estimates and will vary based on exact ingredients and portion sizes.
While these cookies are definitely a treat, they do offer a few small benefits. The cocoa powder contains antioxidants called flavonoids, which can support heart health. The buttermilk adds a touch of calcium and probiotics. And honestly, sometimes the best thing you can do for your mental health is enjoy a warm, homemade cookie without guilt.
This recipe is vegetarian-friendly. For those with dietary restrictions, the gluten-free and vegan variations above work well. The cookies contain dairy (butter, buttermilk) and gluten (all-purpose flour), so they are not suitable for those with allergies to these ingredients unless modified.
I’m not a nutritionist, and I don’t pretend to be. What I know is that food is about more than numbers. These cookies are about comfort, connection, and the simple joy of something homemade. Enjoy them mindfully, share them generously, and don’t stress about the calorie count.
Conclusion
These red velvet crinkle cookies have become a staple in my kitchen, and I think they’ll become one in yours too. They’re the perfect blend of nostalgia and simplicity—a recipe that feels special enough for holidays but easy enough for a random Tuesday. The crackled tops, the soft fudgy centers, that hint of cocoa and vanilla… it’s everything you love about red velvet cake, but in a fraction of the time.
I hope you make these cookies and make them your own. Add white chocolate if that’s your thing. Double the vanilla. Roll them in extra powdered sugar until they look like snowballs. The beauty of a simple recipe is that it leaves room for your personality to shine through.
If you try these, I’d love to hear about it. Leave a comment below, tag me in your photos, or tell me about the cozy moment you enjoyed them in. Did you make them for a snow day? A book club? Just because? Whatever the occasion, I’m so glad this recipe found its way to you. Happy baking, friend.
Frequently Asked Questions
Why did my cookies not crack?
This usually happens for two reasons: the dough wasn’t chilled long enough, or you didn’t use enough powdered sugar. Make sure the dough is firm before baking, and give those dough balls a generous double coating of powdered sugar. The cracks form as the dough expands and the sugar coating breaks apart.
Can I use gel food coloring instead of liquid?
Absolutely. In fact, I prefer gel food coloring because it gives a more vibrant red without adding extra liquid. Start with 1 teaspoon and add more until you reach your desired shade. Liquid food coloring works too, but you may need more, which can slightly affect the dough texture.
Why did my cookies spread too much?
Over-spreading is usually a sign that the dough was too warm when it went into the oven. Chill the dough for at least 30 minutes, and if your kitchen is warm, pop the shaped dough balls back in the fridge for 10 minutes before baking. Also, make sure your butter wasn’t too soft when you started.
Can I make the dough ahead of time?
Yes! The dough can be refrigerated for up to 3 days before baking. You can also freeze the shaped, powdered-sugar-coated dough balls on a baking sheet, then transfer them to a freezer bag. Bake from frozen, adding 2-3 minutes to the baking time.
How do I get that perfect red color without artificial dye?
You can use natural red food coloring made from beet juice or pomegranate powder, but the color will be more of a deep burgundy than a bright red. For a truly vibrant red, I recommend using a high-quality gel food coloring. There’s no substitute for that classic red velvet look.
Pin This Recipe!

Best Easy Red Velvet Crinkle Cookies Recipe

These red velvet crinkle cookies are soft, fudgy, and topped with a crackled powdered sugar coating. They come together in under an hour with simple ingredients, making them perfect for holidays, cookie swaps, or a cozy Tuesday treat.
- Prep Time: 20 minutes
- Cook Time: 12 minutes
- Total Time: 1 hour 2 minutes (including 30 minutes chilling)
- Yield: 24 cookies 1x
- Category: Dessert
- Cuisine: American
Ingredients
- ½ cup (113g) unsalted butter, softened
- 1 cup (200g) granulated sugar
- 1 large egg, room temperature
- 2 tablespoons (30ml) buttermilk
- 1 teaspoon vanilla extract
- 1½ cups (190g) all-purpose flour
- 2 tablespoons (10g) unsweetened cocoa powder
- ½ teaspoon baking powder
- ¼ teaspoon salt
- 1 tablespoon (15ml) red food coloring (liquid gel preferred)
- ½ teaspoon white vinegar
- ½ cup (60g) powdered sugar (for rolling, plus extra)
Instructions
- Cream the butter and sugar: In a large mixing bowl, beat the softened butter and granulated sugar together until light and fluffy, about 2-3 minutes with a hand mixer on medium speed. Scrape down the sides of the bowl.
- Add the wet ingredients: Beat in the egg, buttermilk, vanilla extract, red food coloring, and white vinegar. Mix until well combined and the color is uniform.
- Mix the dry ingredients separately: In a small bowl, whisk together the flour, cocoa powder, baking powder, and salt.
- Combine wet and dry: Gradually add the dry ingredients to the wet mixture, mixing on low speed or folding with a spatula just until no streaks of flour remain. Do not overmix.
- Chill the dough: Cover the bowl with plastic wrap and refrigerate for at least 30 minutes, or up to 2 hours.
- Preheat and prepare: Preheat your oven to 350°F (175°C). Line two baking sheets with parchment paper.
- Roll in powdered sugar: Place the powdered sugar in a small bowl. Portion out rounded tablespoons of dough (about 1.5 tablespoons each). Roll each portion into a ball between your palms. Drop the ball into the powdered sugar and roll it around until completely coated. Roll it once, then roll it again for a double coating.
- Place on baking sheets: Arrange the coated dough balls about 2 inches apart on the prepared baking sheets.
- Bake: Bake for 10-12 minutes. The cookies should look set around the edges but still soft and slightly underdone in the center.
- Cool: Let the cookies cool on the baking sheet for 5 minutes. After 5 minutes, transfer them to a wire rack to cool completely.
Notes
Chilling the dough is non-negotiable for proper cracks. Double-coat the dough balls in powdered sugar for dramatic cracks. Do not overbake; cookies should look slightly underdone in the center when removed from the oven. Bake one sheet at a time for even results.
Nutrition
- Serving Size: 1 cookie
- Calories: 110
- Sugar: 10
- Sodium: 55
- Fat: 5
- Saturated Fat: 3
- Carbohydrates: 16
- Fiber: 0.5
- Protein: 1
Keywords: red velvet crinkle cookies, red velvet cookies, crinkle cookies, easy cookie recipe, holiday cookies, fudgy cookies


