Love this? Save it for later!
Share the inspiration with your friends
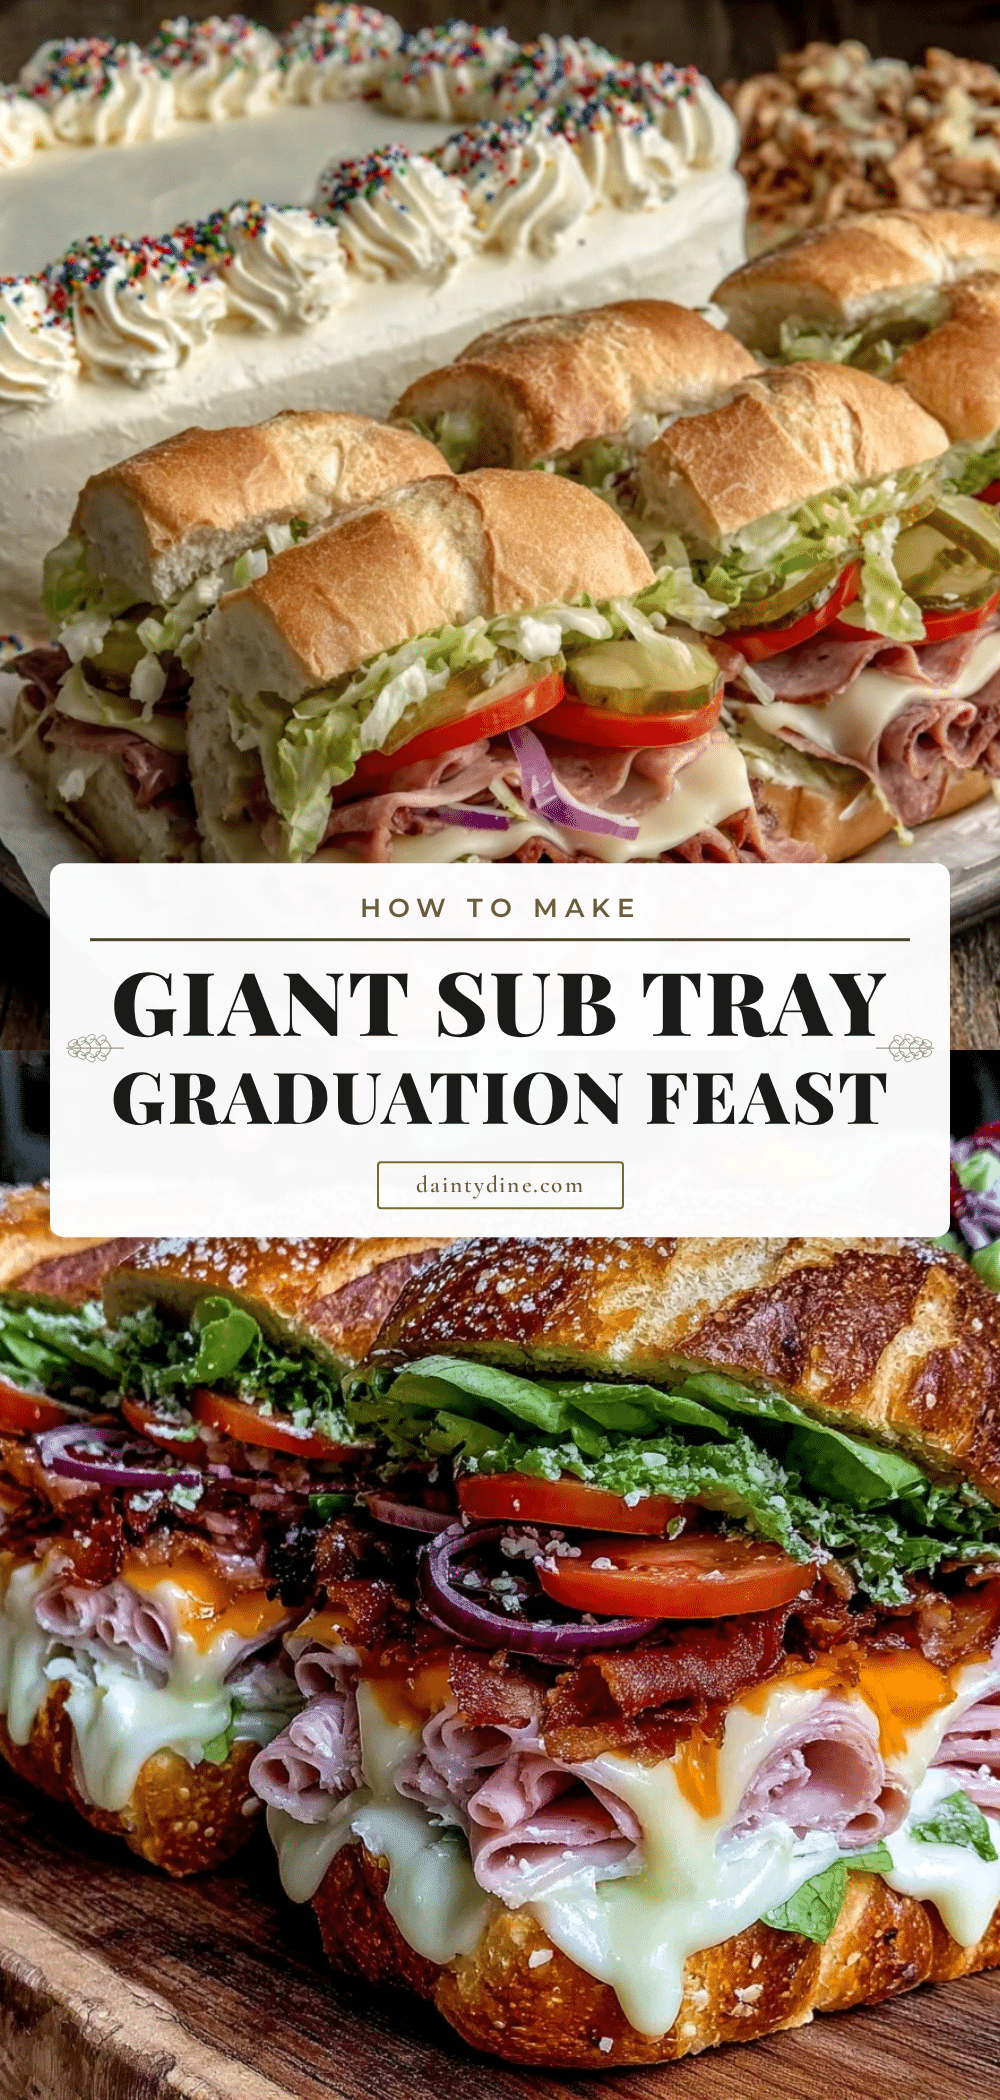
Graduation week rolled around last year, and suddenly my calendar was jam-packed with last-minute celebrations, school events, and all the chaos that comes with the season. One evening, I found myself staring at the clock at 5:30 pm, knowing I had exactly 30 minutes to get dinner on the table before guests arrived for a little graduation party at home. That’s when I had a lightbulb moment: why not whip up a giant sub tray? It’s quick, feeds a crowd, and honestly, who doesn’t love a good sub sandwich piled high with all the fixings?
I’ve made this Giant Sub Tray Graduation Feast recipe more times than I can count since then, especially on those busy weeknights where time is scarce but the appetite is big. It’s perfect for celebrations or just when you want something hearty and fuss-free. Plus, it’s customizable, so you can cater it to your crowd’s favorite flavors. The best part? It’s really just assembly—no fancy cooking skills required, and you can prep most of it ahead of time.
It’s become my go-to for feeding a bunch of hungry people without stress, and I’m excited to share exactly how to pull it off, so you can enjoy more time celebrating and less time in the kitchen. Oh, and if you like speedy, crowd-friendly meals, you might also appreciate my quick rotisserie chicken Caesar wrap or the easy lemon chicken orzo soup for other busy night wins.
Why This Recipe Works
This giant sub tray feast has completely changed how I handle feeding a crowd with minimal hassle. Here’s why I reach for it again and again:
- Feeds a crowd with zero stress — No ovens, no fancy cooking, just simple assembly. I’ve hosted graduation parties, family dinners, and casual get-togethers where this was the star, and everyone’s happy.
- Customizable for any taste — Whether your crowd loves classic Italian subs or prefers turkey and avocado, this tray lets you mix and match. I’ve even done vegetarian versions that don’t feel like an afterthought.
- Perfect for busy weeknights — This isn’t just a party trick. On hectic evenings when I’m juggling work, homework, and activities, this tray comes together in under 30 minutes—and leftovers disappear fast.
- Visual wow factor — It looks impressive. Layered with colorful veggies, meats, and cheeses, it’s like a sandwich party on a platter. Guests always ask for the recipe.
- Great for meal prep — You can prep the ingredients a day ahead, cover tightly, and assemble just before serving. Saves time and keeps the bread fresh.
All in all, this tray hits the sweet spot between easy, delicious, and crowd-pleasing. It’s my secret weapon whenever I want to impress without the stress.
Ingredients Breakdown
Here’s what you’ll need for the giant sub tray. Most of these are pantry staples or easy to find at your local deli.
For the Bread Base:
- Sub rolls or hoagie buns (about 6-8, depending on size) — I like soft yet sturdy rolls that hold up to layers of fillings. Avoid super crusty bread unless you want a jaw workout.
- Butter (optional, for toasting) — Lightly buttering and toasting the rolls adds a golden crunch and keeps the bread from getting soggy too fast.
For the Meats:

- Assorted deli meats
For the Cheeses:
- Provolone and cheddar slices (about 12 slices each) — Provolone melts beautifully if you toast the tray, and cheddar adds a sharp bite. You can also mix in mozzarella or Swiss.
For the Veggies & Extras:
- Lettuce (shredded iceberg or romaine) — Adds crunch and freshness. I shred it finely so it layers nicely without overwhelming the sandwich.
- Tomatoes (2 medium, thinly sliced) — Choose ripe but firm tomatoes to avoid sogginess.
- Red onion (thinly sliced) — Adds a nice bite without being overpowering.
- Pickles or banana peppers (sliced) — Optional, but they bring zest and tang.
- Mayonnaise, mustard, Italian dressing — These add moisture and flavor. Italian dressing is my go-to for that classic sub vibe.
- Salt and pepper — Simple seasoning to bring everything together.
Pro Tips:
- If you want to save time, pick up pre-shredded lettuce and pre-sliced veggies at the store.
- Try to get the freshest deli meats — the flavor difference is worth it.
- Don’t skip the Italian dressing—it adds moisture and a little tang that ties the flavors together perfectly.
- For a little extra zing, sprinkle some dried oregano or crushed red pepper flakes over the assembled tray.
Equipment You’ll Need
You don’t need fancy gear for this feast. Here’s what I actually use:
- Large rimmed baking sheet or serving tray — Big enough to hold all the sub rolls lined up. I use a half-sheet pan because it fits perfectly on my kitchen counter and table.
- Sharp knife — For slicing rolls and veggies. A serrated bread knife is ideal for clean cuts without squishing the bread.
- Cutting board — For safe slicing.
- Small bowls or ramekins — To hold your dressings and condiments for easy spreading.
- Spreader or butter knife — For applying mayo, mustard, or dressing evenly.
If you want to toast the assembled tray (which I highly recommend for a melty finish), you’ll also need:
- Oven or broiler — Just a few minutes under the broiler to melt the cheese and crisp the bread edges.
Step-by-Step Instructions
- Prep the rolls (5 minutes): Slice each sub roll lengthwise but don’t cut all the way through, so they open like a book. If you want, spread a thin layer of softened butter inside and toast them cut-side up in a 350°F (175°C) oven for 5 minutes until lightly golden. This helps prevent sogginess.
- Arrange the rolls on your tray (2 minutes): Line up the toasted (or untoasted) rolls snugly on your baking sheet or tray, leaving just a tiny gap so you can layer toppings evenly.
- Layer the meats (5 minutes): Start with your deli meats—layer turkey, ham, salami, or whatever combo you prefer. Aim for about 3-4 slices per roll, overlapping slightly so every bite gets meat.
- Add the cheeses (2 minutes): Place slices of provolone and cheddar evenly over the meats. If you plan to toast the tray, this will melt beautifully.
- Spread the dressings and condiments (3 minutes): Drizzle Italian dressing over the cheese layers, then add dollops of mayonnaise or mustard where you like. Use a spoon or spatula to spread lightly but evenly.
- Add the veggies (5 minutes): Sprinkle shredded lettuce, lay down thin tomato slices, red onion rings, and any pickles or banana peppers you’re using. Season lightly with salt and pepper.
- Final touch and optional broil (3-5 minutes): If you want melted cheese and crispy edges, pop the tray under the broiler on low for 3-5 minutes. Watch closely to avoid burning. This step is optional but highly recommended.
- Slice and serve (5 minutes): Use a sharp serrated knife to slice each sub crosswise into 2-3 servings. Arrange on a platter or serve straight from the tray.
Total active time: about 25 minutes, plus optional broil time.
Expert Tips & Troubleshooting
Here’s everything I learned from making this giant sub tray feast over and over—these tips will save you headaches and make your tray look and taste like a pro made it.
- Don’t skimp on the bread quality — I’ve tried everything from soft sandwich rolls to crusty baguettes. The soft sub rolls that hold up to layers without falling apart work best. The first time I tried crusty bread, it crumbled everywhere. Lesson learned.
- Toast the rolls before layering — This is a game-changer. It adds flavor and prevents sogginess. I learned this the hard way after serving a soggy sub tray once—never again!
- Layer thoughtfully — Spread dressings evenly but not too thick. Too much moisture at once can make the bread soggy fast.
- Prep ingredients the day before — Slice meats and veggies in advance and store tightly covered. Saves time and stress on the day of your event.
- Broiling is optional but recommended — If you want melted cheese and crispy edges, keep a close eye on the tray under the broiler. It can go from perfect to burnt in seconds!
- Use a serrated knife for slicing — This keeps the subs intact and prevents squishing.
- Watch out for soggy tomatoes — Use firm tomatoes and slice them thinly. Pat slices dry with a paper towel if they’re juicy.
Variations & Substitutions
Once you’ve nailed the classic giant sub tray, it’s fun to mix things up. I’ve tested these variations and they all work great:
- Vegetarian version: Swap deli meats for layers of grilled veggies (zucchini, bell peppers, mushrooms) and add slices of fresh mozzarella. Use pesto instead of Italian dressing for an herby twist.
- Spicy Italian: Add sliced pepperoni, salami, and banana peppers. Use spicy Italian dressing and top with crushed red pepper flakes.
- Turkey avocado: Use turkey breast, ripe avocado slices, crisp bacon, and a smear of chipotle mayo for a smoky kick.
- Greek-inspired: Layer with roasted red peppers, kalamata olives, cucumber slices, feta cheese, and tzatziki sauce instead of Italian dressing.
- Gluten-free: Use gluten-free sub rolls or sandwich thins. The assembly and layering stay the same.
And if you want a lighter side to go with your sub tray, try the fresh smashed cucumber avocado salad—it’s refreshing and super quick to make.
Serving & Storage
This giant sub tray is best served fresh, but here’s how to manage leftovers and prep:
- Serving: I like to serve it straight from the tray for casual gatherings. Guests can help themselves to slices. For a more polished look, transfer slices to a large platter and garnish with fresh herbs or extra pickles on the side.
- Storage: If you have leftovers (rare in my house), wrap individual slices tightly in plastic wrap and store in the fridge for up to 2 days. The bread will soften, so I recommend toasting or warming slices before eating.
- Make-ahead: Prep all the fillings and slice the rolls a day ahead. Keep everything refrigerated and assemble just before serving to keep the bread fresh.
Nutrition Information
I’m not a nutritionist, but here’s a rough breakdown per serving (assuming 12 servings from the tray):
| Nutrient | Amount |
|---|---|
| Calories | 320 |
| Protein | 18g |
| Total Carbs | 30g |
| Dietary Fiber | 3g |
| Sugars | 4g |
| Total Fat | 15g |
| Saturated Fat | 6g |
| Sodium | 700mg |
This giant sub tray provides a solid balance of protein and carbs, which makes it filling and satisfying. You can always adjust the bread or cheese to lighten it up or bulk it with extra veggies for more fiber.
Final Thoughts
So that’s the Giant Sub Tray Graduation Feast—simple, crowd-pleasing, and perfect for those busy weeknights when you want to feed a bunch without the fuss. It’s become my secret weapon for celebrations and busy evenings alike. I love how easy it is to customize and how little time it takes to pull together.
Whether you’re hosting a graduation party or just want an easy dinner that feels special, this tray has your back. Give it a try, and play around with the toppings to make it your own. And if you do, I’d love to hear how it went—drop a comment below or share your favorite twist.
Happy feasting! Your kitchen is about to smell amazing.
FAQs
Can I make the giant sub tray ahead of time?
Absolutely! I prep all the sliced meats, cheeses, and veggies the day before and keep them refrigerated in airtight containers. I only assemble the sub tray a couple of hours before serving to keep the bread from getting soggy. If you want to save even more time, toast the rolls ahead and wrap them tightly.
What if I don’t have a big baking sheet or tray?
No worries! You can line up the sub rolls on a large cutting board or even a clean countertop lined with parchment paper. Just make sure you have enough room to layer everything comfortably. You can also use two smaller trays if needed.
Can I use different breads like baguettes or wraps?
You can, but soft sub rolls or hoagie buns work best to hold all the fillings without falling apart. Baguettes tend to be crustier and can crumble, while wraps don’t give you that classic sub feel. But if you want to get creative, go for it!
How do I keep the sub tray from getting soggy?
Toasting the rolls lightly before assembling is key. Also, don’t overload the tray with wet ingredients like tomatoes—slice them thin and pat dry if juicy. Finally, spread condiments thinly and assemble as close to serving time as possible.
Can I make this vegetarian or vegan?
Yes! For vegetarian, swap deli meats for grilled veggies, fresh mozzarella, or plant-based deli slices. For vegan, use vegan cheeses and dressings and load it up with hearty veggies. Just be mindful that bread and some dressings may contain dairy or eggs, so check labels.
How long will leftovers keep?
Leftover assembled subs can be wrapped tightly and refrigerated for up to 2 days. Bread may soften, so I recommend warming slices in a toaster oven or under a broiler before eating.
What sides go well with a giant sub tray?
I love pairing this tray with fresh, easy sides like the smashed cucumber avocado salad or a simple pasta salad. It balances the hearty subs perfectly and keeps the meal refreshing.
Pin This Recipe!
Giant Sub Tray Graduation Feast

A quick, customizable giant sub tray perfect for feeding a crowd on busy weeknights or celebrations. Easy assembly with no fancy cooking required.
- Prep Time: 15 minutes
- Cook Time: 5 minutes (plus optional 3-5 minutes broil)
- Total Time: 25-30 minutes
- Yield: 12 servings 1x
- Category: Main Course
- Cuisine: American
Ingredients
- 6–8 sub rolls or hoagie buns (soft yet sturdy)
- Butter (optional, for toasting)
- 1–2 pounds assorted deli meats (turkey, ham, salami, pepperoni, or other favorites)
- 12 slices provolone cheese
- 12 slices cheddar cheese
- Shredded lettuce (iceberg or romaine)
- 2 medium tomatoes, thinly sliced
- Thinly sliced red onion
- Pickles or banana peppers, sliced (optional)
- Mayonnaise
- Mustard
- Italian dressing
- Salt and pepper
Instructions
- Slice each sub roll lengthwise without cutting all the way through to open like a book. Optionally spread softened butter inside and toast cut-side up in a 350°F oven for 5 minutes until lightly golden.
- Line up the toasted or untoasted rolls snugly on a large rimmed baking sheet or serving tray, leaving a tiny gap between rolls.
- Layer deli meats evenly on each roll, about 3-4 slices per roll, overlapping slightly.
- Place slices of provolone and cheddar cheese evenly over the meats.
- Drizzle Italian dressing over the cheese layers, then add dollops of mayonnaise or mustard and spread lightly but evenly.
- Add shredded lettuce, thin tomato slices, red onion rings, and any pickles or banana peppers. Season lightly with salt and pepper.
- Optional: Broil the assembled tray on low for 3-5 minutes to melt cheese and crisp bread edges. Watch closely to avoid burning.
- Use a sharp serrated knife to slice each sub crosswise into 2-3 servings. Arrange on a platter or serve straight from the tray.
Notes
[‘Use soft sub rolls that hold up to layers without falling apart.’, ‘Toasting rolls before layering prevents sogginess and adds flavor.’, ‘Spread dressings thinly to avoid soggy bread.’, ‘Prep ingredients a day ahead and assemble just before serving to keep bread fresh.’, ‘Watch broiler carefully to avoid burning cheese.’, ‘Use a serrated knife for clean slicing without squishing subs.’, ‘Use firm tomatoes and slice thinly; pat dry if juicy.’, ‘Variations include vegetarian, spicy Italian, turkey avocado, Greek-inspired, and gluten-free versions.’]
Nutrition
- Serving Size: 1 serving (1/12th of
- Calories: 320
- Sugar: 4
- Sodium: 700
- Fat: 15
- Saturated Fat: 6
- Carbohydrates: 30
- Fiber: 3
- Protein: 18
Keywords: giant sub tray, sub sandwich, party food, easy dinner, crowd-pleaser, deli meats, quick recipe, graduation feast