Love this? Save it for later!
Share the inspiration with your friends
Introduction
“I wasn’t planning on hosting anything fancy for my cousin Mark’s graduation party. Honestly, between work and last-minute errands, I thought I’d just grab some chips and dip. But then, as I was unpacking groceries on a sunny Saturday afternoon, my phone buzzed with a text: ‘Can you bring snacks? Something easy, please!’
Well, you know that feeling when you want to impress but have zero time? That’s when I stumbled upon this easy 15-minute no-cook graduation charcuterie board idea. The best part? No oven, no stove—just a few simple ingredients, a bit of creativity, and bam! A spread that looked like I’d spent hours on it.
Let me tell you, this isn’t your typical “throw some crackers on a plate” kind of board. There was a little chaos (I forgot the cheese knife, and the dog decided to “help” by stealing a grape), but it turned out to be the star of the party. Maybe you’ve been there—last-minute hosting panic mode—and this recipe is exactly the kind of lifesaver you’ll want in your back pocket.
So, let’s get into how you can put together this easy 15-minute no-cook graduation charcuterie board that’s perfect for party snacks, celebrations, or just a fun night with friends.
Why You’ll Love This Recipe
When I first tried this quick no-cook charcuterie board, I was amazed at how simple it was to pull off and how much everyone loved it. Over multiple gatherings, I’ve tweaked and tested it to balance ease and wow-factor perfectly. Here’s why this recipe stands out:
- Quick & Easy: Ready in under 15 minutes—perfect for busy hosts juggling a million things.
- Simple Ingredients: No need for specialty shops. Most items are pantry and grocery store staples.
- Perfect for Graduation Parties: It’s festive, colorful, and snackable—ideal for mingling guests of all ages.
- Crowd-Pleaser: Combines sweet, salty, creamy, and crunchy elements to satisfy diverse palates.
- Unbelievably Delicious: The combo of fresh fruit, quality meats, and sharp cheeses hits all the right notes.
What really makes this recipe different is the no-cook approach—no stress about ovens or stovetops. Plus, I’ve included a few tricks I picked up from my time working with catering pros to make assembly smooth and presentation stunning. Honestly, it’s like comfort food, but chic and effortless.
Whether you’re aiming to impress guests or just want an easy snack spread, this board has you covered. Trust me, it’s the kind of party snack that makes people close their eyes and smile after the first bite.
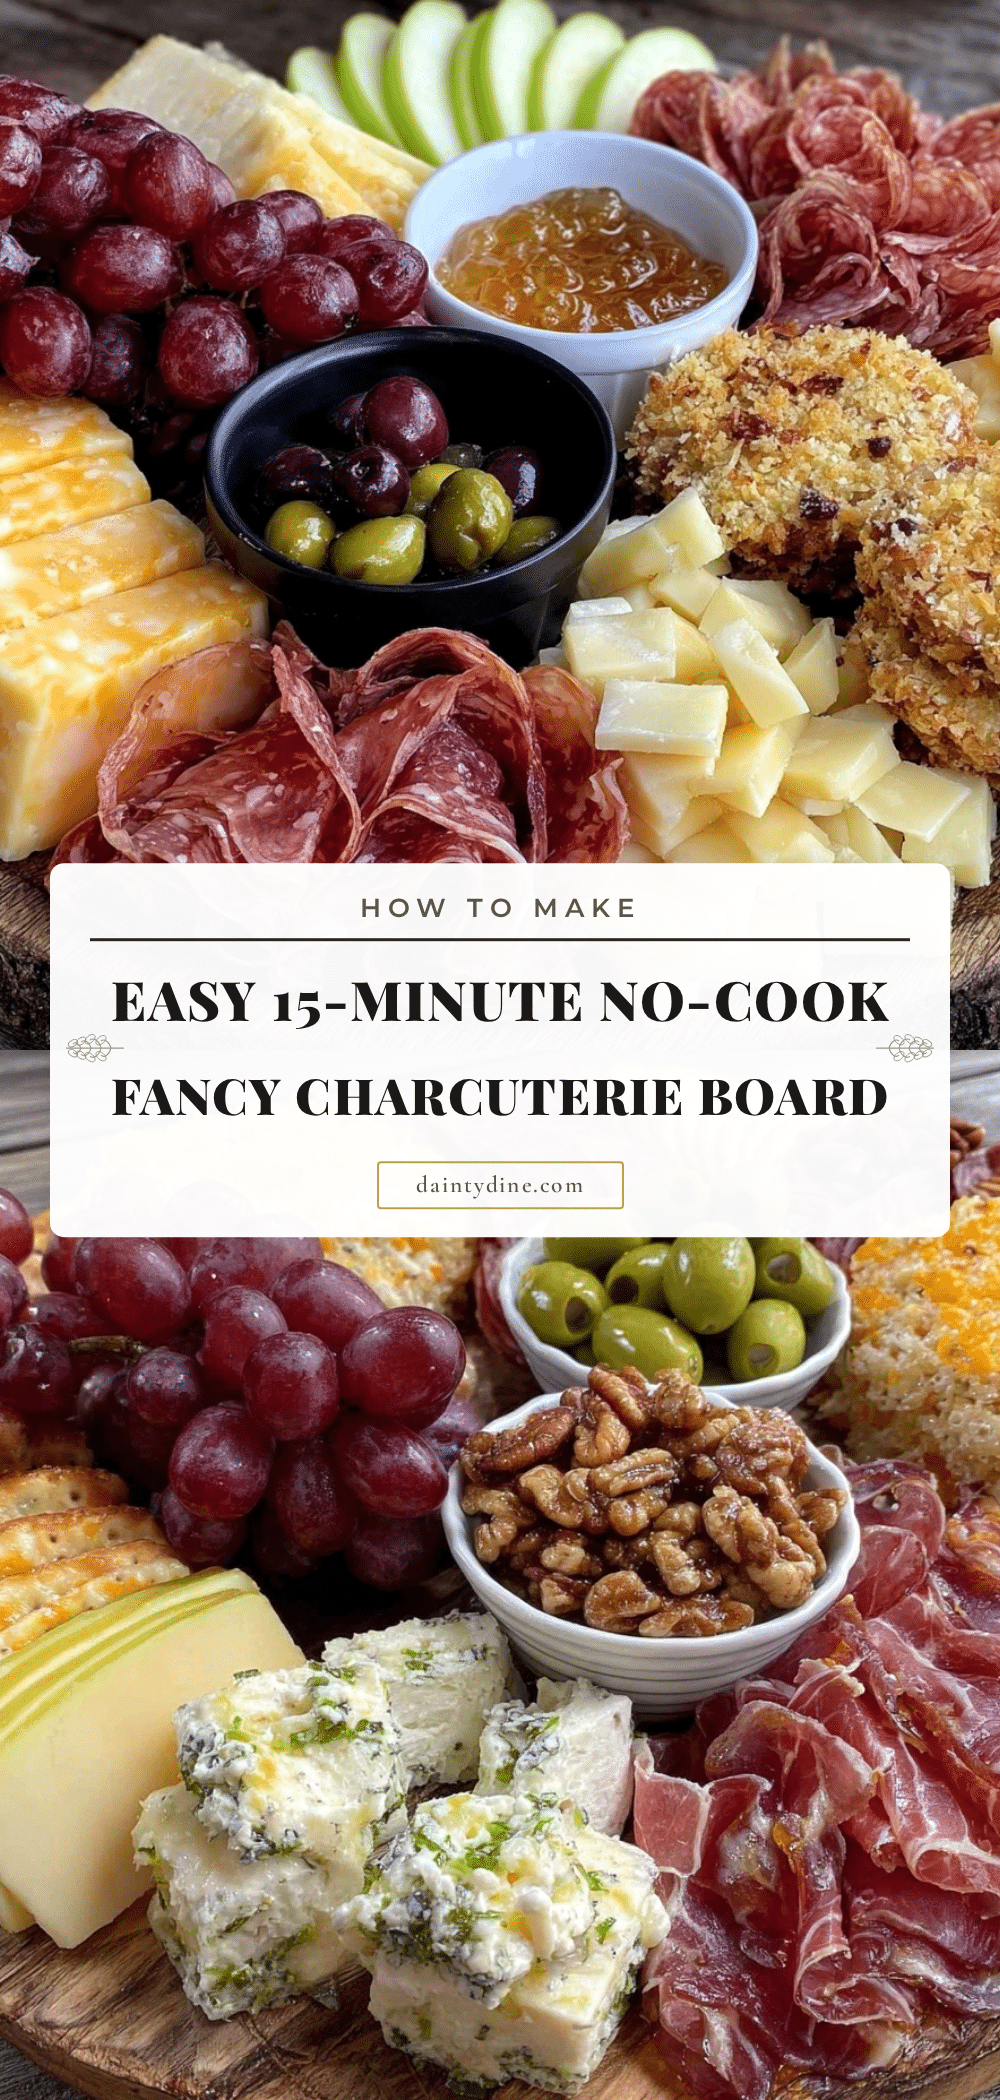
What Ingredients You Will Need
This easy 15-minute no-cook graduation charcuterie board calls for simple, wholesome ingredients that come together to create a balanced, satisfying snack platter. Most are easy to find and can be swapped based on your preferences or what’s in season.
- Cured Meats: Thinly sliced prosciutto, salami, or pepperoni. (I love using Boar’s Head for its texture and flavor.)
- Cheeses: A mix of soft and hard cheeses like creamy Brie, sharp aged cheddar, and tangy goat cheese. (Try to pick cheeses that don’t require slicing—pre-cut wedges or rounds work great.)
- Fresh Fruit: Grapes (red or green), sliced apples or pears, and berries. (In summer, swap in fresh peaches or plums.)
- Dried Fruit: Apricots, figs, or dates add sweetness and chew.
- Nuts: Toasted almonds, walnuts, or pecans for crunch. (Roasted and lightly salted varieties add extra flavor.)
- Crackers & Bread: A variety of crackers (multigrain, water crackers) and sliced baguette or breadsticks.
- Spreads & Extras: Honey, fig jam, or grainy mustard for drizzling or dipping.
- Olives & Pickles: Kalamata olives or cornichons add a salty kick.
Feel free to customize based on what’s local or what you love. For a dairy-free option, swap cheeses with hummus or avocado slices. For gluten-free, choose crackers labeled gluten-free or replace with veggie sticks like cucumber or bell pepper strips.
Equipment Needed

You don’t need much to make this easy 15-minute no-cook graduation charcuterie board—just a few basic kitchen tools:
- Large Serving Board or Platter: Wooden, marble, or slate boards work beautifully. If you don’t have one, a large plate or tray will do.
- Cheese Knife or Small Paring Knife: For slicing any cheese or fruit if needed. If you forgot a cheese knife like I did once, just use a butter knife carefully.
- Small Bowls: To hold olives, nuts, or spreads so everything doesn’t roll around.
- Cutting Board: For prepping fruits, meats, or cheeses.
- Serving Utensils: Small spoons or spreaders for jams and honey.
If you want to be fancy, a pair of small tongs can help guests pick up items without touching the whole board, but it’s totally optional. I’ve put together this board on everything from picnic tables to my living room coffee table, and it works everywhere.
Preparation Method
- Gather All Ingredients: Lay everything out on your kitchen counter so you can see what you have. This makes assembly smoother and ensures nothing gets forgotten. (Time: 2 minutes)
- Prepare the Board: Clean your serving board or platter and start by placing small bowls for olives, nuts, and spreads strategically around the edges. This anchors the setup. (Time: 1 minute)
- Arrange the Meats: Fold or roll slices of prosciutto and salami into loose bundles or rolls. Scatter them in small clusters around the board to create visual interest. (Time: 3 minutes)
- Place the Cheeses: Position cheese wedges and rounds with some space around each. If any cheese needs slicing, cut into bite-sized pieces. (Time: 3 minutes)
- Add Fresh and Dried Fruit: Place grapes in small bunches, arrange sliced apples or pears in fanned-out layers, and tuck dried fruit between cheeses and meats. (Time: 3 minutes)
- Scatter Nuts and Crackers: Fill in gaps with toasted nuts and arrange crackers and slices of baguette along the edges or in small stacks. (Time: 2 minutes)
- Drizzle and Garnish: Spoon small dollops of fig jam or honey onto the board or into bowls. Add olives and pickles last for a pop of color and salty bite. (Time: 1 minute)
- Final Touches: Step back and adjust any items for balance and color contrast. Sometimes adding a sprig of fresh herbs (like rosemary or thyme) adds a nice touch.
Pro tip: If you’re feeling fancy, slice the baguette on a diagonal for a more elegant look. Also, don’t be afraid of uneven spacing—it adds a natural, inviting vibe. I once had a guest comment on how “invitingly casual” my board looked, and I think that’s the magic here.
Cooking Tips & Techniques
Even though this is a no-cook recipe, there are a few tricks I’ve learned over the years that make it shine:
- Balance Flavors and Textures: Mix soft cheeses with crunchy crackers and sweet fruit with salty meats to keep every bite interesting.
- Temperature Matters: Take cheeses and meats out of the fridge about 15 minutes before serving. Cold cheese can mute flavors, and room temperature lets them shine.
- Use Odd Numbers: When grouping items, use odd numbers (3, 5, 7) for a more visually appealing board.
- Don’t Overcrowd: Leave a little breathing room on the board. It makes it easier for guests to pick and looks cleaner.
- Keep It Fresh: If prepping a few hours ahead, cover the board loosely with plastic wrap and refrigerate. Add delicate items like crackers just before serving to avoid sogginess.
One time, I tried arranging everything all in neat rows—total fail! It looked too stiff. Now, I aim for a natural, organic layout that invites people to dig in.
Variations & Adaptations
This easy 15-minute no-cook graduation charcuterie board is super flexible, so here are some ideas to tailor it:
- Vegetarian Version: Skip the meats and add extra nuts, roasted chickpeas, or marinated artichokes for protein and texture.
- Seasonal Twist: In fall, swap fresh fruit for sliced pears and figs; in winter, add pomegranate seeds for a pop of color.
- Flavor Boost: Add spicy elements like pepper jack cheese or pickled jalapeños for a little heat.
- Allergen-Friendly: Use gluten-free crackers and dairy-free cheese alternatives like cashew-based spreads.
- Personal Favorite: I love adding a small bowl of dark chocolate chunks for a sweet surprise—guests always ask for it!
Serving & Storage Suggestions
Serve your charcuterie board at room temperature to highlight the flavors and texture contrasts. Arrange it on a sturdy table or counter where guests can easily access everything.
Complement this board with sparkling water, a light white wine like Sauvignon Blanc, or even a refreshing iced tea for a non-alcoholic option. If you want to make it a full meal, pair with a fresh green salad or crispy garlic chicken for heartier fare.
Leftovers can be stored in airtight containers in the refrigerator for up to 2 days. I recommend keeping crackers separate to avoid sogginess. To reheat, just bring cheeses and meats back to room temperature and serve fresh crackers.
Flavors often develop and meld slightly after resting, so if you prepare it a few hours ahead, it might taste even better!
Nutritional Information & Benefits
This no-cook charcuterie board balances protein, healthy fats, fiber, and natural sugars for a satisfying snack that doesn’t feel heavy. Here’s a rough estimate per serving (about 1/6 of the board):
| Nutrient | Amount |
|---|---|
| Calories | 280-320 kcal |
| Protein | 12-15 g |
| Fat | 20-22 g |
| Carbohydrates | 15-18 g |
| Fiber | 3-5 g |
The nuts provide heart-healthy fats, while fresh fruits add antioxidants and fiber. Choosing quality meats and cheeses ensures you get a good dose of protein and calcium. Just be mindful of portion sizes if you’re watching sodium intake, as cured meats can be salty.
Conclusion
This easy 15-minute no-cook graduation charcuterie board is proof that impressive party snacks don’t have to be complicated or time-consuming. It’s flexible, delicious, and perfect for celebrations or casual get-togethers. I love it because it brings people together around simple, tasty bites without the stress.
Feel free to tweak the ingredients to fit your tastes or what you have on hand—this board is as much about creativity as it is convenience. If you try it, I’d love to hear how you make it your own! Leave a comment below or share your favorite additions so everyone can get inspired.
Here’s to stress-free hosting and happy snacking!
FAQs
Can I prepare the board ahead of time?
Yes! Assemble most items a few hours before your event, cover loosely with plastic wrap, and refrigerate. Add crackers and delicate items just before serving to keep them fresh.
What if I don’t like cured meats?
You can easily omit meats and add more nuts, fresh veggies, or dips like hummus to keep the board interesting and filling.
How do I keep the fruit from browning?
Brush sliced apples or pears with a little lemon juice to prevent browning if you prepare them in advance.
Are there vegan options for this recipe?
Absolutely! Use plant-based cheese alternatives, add roasted nuts, fresh veggies, and flavorful dips like guacamole or baba ganoush.
What are good drink pairings for this charcuterie board?
Light white wines, sparkling water with citrus, iced tea, or even a crisp rosé complement the flavors nicely without overpowering the snacks.
Pin This Recipe!
Easy 15-Minute No-Cook Graduation Charcuterie Board Ideas for Perfect Party Snacks

A quick and easy no-cook charcuterie board perfect for graduation parties or any celebration, featuring a balanced mix of meats, cheeses, fruits, nuts, and crackers assembled in just 15 minutes.
- Prep Time: 10 minutes
- Cook Time: 0 minutes
- Total Time: 15 minutes
- Yield: 6 servings
- Category: Appetizer
- Cuisine: American
Ingredients
- Thinly sliced prosciutto, salami, or pepperoni
- Soft and hard cheeses like creamy Brie, sharp aged cheddar, and tangy goat cheese (pre-cut wedges or rounds preferred)
- Fresh fruit: grapes (red or green), sliced apples or pears, berries (summer options: peaches or plums)
- Dried fruit: apricots, figs, or dates
- Toasted almonds, walnuts, or pecans (roasted and lightly salted preferred)
- Variety of crackers (multigrain, water crackers) and sliced baguette or breadsticks
- Honey, fig jam, or grainy mustard for drizzling or dipping
- Kalamata olives or cornichons
Instructions
- Gather all ingredients and lay them out on your kitchen counter for easy assembly (about 2 minutes).
- Clean your serving board or platter and place small bowls for olives, nuts, and spreads around the edges (about 1 minute).
- Fold or roll slices of prosciutto and salami into loose bundles or rolls and scatter them in small clusters around the board (about 3 minutes).
- Position cheese wedges and rounds with some space around each; slice any cheese if needed into bite-sized pieces (about 3 minutes).
- Place fresh fruit like grapes in small bunches, arrange sliced apples or pears in fanned layers, and tuck dried fruit between cheeses and meats (about 3 minutes).
- Fill gaps with toasted nuts and arrange crackers and baguette slices along edges or in small stacks (about 2 minutes).
- Spoon small dollops of fig jam or honey onto the board or into bowls; add olives and pickles last for color and salty bite (about 1 minute).
- Step back and adjust items for balance and color contrast; optionally add fresh herbs like rosemary or thyme for garnish.
Notes
Take cheeses and meats out of the fridge about 15 minutes before serving to enhance flavors. Use odd numbers of items for visual appeal. Avoid overcrowding the board for easier picking. Cover loosely with plastic wrap and refrigerate if prepping hours ahead; add crackers just before serving to avoid sogginess. Slice baguette on a diagonal for an elegant look. For dairy-free, substitute cheeses with hummus or avocado slices. For gluten-free, use gluten-free crackers or veggie sticks.
Nutrition
- Serving Size: About 1/6 of the boa
- Calories: 280320
- Fat: 2022
- Carbohydrates: 1518
- Fiber: 35
- Protein: 1215
Keywords: charcuterie board, no-cook, party snacks, graduation party, easy appetizer, quick snack, cheese board, meat platter