Love this? Save it for later!
Share the inspiration with your friends
I was standing in the frozen food aisle last November, staring at a can of cream of mushroom soup, when the smell hit me. Not from the can, thank goodness—but from somewhere deep in my memory. It was the smell of my neighbor Mrs. Kowalski’s kitchen, circa 1997, a mix of fried onions and butter and something savory baking in the oven. I was maybe nine years old, standing on my tiptoes at her counter, watching her dump a can of soup into a bowl like it was a secret ingredient. And honestly? It tasted amazing back then. But standing there in that chilly aisle, I realized I couldn’t buy that can. Not anymore. I wanted the memory—the creamy, salty, onion-y goodness—but I wanted it to taste like real food. Like the green beans my aunt grew in her garden. Like actual mushrooms. Like shallots that sizzle and crisp up in a pan. So I walked out empty-handed and drove straight to the farmer’s market. This recipe is what came out of that afternoon—a green bean casserole that tastes like the one you remember, but better. No cans. No shortcuts that leave you wondering what you just ate. Just real ingredients doing what they do best. Maybe you’ve been there too, standing in a store, trying to decide if convenience is worth the compromise. Let me tell you—this version is worth the extra ten minutes.
Why You’ll Love This Recipe
Let’s be honest—most green bean casseroles are a nostalgic mess. They’re creamy, sure, but they’re also loaded with processed stuff that leaves you feeling heavy. This one is different. I’ve tested it about seven times (my family is officially tired of green beans), and I can tell you with confidence: this is the version that works for real life.
- Quick & Easy: This comes together in about 35 minutes, start to finish. No babysitting a roux for twenty minutes. No complicated steps that require three hands.
- Simple Ingredients: You probably have most of this in your kitchen right now. Fresh green beans, mushrooms, cream, butter, shallots. That’s it. No cans, no mystery ingredients with names you can’t pronounce.
- Perfect for Weeknights & Holidays: I’ve made this on a random Tuesday when I needed comfort food fast, and I’ve served it at Thanksgiving when my mother-in-law was watching. It works for both.
- Crowd-Pleaser: My kids eat this. My picky neighbor ate three servings. Even my dad, who swears by the canned version, admitted it was “pretty good.” That’s basically a standing ovation from him.
- Unbelievably Delicious: The crispy shallots on top? They’re not just garnish. They’re the whole point. Crunchy, savory, slightly sweet—they make the dish feel special without being fussy.
What makes this recipe different is the technique. Instead of canned soup, you make a quick mushroom cream sauce that takes maybe eight minutes. Instead of those sad, soggy fried onions from a can, you crisp up fresh shallots in butter. It’s not fancy. It’s just better. And when you take that first bite—the creamy sauce, the tender beans, the crunch of shallots—you’ll close your eyes for a second. I promise.
What Ingredients You Will Need
This recipe uses simple, wholesome ingredients that come together to create something genuinely comforting. No canned soup, no pre-made fried onions—just real food that works hard for you.
For the Green Bean Casserole
- Fresh green beans, 1 pound (trimmed and cut into 2-inch pieces. I prefer thin haricots verts if I can find them—they cook faster and taste sweeter)
- Unsalted butter, 3 tablespoons (I use Kerrygold for the flavor, but any good butter works. Don’t substitute margarine here—it matters)
- Cremini mushrooms, 8 ounces (sliced thin. White mushrooms work too, but cremini have more earthy flavor. Look for firm, dry mushrooms with no slimy spots)
- Yellow onion, 1 medium (finely diced. About 1 cup. You could use a sweet onion if that’s what you have)
- Garlic, 3 cloves (minced. Fresh only—don’t use the jarred stuff here)
- All-purpose flour, 3 tablespoons (this thickens the sauce. For gluten-free, use a 1:1 gluten-free flour blend)
- Whole milk, 1 cup (2% works in a pinch, but whole milk gives you that velvety texture. For dairy-free, use unsweetened oat milk)
- Heavy cream, ½ cup (this is what makes it luxurious. Half-and-half works but won’t be as rich)
- Chicken or vegetable broth, ½ cup (low-sodium. I prefer Better Than Bouillon paste mixed with water—it has deeper flavor)
- Salt, 1 teaspoon (plus more for the blanching water)
- Black pepper, ½ teaspoon (freshly ground)
- Fresh thyme, 1 teaspoon (chopped. Or ½ teaspoon dried. Thyme and mushrooms are best friends)
- Nutmeg, ¼ teaspoon (freshly grated if you can. It sounds weird, but it brightens the whole dish)
For the Crispy Shallot Topping
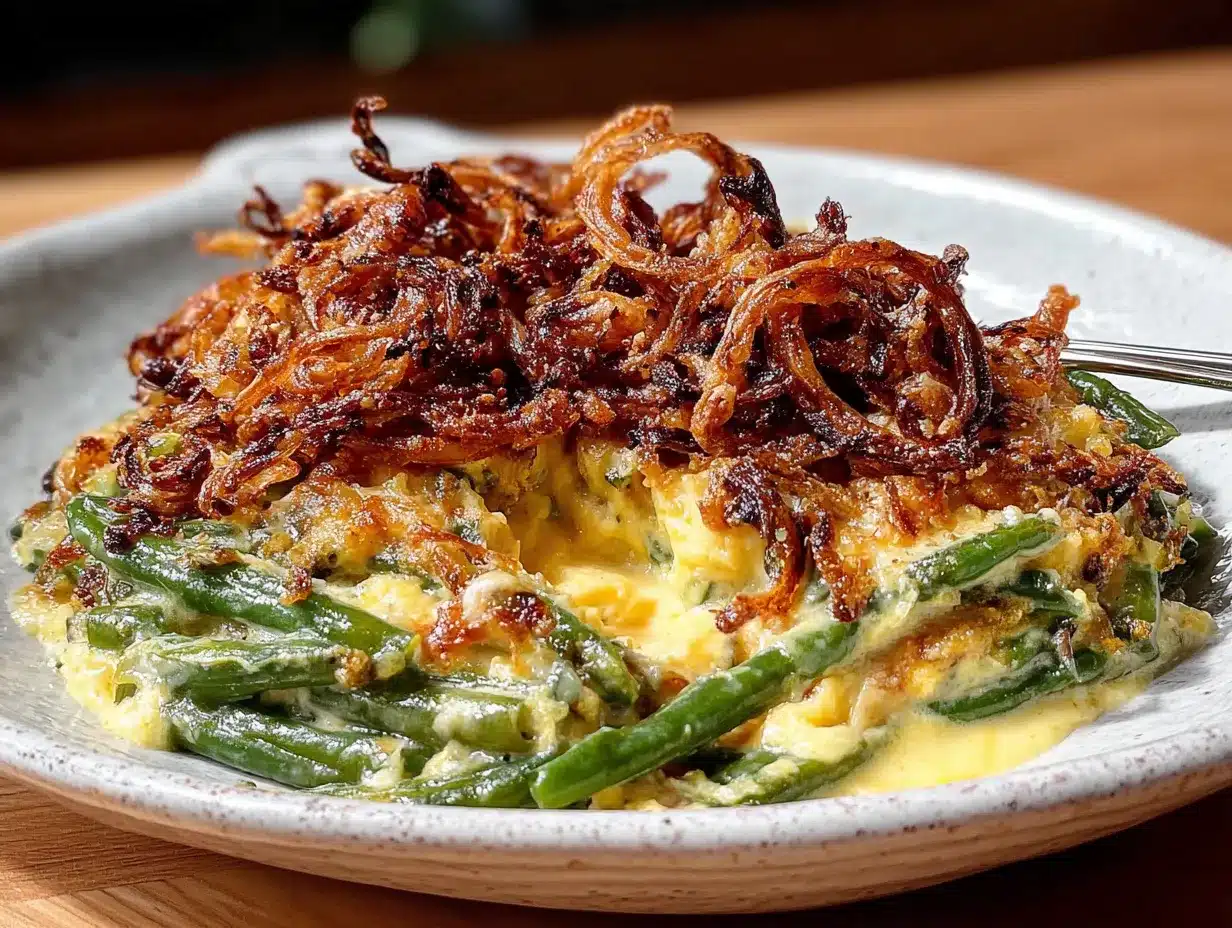
- Large shallots, 3 (thinly sliced into rings. About 1 cup. Look for firm, papery shallots with no green sprouts)
- Unsalted butter, 2 tablespoons
- Salt, ¼ teaspoon
- Fresh parsley, 2 tablespoons (chopped, for garnish—optional but pretty)
I recommend using fresh green beans here, not frozen. Frozen beans get mushy when baked, and you lose that nice snap. If you’re in a pinch, thawed frozen beans work, but blanch them for only 2 minutes instead of 3. And please—please—don’t use canned green beans. They’ve already been cooked to death, and they’ll turn into mush in the oven.
Equipment Needed
You don’t need a fancy kitchen for this recipe. Here’s what you’ll actually use:
- Large pot (for blanching the green beans. Any 4-quart pot works)
- Large skillet or sauté pan (for the mushroom sauce. A 12-inch skillet is ideal—you need room to stir)
- Small skillet (for the crispy shallots. Non-stick makes cleanup easier)
- 9×13-inch baking dish (or any 2-quart casserole dish. Glass or ceramic works best)
- Sharp chef’s knife (for trimming beans and slicing shallots. A dull knife makes shallots frustrating)
- Cutting board
- Measuring cups and spoons
- Wooden spoon or silicone spatula
- Slotted spoon (for removing beans from the blanching water)
- Bowl of ice water (for shocking the beans)
If you don’t have a 9×13 dish, use a 10-inch cast iron skillet instead. It goes from stovetop to oven beautifully, and honestly, it looks prettier for serving. I’ve also used a 2-quart round baking dish, and it worked fine—just watch the baking time since it’s deeper.
Preparation Method
Let’s get cooking. This moves fast once you start, so read through everything first. Trust me—I learned the hard way that scrambling for an ingredient while your shallots burn is not fun.
- Preheat your oven to 375°F (190°C). Get this going first so it’s ready when you are.
- Blanch the green beans. Fill your large pot with water and bring it to a boil. Add 1 tablespoon of salt (it should taste like the sea). Drop in the trimmed green beans and cook for exactly 3 minutes. They should turn bright green and be tender but still have a snap. While they cook, fill a large bowl with ice water. When the 3 minutes are up, use your slotted spoon to transfer the beans to the ice water. This stops the cooking and locks in that gorgeous green color. Let them sit for 2 minutes, then drain well. Pat them dry with a clean kitchen towel—wet beans make watery casserole.
- Make the crispy shallots. While the beans are blanching, heat your small skillet over medium heat. Add the 2 tablespoons of butter. When it’s melted and bubbly, add the sliced shallots in a single layer. Cook for 4-5 minutes, stirring occasionally, until they’re golden brown and crispy. They’ll shrink a lot—that’s normal. Sprinkle with ¼ teaspoon salt and transfer to a paper towel-lined plate. Set aside. Don’t crowd the pan—if your shallots are steaming instead of frying, do them in two batches.
- Cook the mushrooms. In your large skillet, melt 3 tablespoons of butter over medium-high heat. Add the sliced mushrooms in a single layer. Let them sit without stirring for 2 minutes—this gives them a nice golden sear. Then stir and cook for another 3-4 minutes until they’re browned and have released their liquid. You want that liquid to evaporate, not pool in the pan. If the pan looks watery, turn up the heat for a minute.
- Add the onion and garlic. Toss in the diced onion and cook for 3 minutes until softened. Add the minced garlic and cook for 30 seconds until fragrant. Your kitchen should smell amazing right now.
- Make the roux. Sprinkle the flour over the mushroom mixture. Stir constantly for 1-2 minutes. The flour will look pasty and clumpy—that’s fine. You’re cooking out the raw flour taste. Keep stirring until the mixture is golden and smells a bit nutty.
- Add the liquids. Slowly pour in the milk, heavy cream, and broth while stirring. Don’t dump it all in at once—add it in a slow stream, whisking constantly. This prevents lumps. Bring the sauce to a gentle simmer. It should thicken in about 2-3 minutes. You’re looking for a consistency like thick gravy—it should coat the back of a spoon.
- Season the sauce. Stir in 1 teaspoon salt, ½ teaspoon black pepper, the fresh thyme, and the nutmeg. Taste it. Adjust the salt if needed. This is your moment to get the seasoning right.
- Combine everything. Add the drained green beans to the skillet with the sauce. Stir gently until every bean is coated. The sauce should cling to the beans, not pool at the bottom. If it seems too thick, add a splash of milk.
- Transfer to the baking dish. Pour the green bean mixture into your prepared 9×13 dish. Spread it evenly. Sprinkle the crispy shallots over the top in an even layer.
- Bake. Place the dish in the preheated oven and bake for 15-18 minutes. You want it bubbly around the edges and the shallots to deepen in color. Don’t overbake—the beans should stay bright green, not turn army green.
- Rest and serve. Let the casserole sit for 5 minutes before serving. This lets the sauce set up a bit. Sprinkle with fresh parsley if you’re feeling fancy.
Cooking Tips & Techniques
I’ve made this casserole more times than I can count, and I’ve messed it up in almost every way possible. Here’s what I learned so you don’t have to.
Don’t skip the blanching step. I know it feels like an extra step, but it’s non-negotiable. Blanching sets the color, softens the beans just enough, and removes that raw, grassy taste. If you skip it, your beans will be crunchy in a bad way and the casserole will look gray. I learned this the hard way when I was rushing for a potluck and thought I could just throw raw beans in the sauce. Spoiler: I could not.
Watch your heat with the shallots. Shallots go from golden to burnt in about 30 seconds. Keep the heat at medium, not high. And don’t walk away—I’ve burned three batches of shallots while answering texts. They’re expensive, and it hurts to toss them. If they start browning too fast, pull the pan off the heat for a few seconds.
Season as you go. Don’t wait until the end to add all the salt. Season the mushrooms as they cook, season the sauce, taste the final mixture before it goes in the dish. Layers of seasoning make a difference. Underseasoned casserole is sad casserole.
Multitasking is your friend. While the beans blanch, slice your shallots. While the mushrooms cook, measure your milk and cream. While the sauce simmers, get your baking dish ready. This whole thing comes together in about 30 minutes if you stay organized. I like to prep all my ingredients before I turn on the stove—it makes the whole process feel calmer.
If your sauce is too thin, let it simmer a minute longer before adding the beans. If it’s too thick, add a splash of milk. You’re looking for the consistency of a creamy soup—not watery, not paste.
Variations & Adaptations
This recipe is flexible. Here are some ways to make it your own.
Make it vegetarian or vegan. Use vegetable broth instead of chicken broth. For a vegan version, substitute the butter with vegan butter (I like Miyoko’s) and use unsweetened oat milk and full-fat coconut cream instead of dairy. The crispy shallots can be cooked in olive oil instead of butter. I’ve tested this for a vegan friend, and honestly, it was still delicious—just slightly less rich.
Add protein. Toss in 1 cup of shredded rotisserie chicken or cooked bacon crumbles before baking. My husband loves the bacon version—I just cook 4 slices of bacon, crumble them, and stir them in with the beans. It makes it more of a main dish.
Switch up the mushrooms. Cremini are my go-to, but shiitake mushrooms add a meatier, more savory flavor. Just remove the stems first. Or try a mix of wild mushrooms if you’re feeling fancy. I did this for a dinner party once, and everyone asked for the recipe.
Make it ahead. Assemble the casserole completely (without the shallot topping) up to 2 days in advance. Cover and refrigerate. When you’re ready to bake, add the shallots and bake for 20-25 minutes, adding 5 extra minutes since it’s starting cold. This is a lifesaver for Thanksgiving.
Try a cheesy version. Stir in ½ cup of grated Gruyère or sharp white cheddar with the sauce. It melts beautifully and adds another layer of flavor. I do this when I want the casserole to feel extra indulgent.
Low-carb option. Skip the flour roux and thicken the sauce with 1 tablespoon of arrowroot powder mixed with 2 tablespoons of cold water. The texture will be slightly different—less creamy, more glossy—but it works.
Serving & Storage Suggestions
This casserole is best served warm, right out of the oven, when the shallots are still crispy and the sauce is bubbling. Let it rest for 5 minutes so it holds its shape on the plate. I like to serve it alongside a simple roast chicken or a juicy steak, but honestly, I’ve eaten it as a main dish with a side of crusty bread and been perfectly happy.
For a complete meal, pair it with:
- Roasted turkey or chicken
- Grilled pork chops
- Pan-seared salmon
- A simple green salad with lemon vinaigrette (to cut the richness)
Storage: Leftovers keep in an airtight container in the fridge for up to 4 days. The shallots will lose their crunch, but the flavor will still be great. To reheat, I recommend the oven at 350°F for 10-15 minutes, or the microwave in 30-second bursts. The microwave is faster, but the oven helps the texture stay better.
Freezing: You can freeze the unbaked casserole (without the shallot topping) for up to 3 months. Thaw overnight in the fridge, add fresh crispy shallots, and bake as directed. I don’t recommend freezing after baking—the texture gets watery and the beans turn mushy. I learned this when I tried to meal prep a double batch. Not my finest moment.
One thing I love about this recipe is that the flavors actually get better after a day in the fridge. The mushrooms and thyme meld together, and the sauce thickens beautifully. So if you have leftovers, consider it a bonus.
Nutritional Information & Benefits
Here’s the approximate nutritional breakdown per serving (based on 8 servings):
- Calories: 215
- Total Fat: 16g
- Saturated Fat: 10g
- Carbohydrates: 14g
- Fiber: 3g
- Sugar: 6g
- Protein: 5g
- Sodium: 480mg
Green beans are a solid source of vitamins A, C, and K, plus fiber that keeps you full. Mushrooms provide B vitamins and selenium, which supports your immune system. And shallots? They’re packed with antioxidants and compounds that may help with heart health. So while this isn’t exactly health food, it’s a lot more nutritious than the canned version. You’re getting real vegetables with real nutrients, not processed fillers.
For those watching their intake, this recipe is naturally gluten-free if you use a gluten-free flour blend. It’s also vegetarian as written. The main allergens are dairy (butter, milk, cream) and gluten (flour). If you’re dairy-sensitive, try the vegan adaptations above—they work surprisingly well.
I personally love that this casserole feels indulgent but isn’t loaded with weird additives. It’s comfort food that doesn’t make me feel gross afterward. That’s a win in my book.
Conclusion
This green bean casserole is the one I keep coming back to. It’s not because it’s fancy or complicated—it’s because it tastes like the memory I was chasing in that frozen food aisle, but better. Real cream instead of processed soup. Fresh shallots instead of canned onions. Actual mushrooms that you can see and taste. It’s the same comforting, creamy, crunchy dish you remember, but made with ingredients you can feel good about.
I hope you try it. I hope you make it for a weeknight dinner when you need something warm and satisfying, and I hope you bring it to your holiday table and watch people go back for seconds. And when you do, I’d love to hear about it. Leave a comment below and tell me how it turned out—did you add bacon? Did you try the vegan version? Did your picky eater actually eat the green beans? Share your wins, your tweaks, your happy accidents. That’s what makes cooking fun.
Now go preheat your oven. Your green bean casserole is waiting.
Frequently Asked Questions
Can I use frozen green beans instead of fresh?
You can, but I don’t recommend it. Frozen green beans have already been blanched, so they tend to get mushy when baked. If you’re in a pinch, thaw them first and skip the blanching step—just add them directly to the sauce. Reduce the baking time by 5 minutes so they don’t overcook.
Can I make this casserole ahead of time?
Absolutely. Assemble the casserole completely (without the crispy shallot topping), cover it, and refrigerate for up to 2 days. When you’re ready to bake, add the shallots and bake for 20-25 minutes. Since it’s starting cold, add about 5 extra minutes to the baking time.
Why are my crispy shallots burning?
Your heat is probably too high. Shallots cook quickly and go from golden to burnt in seconds. Keep the heat at medium, not high, and stir them frequently. If they start browning too fast, pull the pan off the heat for a few seconds. Also, make sure your shallots are dry before they hit the pan—wet shallots steam instead of crisp.
Can I use a different type of mushroom?
Yes! Cremini mushrooms are my favorite for their earthy flavor, but white mushrooms work fine. For a more savory taste, try shiitake mushrooms (remove the stems first). A mix of wild mushrooms like oyster and chanterelle makes it feel extra special, though it’ll cost more. Just slice them all the same size so they cook evenly.
How do I reheat leftovers without the shallots getting soggy?
The shallots will soften no matter what, but the oven gives you the best chance of keeping some texture. Reheat in a 350°F oven for 10-15 minutes, uncovered. If you’re in a hurry, the microwave works—just expect the shallots to be soft. For a fresh crunch, you can make a small batch of crispy shallots and sprinkle them on top after reheating.
Pin This Recipe!

Easy Green Bean Casserole with Crispy Shallots (No Canned Soup)

A creamy, crunchy green bean casserole made from scratch with fresh green beans, mushrooms, and crispy shallots. No canned soup or processed ingredients—just real food that tastes like the classic you remember, but better.
- Prep Time: 15 minutes
- Cook Time: 30 minutes
- Total Time: 45 minutes
- Yield: 8 servings 1x
- Category: Side Dish
- Cuisine: American
Ingredients
- 1 pound fresh green beans, trimmed and cut into 2-inch pieces
- 3 tablespoons unsalted butter
- 8 ounces cremini mushrooms, sliced thin
- 1 medium yellow onion, finely diced (about 1 cup)
- 3 cloves garlic, minced
- 3 tablespoons all-purpose flour
- 1 cup whole milk
- ½ cup heavy cream
- ½ cup low-sodium chicken or vegetable broth
- 1 teaspoon salt, plus more for blanching water
- ½ teaspoon freshly ground black pepper
- 1 teaspoon fresh thyme, chopped (or ½ teaspoon dried)
- ¼ teaspoon freshly grated nutmeg
- 3 large shallots, thinly sliced into rings (about 1 cup)
- 2 tablespoons unsalted butter (for shallots)
- ¼ teaspoon salt (for shallots)
- 2 tablespoons fresh parsley, chopped (optional, for garnish)
Instructions
- Preheat your oven to 375°F (190°C).
- Blanch the green beans: Bring a large pot of salted water to a boil. Add the green beans and cook for exactly 3 minutes until bright green and tender-crisp. Transfer to a bowl of ice water to stop cooking. Drain well and pat dry.
- Make the crispy shallots: In a small skillet over medium heat, melt 2 tablespoons butter. Add the sliced shallots in a single layer and cook for 4-5 minutes, stirring occasionally, until golden brown and crispy. Sprinkle with ¼ teaspoon salt and transfer to a paper towel-lined plate.
- Cook the mushrooms: In a large skillet over medium-high heat, melt 3 tablespoons butter. Add the sliced mushrooms in a single layer and cook without stirring for 2 minutes. Stir and cook for another 3-4 minutes until browned and liquid has evaporated.
- Add the onion and garlic: Add the diced onion and cook for 3 minutes until softened. Add the minced garlic and cook for 30 seconds until fragrant.
- Make the roux: Sprinkle the flour over the mushroom mixture and stir constantly for 1-2 minutes until golden and nutty-smelling.
- Add the liquids: Slowly pour in the milk, heavy cream, and broth while stirring constantly. Bring to a gentle simmer and cook for 2-3 minutes until thickened to a gravy-like consistency.
- Season the sauce: Stir in 1 teaspoon salt, ½ teaspoon black pepper, thyme, and nutmeg. Taste and adjust seasoning if needed.
- Combine everything: Add the drained green beans to the skillet and stir gently until every bean is coated in sauce.
- Transfer to the baking dish: Pour the green bean mixture into a 9×13-inch baking dish and spread evenly. Sprinkle the crispy shallots on top.
- Bake: Place the dish in the preheated oven and bake for 15-18 minutes until bubbly around the edges and the shallots have deepened in color.
- Rest and serve: Let the casserole sit for 5 minutes before serving. Garnish with fresh parsley if desired.
Notes
Don’t skip blanching the green beans—it sets the color and ensures they’re tender. Watch the shallots carefully as they go from golden to burnt quickly. Season as you go for the best flavor. For make-ahead, assemble without the shallot topping and refrigerate for up to 2 days; add shallots and bake for 20-25 minutes. Leftovers keep in the fridge for up to 4 days.
Nutrition
- Serving Size: 1 serving (about 1 c
- Calories: 215
- Sugar: 6
- Sodium: 480
- Fat: 16
- Saturated Fat: 10
- Carbohydrates: 14
- Fiber: 3
- Protein: 5
Keywords: green bean casserole, no canned soup, crispy shallots, homemade, Thanksgiving side dish, comfort food, vegetarian, gluten-free option